How to Trim a Video using Photos App and iMovie on iPhone/iPad
So you just shot some pro-level videos using your iPhone? You may still have to do some basic editing like cutting, for sharing, uploading to Instagram, Facebook, or sending through WhatsApp, or Messages. It's quite easy to cut videos with iPhone built-in Photos app/iMovie on iPhone/iPad.
However, the trimming option in Photos app and iMovie on iPhone/iPad sometimes doesn't get trimmed properly to your desired part of the video for unfixed iOS/iPadOS glitches. Therefore, it’s recommended to turn for desktop video editing software to shorten iPhone videos.

- - Cut out unwanted slices from at the beginning, end of a clip, or in the middle of a clip.
- - Merge trimmed iPhone video segments together.
- - Support any resolution and video format, such as 4K, 1080p, HEVC, MP4, MOV.
- - High-quality engine and GPU acceleration tech bring great quality and 47x faster speed.
- - Split, edit, compress videos on iPhone and offer a few more video processing options.
Note: The Windows version now supports AI-powered Super Resolution, Frame Interpolation, and Stabilization to enhance video and image quality. These AI features are not yet available in the Mac version but will be coming soon.
How to Trim a Video on iPhone With Photos App
iPhone's built-in Photos app offers you a basic video trimming feature to shorten the start and the end of a clip, but it doesn't trim the middle of a video.
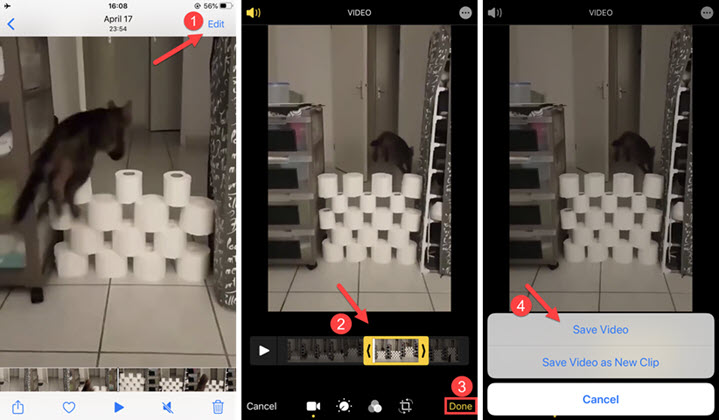
Step 1: Open Photos app on your iPhone and select the video you want to take a cut from.
Step 2: Tap the Edit button in the top right corner.
Step 3: Adjust the handles on both side to change the start and the end time. You are allowed to tap the Play button in the front of the timeline to preview the revised iPhone clip.
Step 4: Tap Done, and select either Save Video or Save as New Clip. Save Video keeps the trimmed version of the video, while Save as New Clip keeps the trimmed video as well as the original video in your photo library. Note that both the original video and edited clip take up iCloud storage. You can delete the original if you don't want it anymore.

How to Cut Videos in iMovie on iPhone/iPad
Considering the fact that you are only allowed to reset the start time and end time of the video using the Photos app, which is very limited. If you want to remove the dead time or sensitive information in the middle, you can rely on iMovie for iOS that is free video editing software. There comes with a tutorial on how to cut iPhone videos with iMovie for iOS in the following.
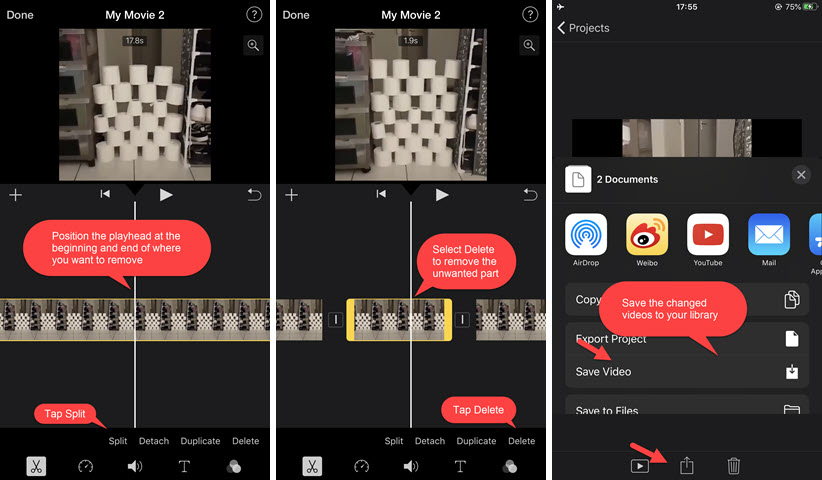
Step 1: Launch iMovie for iOS on your iPhone > Tap on the Plus icon to build a new project. To remove clips, you will select the Movie theme > Select one or more video you will edit and tap the checkmark. Then click Create Movie to add the video(s) to the timeline.
Step 2: Position the playhead at the beginning of where you want to remove > Tap on the video clip to select it > Tap on Split under the Cut tab.
Step 3: Position the playhead at the end of where you want to remove > Tap on the video clip to select it > Tap on Split under the Cut tab.
Step 4: Tap on the video clip you want to remove to select it > Select Delete to remove it.
Step 5: Tap the Play button below the viewer to confirm the changes of the video. Tap Done in the top left corner to finish cutting. To save the changed video to the library, click on the Share button in the lower area > Select Save Video > Choose an output format you like.

How to Cut a iPhone Video on a PC/Mac
If you want to a more precise and efficient cut, save your iPhone videos that you want to cut to your computer via USB, AirDorp, etc. just make sure you can easily access them later for processing. Download and launch VideoProc Converter AI on PC or Mac, then follow the tutorial below to learn how to cut a video on iPhone.
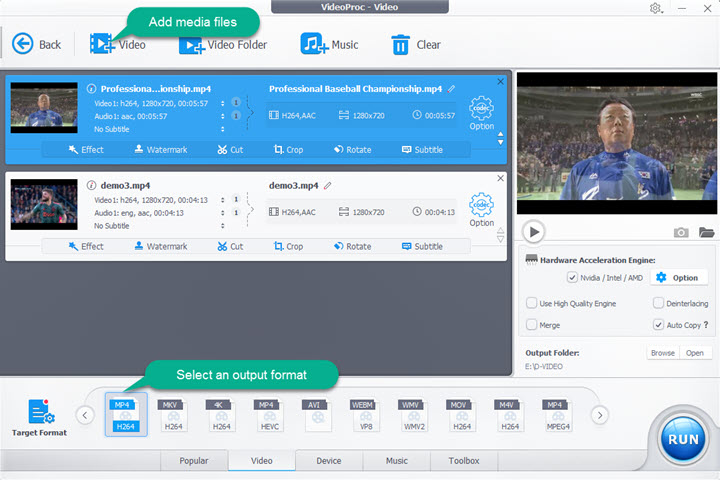
Step 1: Load source iPhone video
Open VideoProc Converter AI, and you'll see a Video button on the left, click on that, and a new Video Window appears. Click the +Video icon at the top and select the clip you want to trim in the popping-up window. You can also simply load the video by drag-n-drop.

Step 2: Cut your clip
Once the footage is open, select an output format on the Target Format list below. Select Cut from the video editing options. A new window will appear, allowing you to cut your iPhone clip. Click the orange Cut button and you should see a new screen below. Click the Edit icon to start cutting. Drag the start and the end point slider beneath the video preview window to your preferred position. Click the green Done icon next to the Duration bar. Click the orange Cut icon and repeat the steps above to get another section of your clip that you want to keep. When finished, click the Done button to save the changes and close the window.

Different from Photos app and other video editing programs, VideoProc Converter AI allows users to remove one or more parts from the video. For example, you only want to keep the first 1min-2min, 4min-6min, 8min-9min, etc, the tool can cut from any section of the clip and output the trimmed segments as a new video file.
After you cut the video, you should see how many clips you keep on the Video Window.
Step 3: Start processing
Back to the window, you will see how many clips you get. Click the Browse button to select an output folder to save the trimmed video, and click the RUN button at the bottom to begin process cutting iPhone clips. The separate sections you keep will be merged into a new video automatically.

How to Trim a iPhone Video on a PC/Mac
Step 1: Add your iPhone clip to trim
Click on Video > + Video icon and choose the footage from iPhone to load.
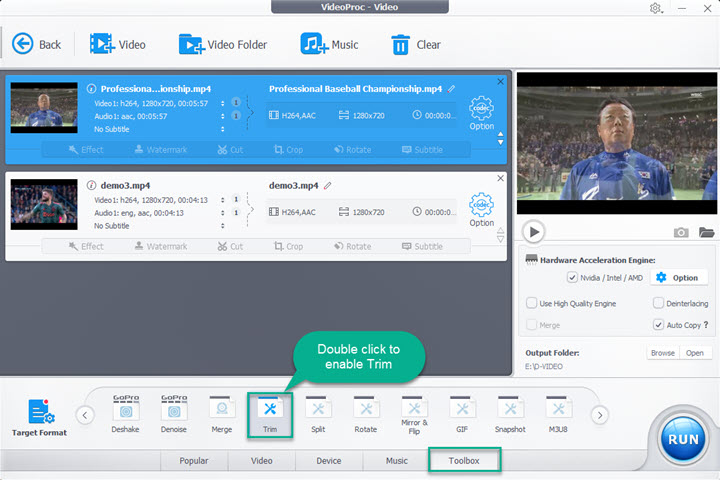
Step 2: Trim the footage shot by iPhone
Select a target format as output. Click the Toolbox button in the tools panel at the bottom of the Video window. A list of video editing options appears. Click the Trim icon and click the codec Option to open the Trim window. Set the start point the endpoint by dragging the trimming slider. You can also set the specific Start and End Time for your video. Click the Done button to save the trimmed part. The Trim option only allows users to get one section from an iPhone clip.

Step 3: Click the RUN button
Specify a destination folder to save the trimmed footage, and click the RUN button to start to chop off unwanted part from your iPhone video. This completes the procedure for trimming/cutting iPhone footages. The time it takes also depends on the video length. After trimming, you can use VideoProc Converter AI to merge separate iPhone clips into one video file.
Tips: Cutting is different from the split. If you want to cut or split your iPhone video into separate pieces, use the Split feature that is available from the toolbar of the Toolbox.
FYI: the maximum iPhone video length you can send
Users who want to shorten the iPhone clip by cutting/trimming to fit for web sharing and emailing may have no idea the length of the iPhone video they can keep. If you are one of them, read the following information about the maximum length of the iPhone footages you can email, upload to Instagram, Facebook, Twitter, Whatsapp, etc. Such video sharing sites also have file size limit and video specs' requirement. Feel free to use VideoProc Converter AI to shrink your iPhone video clips, adjust resolution, aspect ratio, frame rate, format, and more.
Instagram: 3 to 60 seconds.| Facebook: 1 second to 240 minutes
Twitter: max 2 minutes and 20 seconds. | Snapchat: 10 seconds or less. | iMessage: 3.5 minutes or less.
Whatsapp: limited to 16MB. Check the list below and get to know the maximum length of iPhone video you can send in Whatsapp.
| Resolution | Max iPhone video length |
|---|---|
| 720p HD 30fps | 20 seconds |
| 1080p HD 30fps | 16 seconds |
| 1080p HD 60fps | 10 seconds |
| 4K 30fps | 5 seconds |
| 4K 60fps | 2 seconds |
Email: 25MB or less. Below is a list of the maximum length of iPhone clip you can email.
| Resolution | Max iPhone video length |
|---|---|
| 720p HD 30fps | 37 seconds |
| 1080p HD 30fps | 25 seconds |
| 1080p HD 60fps | 16 seconds |
| 4K 30fps | 9 seconds |
| 4K 60fps | 3 seconds |


 Home
Home

