Are you looking for the best video size reducer to make your huge video file more manageable? You've come to the right place. The file size of a video we shoot via cameras or mobile phones far exceeds what the web allows. For instance, the bit rate of the video captured by an iPhone can easily surpass 50 Mbps. While Discord allows for only 8 MB for a video to be sent. Once this bit rate is exceeded, some applications refuse to send the video, while others auto-compress your video dramatically at the cost of quality.
Yet, finding an ideal video size reducer is not as easy as expected. Some video compressors could not get your desired size, and some others reduce video size at the expense of video quality. Here we recommend you 5 best solutions to tackle this task.
1. VideoProc Converter AI
VideoProc Converter AI comes to an ideal video size reducer software, which calls upon interframe and intraframe coding algorithms, along with advanced entropy coding to shrink your video to the hilt and get rid of temporal and spatial redundancies for a more efficient encoding, achieving 90% video size reduction with almost no quality loss.
It allows users to reduce video size in various ways. The easiest way is by directly inputting a target file size or adjusting the compression ratio left or right using a slider. You can also choose to cut off unwanted parts to shorten your video length, split a large video into segments to adapt to social media's size limits, turn the video format to a higher compression efficiency ones, like H.264 to HEVC, downscale video resolution, lower the bit rate, frame rate, etc.
This best video size reducer is fast with the assistance of the unique level-3 hardware acceleration powered by Intel®, AMD®, and NVIDIA® GPUs. Together with the auto copy feature, you can lower the CPU usage to 2% and process your videos at up to 47x real-time faster.
How to Reduce Video File Size with the Best Image Quality in VideoProc Converter AI
VideoProc Converter AI supports 7 ways to compress a video on a Windows or Mac. Here we just take the more direct and handle way as an example.
Step 1: Import your source video.
Download VideoProc Converter AI, install and launch it. Then click "Video" icon to enter the video conversion interface. Click "+ Video" button to load your source video.
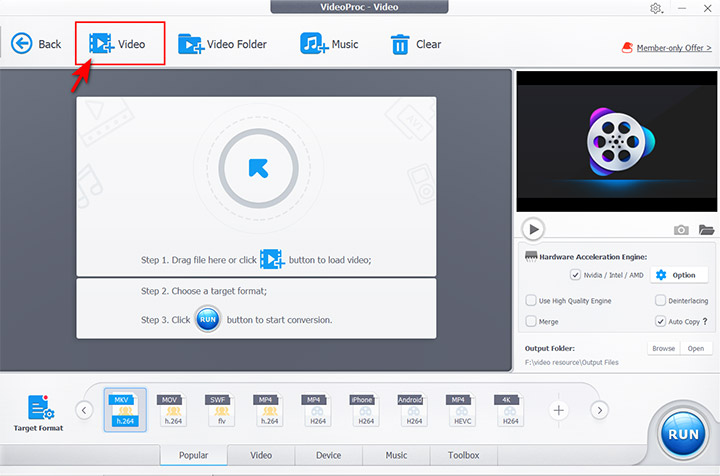
Step 2. Reduce the video size in the Compress tool.
Go to the "Toolbox", find "Compress", and double-click to open it. You can simply drag the compression slider to set the desired compression ratio. Surely, you can also enter your target size directly. Hit Done to confirm.

Tips:
You can choose from different codecs. For example, select AV1 to get the best possible picture quality in a compressed video. (Just keep in mind that AV1 isn't widely supported yet, so make sure your playback platform is compatible with this codec.)
Step 3. Export your video.
Click RUN to start the process of reducing the size of your large video file(s).
2. VLC
VLC is free media player that can do so many post editing works beyond your imagination, things like transcoding, cutting, cropping, adding subtitles, and even change your video size to a proper file size so that you can easily and successfully uploaded online to YouTube or to your iPhone/android devices. You can also lower down the Bitrate and Quality in a way to reduce video size.
Pros: Free and fast – platforms-orientated.
Cons: You do not know how much size exactly the processed file would be.
How to Reduce a Video Size by Lowering the Overall Bitrate in VLC
Step 1. Go to the conversion panel.
Launch VLC and click Media > Convert / Save > +Add button and select the video.
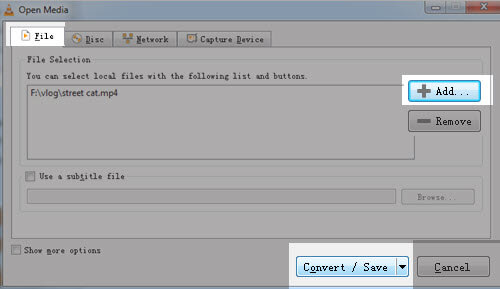
Step 2. Choose a compression codec/format.
Click the arrow down button and choose H264 codec or drag the bar down to other possibilities - iPod, Android, YouTube. (H264 and HEVC/H265 is by far the most efficient compressing codec).
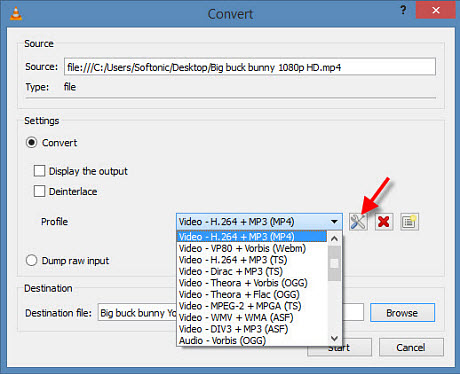
Step 3. Tweak the bit-rate, video size, quality, frame rate etc.
To make a video file smaller in VLC, you can also go advanced by clicking the wrench icon to adjust the video and audio bitrate, quality and frame rate under encoding parameters. It also allows you to scale down the resolution by 1/4, 1/2, 3/4.
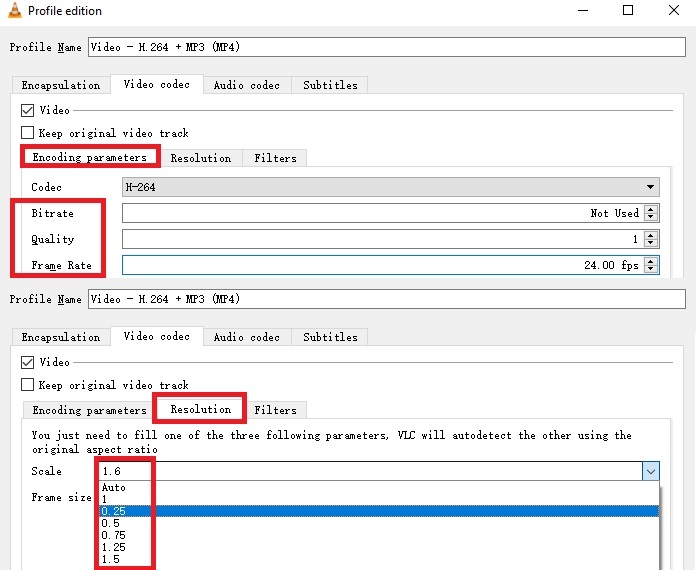
3. Handbrake
Handbrake is a robust open source video transcoding tool that much commercial software are designed and developed catching hot on its reels. In comparison with VLC, this tool gives more choice over codecs and formats both rare and professional. While comparing to Final Cut Pro and iMovie on macOS, it is also lightweight with no more than 30MB in size which could be your ideal first choice to efficiently make a video file smaller with all media info crystal clear.
Pros: You can get a preview of the processed video to decide if its quality meet your requirement
Cons: You do not know how much size exactly, just as same as VLC.
How to Reduce Video Size in HandBrake
Step 1. Open a file in Handbrake.
You can either drop a file to the editing panel or click the "File" choice - open a single video file. Choose the video.
Step 2. Adjust the parameters of this video.
You can change the video dimensions, set the video codec to H.265, change the FPS to lower ones, toggle the quality bar to lower quality etc.
Remember to choose the universal format "MP4" as the output format.
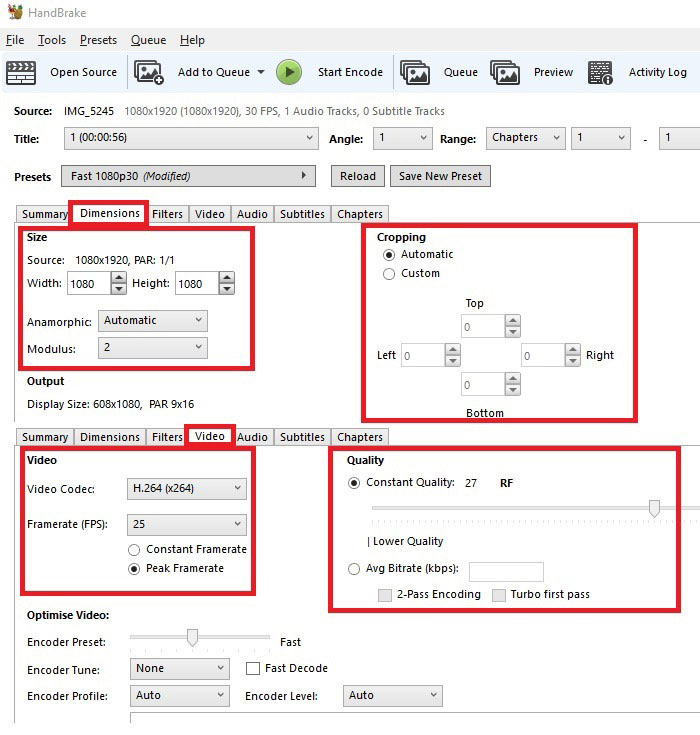
Step 3. Click "Start Encode" to process the video the way you like.
4. iMovie
Both Quicktime and iMovie can make a video file smaller. But Quicktime does not support tweaking the video by width or length. One can only choose to export video resolutions in lower 1080p, 720p, or 480p to achieve the reduction of the overall video size. However, in iMovie, you can do so many adjustments to shrink video file size by cutting/trimming the video content or lowering down the resolution and quality of the video upon sharing.
Pros: You get the estimated file size and video length crystal clear.
Cons: May consume a huge computer power to get things done.
How to Reduce Video File Size Using iMovie
Step 1. Open your video in iMovie.
You can then trim the video length and crop to reduce the video size/scale in iMovie very easily.
Step 2. Click the share button in the top right corner.
Step 3. Choose File.
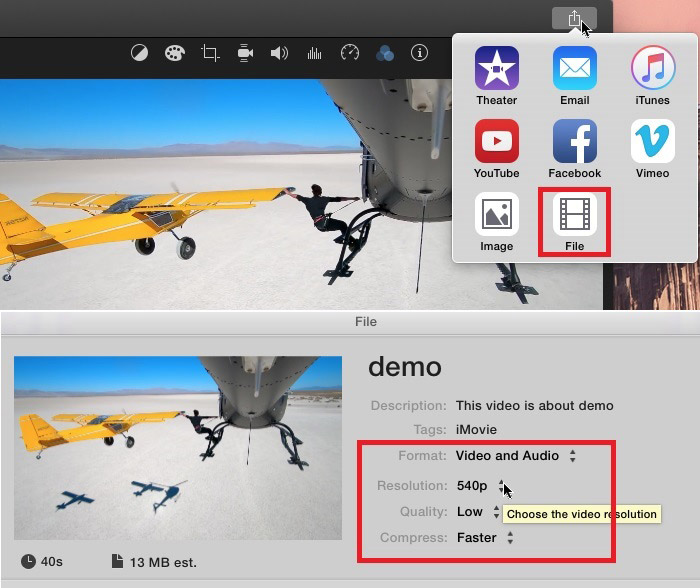
Step 4. Change the video file size using iMovie free.
By selecting the format to "Video and Audio" you'll be able to adjust the video resolution, quality, and processing speed. The estimated file size will be displayed according to your settings.
5. FreeConvert
During our tests, we are quite in love with this Freeconvert tool online as it provides all the possible means for changing a video file size – resize, change of codecs, change of video file size, etc. Users can reduce a video file size by video quality, bitrate, or video size, meaning you can even scale down a video to reduce file size.
Pros: You can apply multiple means combined.
Cons: Unfriendly for large video projects since it is working online, and you cannot pause it.
How to Reduce Video Size Online in FreeConvert
Step 1. Go to Freeconvert.com.
Step 2. Tweak and preset video parameters.
There, you can choose the output format (MP4 recommended), video codec(H265 recommended). With different orientations - size, quality, bit-rate, you get different options.
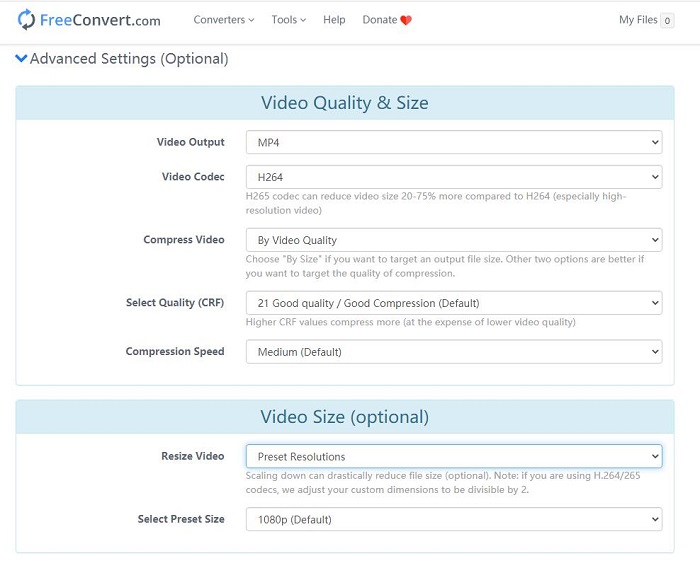
Step 3. Upload a video as instructed by clicking the Choose File button.
You can either choose from your local folder, Dropbox, Google Drive, or input a single URL.
Step 4. Click the compress now button to proceed and click Download MP4 button to save the video locally.
You'll have to wait for the video to be fully uploaded. And it will give a thoughtful notice telling you how much you've saved in total - "You've saved xx%"
Tips for Reducing the Size of a Video
Before to figure out the issue "How can we decrease the video size", we probably need to first make it clear that what determines a video size, then we can know where we will go and what we are going to do.
It is quite simple - the size of a video equals its duration multiplying its bitrate. There are possibly some newcomers who have little knowledge of video elements video bitrate. Video bitrate simply means how many bits one second duration of the video has. In some ways, one-second video images have more bits, the size of video would be bigger, but the video quality would be higher.
So if we want to decrease the size of a video, we have two ways to make it,
1. Shortening its duration
When we are shooting a video, mostly there must be some redundant shots. So we can remove such unwanted parts, shorten the duration, and make it smaller.
This is just one option, and the other one is breaking up the whole video file into multiple individual parts.
This is kind of silly, some friends probably think, since we have not reduced the video size at all by it. While in some situations, it would be the easiest way. For example, when we plan to share our videos on social media, we know that some social media has the limit for video size, and we can just cut them into multiple segments for uploading.
2. Lowering its bitrate
Well, you need to know that here lowering bitrate does not simply mean decreasing the bitrate of the video at all, but we suggest every second of the video conveys fewer bits. This is because, if we simply change the bitrate number of the video to be smaller, there might be image quality loss. Sacrificing image quality for smaller video size is definitely not what we want, right?
However, how can we change the bitrate, but not influencing the video quality, or as little as possible, at the same time?
Base on my personal experience and knowledge, still two options are on our list to try, cropping and video codec changing.
If the camera or other devices cover some needless views, when we are shooting a video, we can crop them and reduce the video size. While, if you think each scenery in the image is precious, you need the other option to help you, i.e. changing the video codec.
Video bitrate is determined by its resolution, frame rate, and its codec. While, if we change the resolution and frame rate directly, there is no doubt that it must lead to video quality loss. But changing the codec would have less influence on video quality or none at all.
Video codec helps us compress a video efficiently. While there are many types of the codec, MPEG-1, MPEG-2, MPEG-4, H.264, H.265 (HEVC), VP8, VP9, XVID/DIVX, etc. And the compression efficiency of each codec differs. For now, H.265 would be the best. It has up to a 50% better compression ratio than the H.264 codec, which means it can save up to 50% video size compared to H.264.
So if you want to reduce video size by changing the video codec, H.265 would be a good choice. However, you need to know that H.265 has not been as popular as H.264, which means some applications are not compatible with it.
Well, these are pretty much all the methods that we can imagine helping you decrease video file size with much less quality loss.
On top of that, you must also know that in a video file, there are not just the video images, but also include some other types of data, such as the audio codec and audio data, captions, menus, chapters, and so on. Changing them can also help us make the whole video file smaller. However, mostly, they just take up a quite minimal amount of the whole video file, so in this post, we did not take them into consideration and discussion.


