By Alisa Cassiel
Contact Author
How to Create a GIF from a Video File with VLC
 If you need to make GIFs from videos easily, click here: The most recommended solution by us [85%]
GIFs are essentially a sequence of continuous frames. Animated GIFs have exploded in popularity, becoming a staple for expressing emotions and demonstrating actions across social media like Facebook and Twitter. Their lightweight nature makes them ideal for sharing vivid moments without the bulk of video. While many rely on existing GIFs, do you know how to use VLC to create a GIF?
The truth is, VLC Media Player itself doesn't have a built-in function to directly create GIFs. However, you can use VLC to extract frames from a video and then use other software to weave these frames into a GIF.
Sounds a bit involved? Don't worry! This article will guide you through a step-by-step tutorial on creating GIFs directly from video using VLC. Let's dive in!
Key Takeaway: To create GIFs from videos in VLC, you'll need at least two different tools, with multiple steps and confusing settings. For a simpler and more efficient solution, consider using a GIF maker like VideoProc Converter AI, which can convert video to GIF in a few clicks.
How to Create a GIF from a Video with VLC
VLC is an open-source and versatile media player with tons of impressive features. You can extract frames from the video you want to gif using VLC, then make adjustments and turn the frames into a gif with Photoshop. Below are the specific steps to create a GIF from a video in VLC and Photoshop.
Step 1. Play and Record the Scene You Want to GIF in VLC.
The first thing to create a GIF from a video is to capture what you need from the video to generate a video clip.
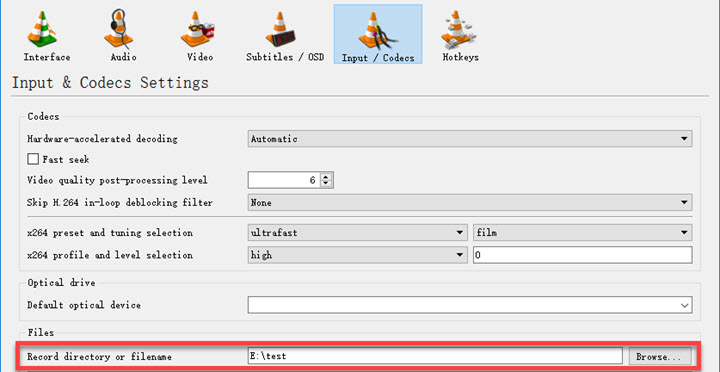
- Launch VLC > go for Tools and select Preferences from the context menu at the top > In Input & Codecs Settings, reset a new directory for storing recording files. Or recording will be saved in C: drive/Finder by default. Then save the changes and reboot VLC to have the settings to work.
- Click on Advanced Controls under View tab if there is no red Record control in the timeline area.
- Click Media and Open Files from the context menu to play a video file.
- Locate to where you want to begin > click the red button to start recording and hit the button again to stop. The video clip should be auto saved in the location you've set.
Step 2. Split the Recording into Frames
- Go to Preferences once again and click the option All under Show Settings at the bottom.
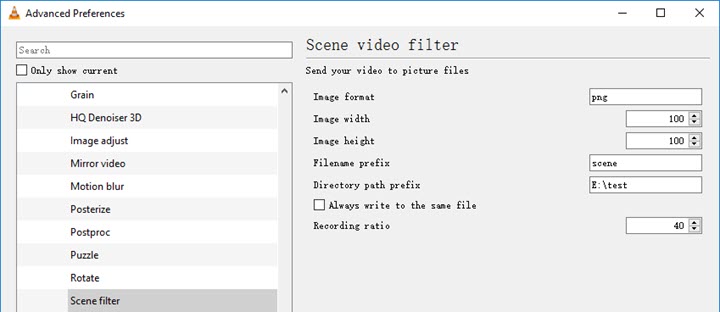
- Now scroll down to Video from the sidebar > expand Filters and click Scene filter > filter settings will be shown on the right side where you can set the image format, file location, recording ratio, etc. It's worth noting that you should type or copy a location path in the field of Directory path prefix to set a new location. And hit Save and reboot VLC to apply your settings.
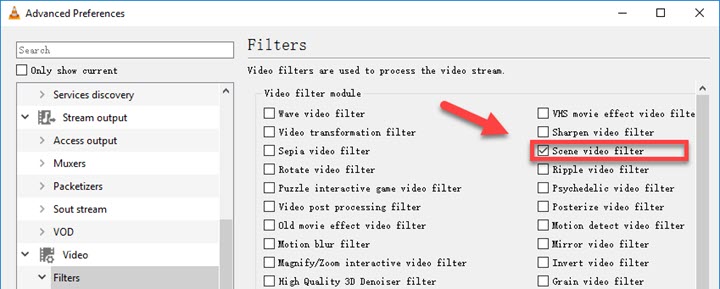
- Select Filters in the sidebar > place a check mark in the box of Scene video filter to enable the filter.
- Go back to the home page and click Media and Open File and play a video you want to gif. Now the video will be converting into frames one by one, and they will be saved automatically in the location previously made.
But this is not the end, you need another software to convert these frames to GIF. Here we use Photoshop for the next step.
Step 3. Make GIFs from Frames with Photoshop
- Launch Photoshop and go to File > Scripts > Load Files into Stack.
- Click Browse and load the frames you made in VLC > select OK and wait for loading.
Step 4. Create Frame Animation and Export Images as GIF
- In the timeline area, click Create Frmae Animation > then go for the Hamburger menu at the rightmost of the timeline > select Make Frames From Layers from the context menu. And each layer will become one frame of the GIF animation.
- Click the Play/Pause button to play the GIF animation. You are allowed to make the GIF to play on loop, set up the deadline time between each frame, crop a GIF, and many more.
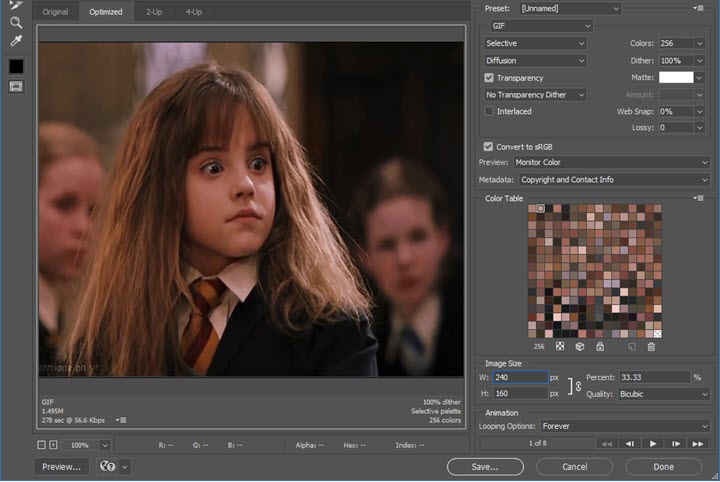
- Now go to Files > Export > Save for Web (Legacy) > Choose the file format as GIF and make adjustments like color grading, image size and others > select an output directory. Now you have made your own GIFs!

This is the entire process to make a GIF from a video with VLC and Photoshop. You can tell that it is pretty complex because you need two different tools, VCL to extract the desired scenes as frames, and then Photoshop to make these frames into a GIF image.
Create a GIF from a Video with VLC Alternative
Creating GIFs from videos in VLC can be quite involved, with multiple steps and potentially confusing settings. For a simpler and more efficient solution, consider this video to gif software - VideoProc Converter AI. This powerful software streamlines GIF creation, often allowing you to transform video clips into engaging animations with just a few clicks within its intuitive interface. Unlike VLC's complexity, VideoProc Converter AI integrates the entire process.
It's designed for ease of use, offering one-click GIF generation while still providing precise control over start/end times, duration, and frame rate for high-quality results. Beyond GIFs, it's a versatile video converter, editor, downloader, and recorder. Leveraging AI, it may even enhance GIF quality by addressing blur or noise. Ready for effortless GIF creation? Download and install VideoProc Converter AI on your PC or Mac to get started.
Before we get started, download and install VideoProc Converter AI on your PC or Mac first.
VideoProc Converter AI - One-click GIF Maker to Create GIF from Video
- Edit a video and convert it to a GIF image in one stop.
- Easily select and cut your favorite video clips to make personalized GIFs.
- Customize GIF parameters like loop time, image size, duration, etc.
- Full GPU accelerated - process and convert a video to a GIF in seconds.
- AI-enhance your GIF with upscaling, interpolation, stabilization, denoising, and more.
 Download VideoProc on Windows
  to create GIFs from videos
 Download VideoProc on Mac
  to create GIFs from videos
Step 1. Load Your Video
Launch VideoProc Converter AI and import a video by clicking +Video on the main interface of video. Videos of any formats, resolutions, and recource are compatible.
Step 2. Convert the Video to a GIF
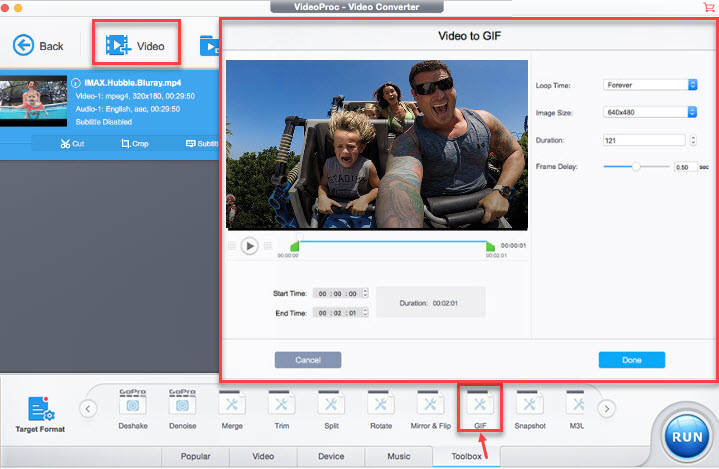
Click Toolbox on the bottom toolbar, and select GIF. Double click GIF icon to set loop time, image size, duration and frame delay. You can extract desired frames by dragging the green knob as well.
Step 3. Export a GIF File
Click Done after all the settings. Then choose a folder to save your GIF and click RUN. You will get your own GIF in seconds.
Final Words:
VLC excels in media playing, and some users also take it as a video editor. But as a GIF maker, it does not perform as excellently as a media player. You have to convert a video to a GIF image by means of another tool.While VideoProc Converter AI, an all-around video processing program, gets my vote when it comes to making GIFs.


