Can I trim video clips in VLC on Mac? The answer is yes. But, how can I trim a video clip using VLC on Mac without errors? This is a frequently asked question because users are bothered by the following problems:
"I am running VLC 1.1.5 64-bit on macOS 10.13.6. On the web I found instructions saying I should click on Video - Advanced Controls in the menu bar to reveal options that let me trim and cut video clips. However, there is no such option in my copy of VLC."
"What I want to do is cut a 2-minute portion from the middle of a two-hour-long footage (in MXF format that QuickTime can't open) that I've got."
If you are facing similar problems, or you simply need a detailed guide to walk you through the whole process, the following tutorial will help you to trim unwanted part from the video without any hassle.
How to Use VLC to Cut or Trim Your Video Clips on Mac
Step 1: Download and install the latest version of VLC for Mac.
Step 2: Choose the video output directory (where the trimmed video will go to).
- Launch VLC media player from the Launchpad or application on your Mac.
- Navigate to the Preferences window which is accessible from the VLC menu at the top bar.
- Click the Input/Codecs tab.
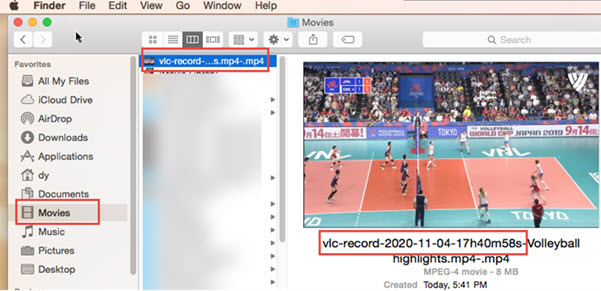
- Choose a location to store the trimmed file by clicking the Browse button under Record directory or filename.
- Hit the Save button to confirm the changes made in preferences.


Step 3: Add the video you want to trim or cut into the playlist.
- Drag and drop the target video file into the playlist. If it doesn't start playing automatically, you can double-click on the video to playback.

Step 4: Start Cutting the Video in VLC.
- Move the playhead to the start point of the video where you want to cut and pause the video by hitting the space bar on your keyboard. You can also click the pause button in VLC.
- Click the Playback from the VLC menu > select Record. At this time, you can see a checkmark appearing next to Record, that means you have selected the start point.
- Press the spacebar again to resume the playback. When the playhead reaches the desired end point, pause the video and click the Record option again.
- After that, you have successfully trimmed the video, with the part from the start to the end point saved, though there is no notification or any alert.


Step 5: Check the Output Folder.
- You can find the trimmed clips in the output directory you choose in step 2.

VLC as a free media player offers us lots of functions to play around; still, it is not a dedicated video editing software. You may notice that there are several drawbacks to trim or split a video in VLC:
You can only trim the head and the tail off from a video.
You cannot remove multiple sections from the video.
You cannot batch trim multiple videos at once.
You cannot split video into several mini sections at once in VLC.
The VLC trick to trim a video is indeed a process to record the part you want, which is not flexible, nor precise. What you truly need is one of the Top 10 Free Video Cutters that can cut any section of the video, remove any sections flexibly, and the merge the rest together.
Let's see how it works to perform flexible cuts using VideoProc Converter AI.
Cut or Trim Video on Mac Precisely by Seconds With One-click
Find It Difficult To Trim/Cut Footages with VLC on Mac? Try Alternative Way. 85% people reach out to VideoProc Converter AI: cut or trim video on Mac flexibly and accurately.
Unlike many other professional video editing software on the marketplace, VideoProc Converter AI doesn't involve any complicated operations and it works fast and efficient, saving you tons of time and energy. The interface is the known-at-a-glance type, no learning curve required at all.
VideoProc Converter AI is a lightweight video cutter, with bonus features such as ripping DVD, recording screen and facecam, and grabbing videos from your favorite video-sharing sites. You can cut, trim and split videos precisely to the second, crop video into different aspect ratio, add filters, adjust colors, extract or edit subtitles, and so on.

VideoProc Converter AI - Cut/Trim Video on Mac Precisely by Seconds
- Drag and drop video, set cut points, remove unwanted sections, done!
- Enable frame-by-frame or second-by-second cutting or trimming on Mac
- Support rare and mainstream input formats, 420+ output options
- Hardware acceleration makes the cutting process 47X faster than real-time play
How to Cut or Trim a Video on Mac with VideoProc Converter AI?
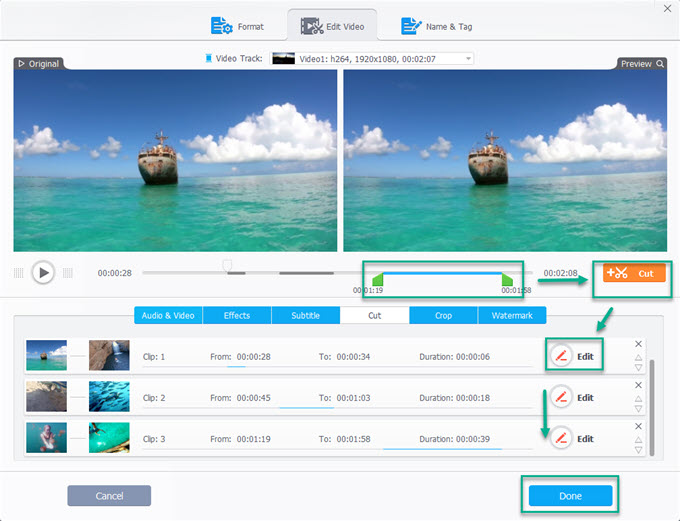
Step 1. Launch VideoProc Converter AI and click the +Video button to import one or more video files into the program. On the Edit Toolbar, click the Cut button.

Step 2. Drag the green knob to set the beginning and the ending of the wanted video section. Click the orange scissor icon to cut the clip. Hit the Done button to finish the cutting.

Step 3. If you want to cut more clips, drag the green knob to pinpoint the different cutting points and repeat step 1-2. You can also adjust the sequences of different clips by clicking the up and down arrow of each clip. When finished, click the Done button and all your cut clips will merge into a new video.
Final Words
As you can see, VLC is great for its performance as a media player, but as a video cutter, it is not that perfect.
By contrast, VideoProc Converter AI is a more versatile editing tool that can not only simplify the cutting/trimming, but also provides you with a lot many other useful functions for video editing. So why not give VideoProc Converter AI a try as this software can make your editing much easier?


