AVCHD (Advanced Video Coding High Definition) files usually come from camera recorders such as Sony, Canon, Panasonic, and JVC devices. It is a structured folder to store the real video clips (with extension .mts or .m2ts), as well as accompanying metadata and other related files.
Compatible issues arise when importing AVCHD to Windows and Mac computers, besides copying out the MTS files, the best way is to convert AVCHD to MP4 as the latter is the most compatible format. Since MP4 also supports MPEG-4 AVC/H264 codecs used in AVCHD videos, it means when you rewrapping AVCHD to MP4, there is no need to transcode the video stream and hence no quality loss.
1. Convert AVCHD to MP4 at the Original Quality
To convert AVCHD video to MP4 at the original quality, the video converter program needs to be able to pass through the video stream without re-encoding, as well as maintain the same resolution, frame rate (FPS), aspect ratio, etc.
- For non-techie persons, you don't need to understand the nitty-gritty of all the terms. VideoProc Converter AI as an easy-to-use video processing software can handle the conversion task quickly, with presets and 1-click solutions.
- For power users curious about how it works, VideoProc Converter AI supports Auto Copy, and shows you detailed information of the video in codec settings. You can adjust resolution, bitrate, FPS, or opt to keep them the same as the original.
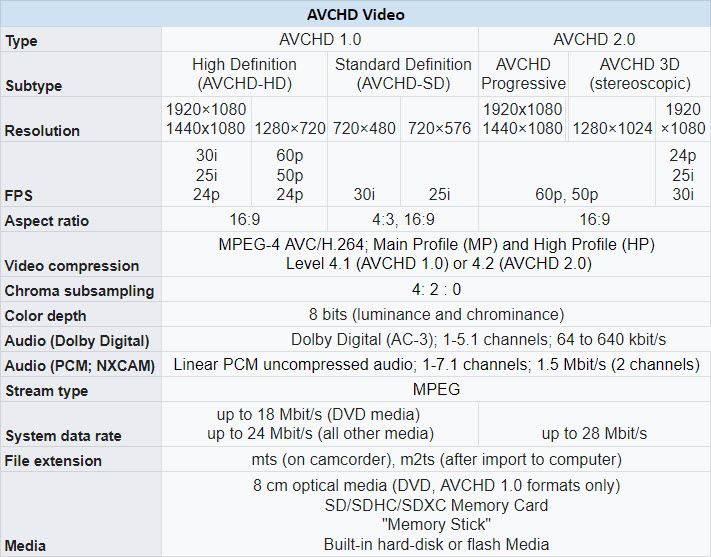
Above is a detailed chart for AVCHD Video. As you can see, the AVCHD videos you have at hand can be in various resolutions, FPS, and either interlaced or progressive. Some less well-designed converters can mess up or unnecessarily transcode the video, and result in quality loss, or changing other parameters against your will.
With VideoProc Converter AI, you can rest assured that there won't be quality loss, and it will keep everything the same as the source video by default.
VideoProc Converter AI – Best AVCHD to MP4 Converter Software
- Convert AVCHD to MP4 (mts/m2ts from Sony, Samsung, Panasonic, JVC camcorders etc.).
- Merge spanned mts/m2ts/ts files in AVCHD/BDMV folders.
- Preserve metadata, allow 1:1 Auto Copy (remux) to keep original quality.
- Parse and analyze non-standard AVCHD formats/DVD/camcorder files.
- Toolbox to edit any video, record, download video, copy DVD, deinterlace video.
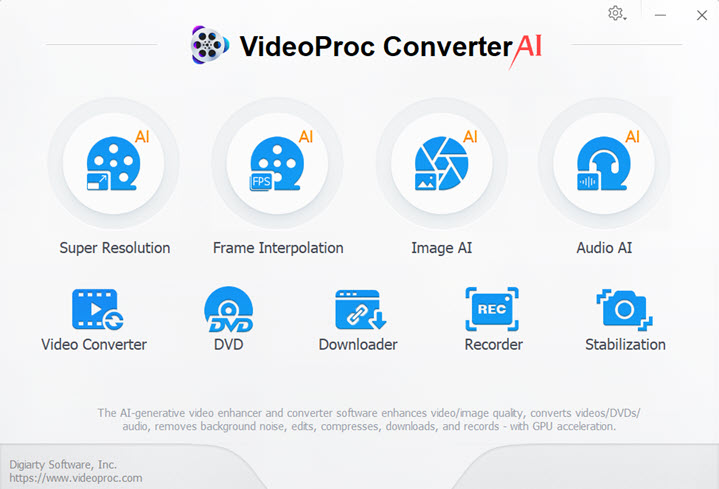
Easy Steps to Convert AVCHD to MP4:
Step 1. Add AVCHD video to the converter.
Launch VideoProc Converter AI and click the Video module from the main screen.
- The actual video clips stay inside the AVCHD folder structure from the camcorder. You can drag and drop the folder into VideoProc Converter AI, and it will automatically detect the mts/m2ts/ts videos.
- You can also click into the folder, which usually has a structure of \AVCHD\BDMV\STREAM\00001.MTS or anything similar. The 5-digit number named clips with extension MTS/M2TS are the actual video clips from the camcorder recordings.
If you are on a Mac computer, the AVCHD folder is treated as a bundle, you can need to right-click on it to show the package. In that way, you can go inside the folder structure.
Learn more: how to convert AVCHD to MP4 on Mac >
Step 2. Select MP4 as the target format.
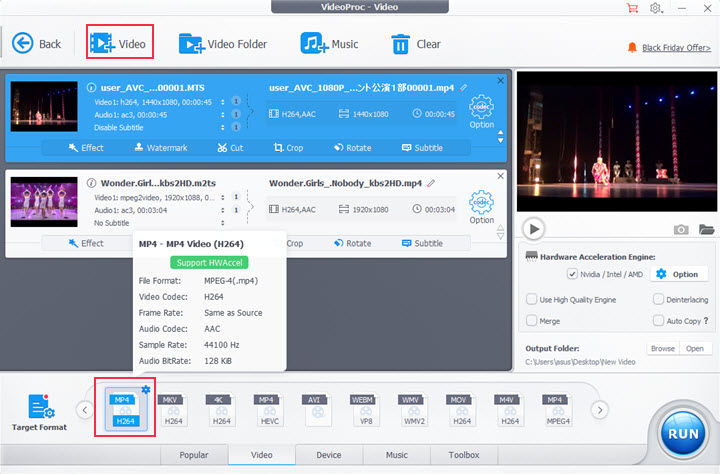
For the novices, you can click on the Target Format at the bottom of the interface, and easily choose a ready-to-use MP4 profile according to your goal, for instance:
- For general usage, you can simply choose the MP4 Video (H264).
- If you prefer to playback the AVCHD videos on iPhone, Apple TV, Samsung/Sony/Panasonic TV, you can choose the MP4 profile for each device.
- If you want to share the video online, choose the preset for corresponding platforms such as YouTube, Vimeo, Facebook, etc.
Handy feature:
If you don't want to include certain video clips, you can quickly click the cross button to remove them from the task queue. Also, after batch converting the videos, you can clear the list in 1-click, and start another batch task.
Frivolous as it might seem, you will soon realize how handy it is during the conversion workflow.
Step 3. Choose output settings and hit the Run button.
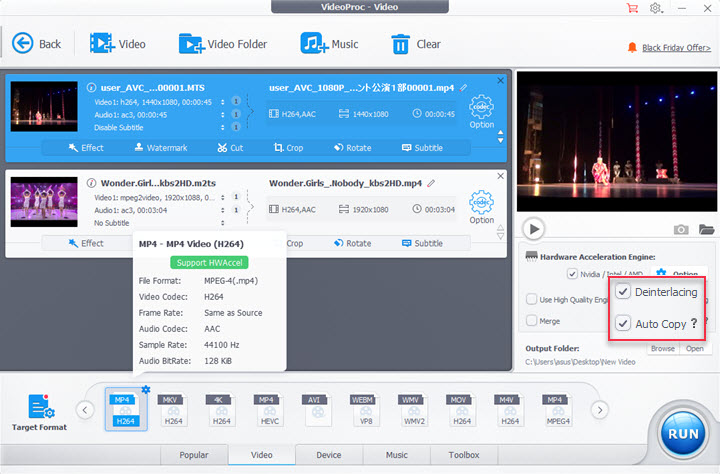
- In the output panel (right side of the interface), tick Auto Copy. Other settings are optional according to your needs.
- Choose an output folder for the converted MP4 files.
Bonus tips for every user:
- If the AVCHD videos are set to record as interlaced videos, and you prefer to deinterlace the footage, you can tick Deinterlacing option upon exporting.
- If you want to join multiple AVCHD videos (.mts footage inside the AVCHD folders) into one, click Merge upon exporting.
- For power users, you can also click the Gear Icon to open up the Codec Settings panel. From there you can adjust resolution, frame rate, bitrate mode and other parameters.
Bonus tip for the editing crowd:
If you are trying to convert AVCHD to MP4 so as to edit the video smoothly in Premiere, iMovie, Final Cut Pro, Sony Vegas, etc., you can use VideoProc Converter AI as the best companion for video editing software.
Plus, besides MP4, you can also use VideoProc Converter AI to transcode mts/m2ts in AVCHD to more efficient codec: ProRes (422, LT, HQ, Proxy) which are born for video editing.
You can also watch this walkthrough to convert AVCHD to MP4 using VideoProc Converter AI:
2. How to Convert AVCHD to MP4 Using Online Tool (200MB Max)
If your videos are of small sizes, you can upload them to the AVCHD to MP4 online converter. Since every online converter has limitations on file size, we managed to find one that allows a larger size than other tools – a maximum of 200MB.
Step 1. Visit the official page of this AVCHD to MP4 online converter.
Step 2. Upload mts/m2ts file inside the AVCHD folder.
Please note that this online AVCHD to MP4 converter doesn't support auto analyzing or parsing the AVCHD folder. You need to go inside the AVCHD folder, and manually find out the mts or m2ts footage inside. They are normally the 5-digit number named files.
The folder path can be like this: \AVCHD\BDMV\STREAM\00001.MTS
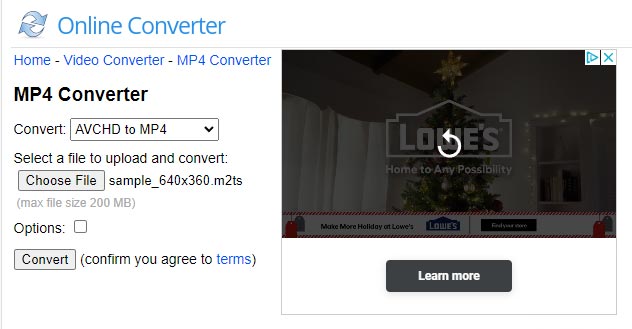
Step 3. Click Convert to start re-wrapping AVCHD to MP4 (MPEG-4 Video) video.
For security concerns, remember to hit the Delete option to remove the uploaded AVCHD (mts/m2ts) video from its server.
3. How to Convert AVCHD to MP4 with VLC
As an open-source media player, VLC can be occasionally used as a converter for certain formats. Depending on the native codec pack installed in VLC, the AVCHD playback is unpredictable. Still, you can try to convert AVCHD to MP4 using VLC.
Step 1. Download and install VLC from Videolan official page.
Step 2. Click Media from the menu, and go to the Convert/Save option.
The shortcut key is Ctrl+R
Step 3. Under the file tab, click Add to import videos inside AVCHD.
Usually, there are multiple MTS files inside the AVCHD file, you can batch add them into VLC.
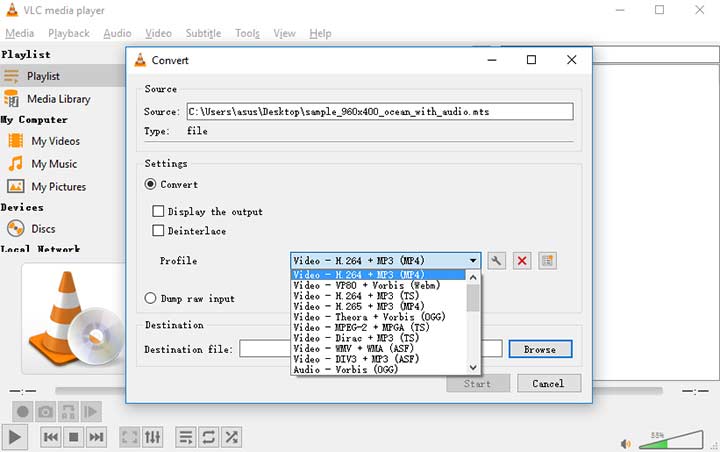
Step 4. Click the Convert/Save button at the bottom of the dialogue box.
Step 5. In the profile section, click the dropdown menu and select Video – H.264 + MP3 (MP4).
For power users, you can also click the wrench icon to choose the codec for the video stream and audio stream.
Step 6. Click Browse to decide where you want the output video to be stored.
Step 7. Click Start and VLC will start to convert AVCHD to MP4 videos.
4. How to Convert AVCHD to MP4 via Freeware Handbrake
Another free method to AVCHD to MP4 is using Handbrake. It is an open-source transcoder based on FFmpeg.
The interface may look intimating with jargon and technical terms for non-techies, but don't worry, here is a detailed walkthrough:
Step 1. Install Handbrake from here: https://handbrake.fr/
Step 2. Import AVCHD to Handbrake.
- Click the Open Source icon beneath the menu.
- Select add video (or add folder) option.
- Navigate to the path where you store the AVCHD videos.
Please note that Handbrake is less intelligent in analyzing video clips inside folders, especially when the video is nested quite deep in the folder directory (long path).
If you drag and drop AVCHD folder and see the alert of "No valid source or titles found", it's better to manually go inside the folder until you find the footage.
Or you can jump back to method 1 using VideoProc Converter AI as a more intuitive and easier way.
Step 3. Choose MP4 as the container in the Output Settings.
You can use H. 264(x264) as the video codec and go on managing frame rate and quality settings.
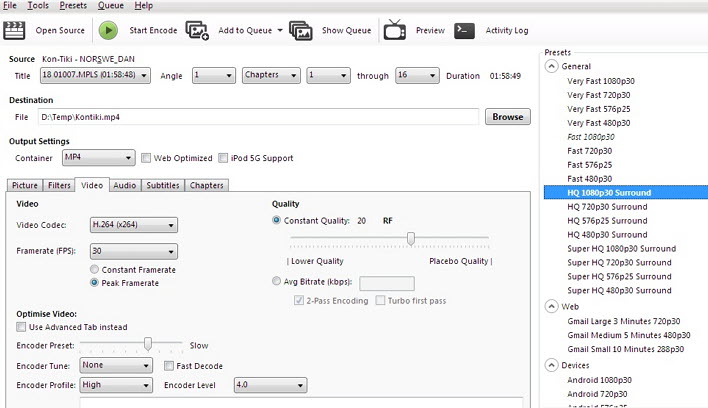
Step 4. (Important!) Force Handbrake to use MP4 instead of M4V.
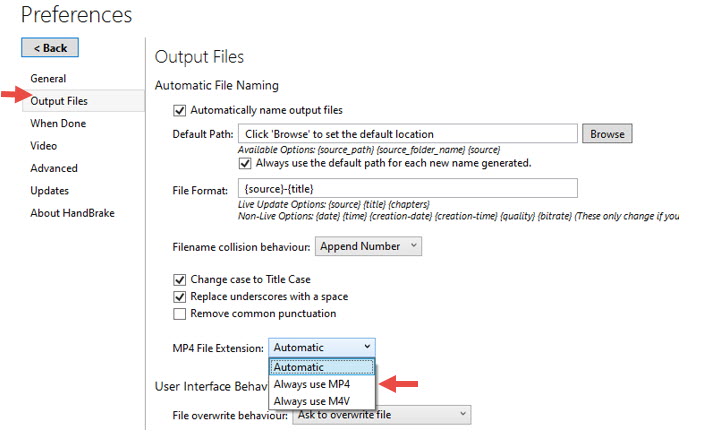
In step 3, even if you have already chosen MP4 as the container, you will notice the output file comes with an extension of .m4v instead of .mp4 when choosing the output path.
In that case, you need to go to Menu > Tools > Preferences. Under the output Files tab, click the dropdown menu in MP4 File Extension, and select Always use MP4.
Step 5. Go on manage settings for more AVCHD videos.
Handbrake adopts an interface design for DVDs, and hence naming multiple videos inside one folder as Titles. If you are not familiar with this, you might feel puzzled and wonder where all the other mts/m2ts videos are. You need to click the dropdown menu in the Title, and manage codec settings for each footage.
Step 6. Click the little triangle on "Add to Queue", and in the dropdown menu, select Add All.
Step 7. Now you can click the Queue Icon, and check if all the AVCHD videos you need are waiting in the queue.
Step 8. Click Start Queue (the green button) to start converting AVCHD to MP4.
If you prefer simpler solutions, you can check the first method on this page, or use these Handbrake alternative software.
FAQs
1. Do I need to keep CPI when copying AVCHD folder for MP4 conversion?
It depends on your goal. Below is an illustration of AVCHD folder structure. As you can see, the footage you need to convert to MP4 is inside BDMV\STREAM MTS or M2TS videos. As for CPI file, it contains clip information necessary for playing back AVCHD video on cam and for BD burning.
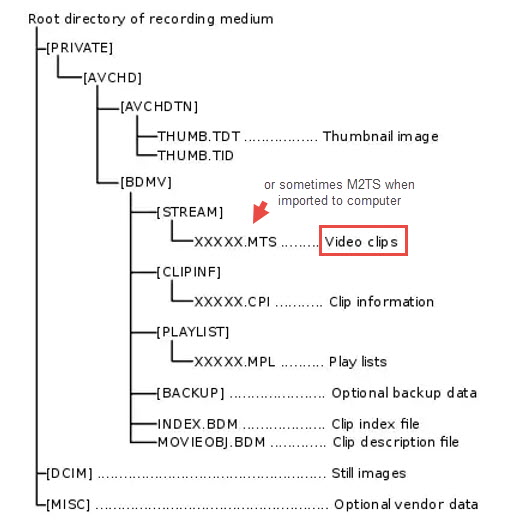
If you merely want to convert AVCHD to MP4, you can directly deal with MTS footage. However, if you want to edit AVCHD video in iMovie or Final Cut Pro, the editor applications need the structure information because they are importing the entire folder instead of single MTS video. If you use VideoProc Converter AI, you don't need to worry about all these, and you can dump the AVCHD file into it, and output the MP4 video to use flexibly without quality loss.
2. How to Join Segmented/Spanned AVCHD videos?
You might notice there are multiple video clips in the AVCHD, even if you recorded it as one take. Depending on the format and SD card file system (FAT32 or exFAT), videos recorded for a long duration can be divided by the camcorder into multiple clips, each with a maximum size of 4GB or 2GB. Or if you go multiple takes on set, there will be many tiny segmented videos too.
You can easily merge videos using VideoProc Converter AI upon the AVCHD to MP4 conversion. You can also directly merge MTS files without container swapping.


