Summary: This post will give your specific suggestions on GoPro low light settings in different scenes, such as a cloudy day, after sunset, before sunrise, at dimly lit restaurant, in nightclub, and in a fireworks show.
- "Trying to get good video at nighttime or low lighting situations with the GoPro 8 HERO Black, I have turned on the auto low light setting but still doesn't seem to work. The video is still jittery or blurry on low light. How to set to improve the bad light effect on GoPro 8 or how to fix the low light video, any suggestion?"
Have you ever used your GoPro HERO11/10/9/8 Black or GoPro Max to shoot videos or photos in low light scenes? If you have tried, you may find that GoPro is absolutely not the best camera for low light photography, although is good for 360 and 4K action shooting. Your shooting is grainy or noisy, and even can't really see a lot on the video, except for the obvious lights. Sometimes even the Low Light mode or night mode still can do nothing to enhance the quality.
Keep reading to figure out the best GoPro settings for low light.
4 Main Factors that Affect Light Performance
What's the best GoPro low light setting to get high-quality shootings in dark conditions? Firstly, let's figure out which factors influence light performance.
1. Aperture
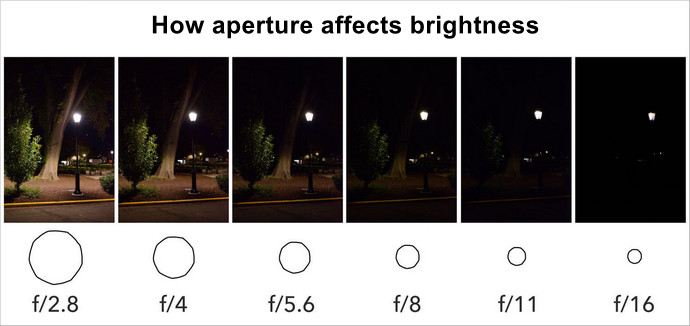
Aperture is a hole within your camera lens that controls the amount of light that passes through the lens and gets into the light-sensitive surface of camera body. We use "f-number" or "f-stop" to express the size of aperture. The full range of aperture values is as follows: f/1, f/1.4, f/2, f/2.8, f/4, f/5.6, f/8, f/11, f/16, f/22, f/32, f/44, f/64. The slash is omitted in some cameras and written like this, f1.4. The smaller the number, the more the light and the brighter the image. For example, f/4 will give you a brighter image than f/5.6. So when you're in low light environment such as indoors or at night, you should use small f-number (large aperture) to capture as much light as possible.


2. ISO
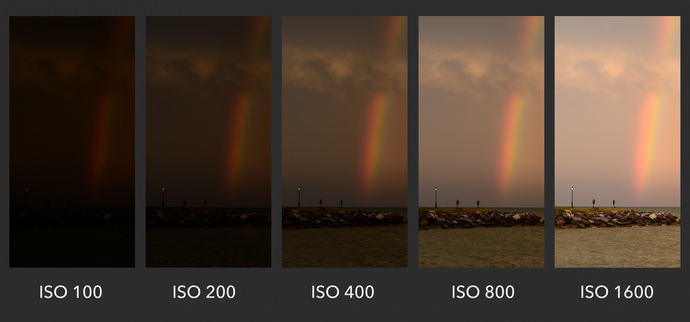
ISO is another factor that controls the brightness of your image. A common set of ISO values is as follows: ISO 100, ISO 200, ISO 400, ISO 800, ISO 1600, ISO 3200, ISO 6400. The bigger the ISO number, the brighter the image. If you double the ISO value, you will double the brightness of the photo accordingly. However, you're not suggested raising the ISO settings for night too high in your GoPro or other cameras to capture bright photo or video in low light conditions, because you probably end up with grainy or noisy image which can't be fixed in post-production.

3. Frame Rate
Frame rate, also known as FPS, refers to the number of images taken every second to make a video. Nowadays, electronic devices always provide several FPS options. Taking GoPro as example, users can choose from 12fps to 240fps, varying with models. High FPS can deliver smooth video. However, the higher the frame rate, the lower the amount of light and the darker the image. When the FPS is increased, the shutter speed will be faster and the exposure time of each frame will be shorter. Then, there's less light reaching the camera sensor, thus making image darker than when fps is lower. So high FPS isn't recommended in low light circumstances.

4. Image Sensor
Image sensor can affect the brightness of image as well. The larger the sensor, the brighter the image. Sensor picks up light via pixels. When the sensor is bigger, it has more pixels. When there're more pixels, the camera can detect more light and details.
Best GoPro Settings for Low Light
After reading above content, you may roughly know how to fiddle with the settings on your GoPro HERO11/10/9/8/7/6/5 and GoPro Max to capture brighter shooting in dim conditions. But before you go any further, I have to tell you that there're some parameters you can't control with the GoPro camera. One is your GoPro aperture, the other is image sensor. The aperture of a GoPro is fixed to f/2.8. However, it is already large enough to let adequate light in. Well, what settings can we tweak on GoPro for shooting at night or low light environments? Check details below.
1. Enable Low Light Mode
The first thing we should try is to turn on the GoPro's built-in Low Light setting. After enabling it, your camera will adjust the frame rate automatically according to light conditions. When the scene suddenly gets dark, your GoPro will lower the frame rate to let more light in. This is very helpful when you're in a situation where the light is constantly changing, such as concert.
If you want to use GoPro to take photos in low light environments, you can enable Night Photo mode and set a long exposure, such as 5s and 20s.
If your shot still doesn't look good with Low Light on, try some manual settings we introduce below.
2. Use Low Frame Rate, 24fps, 25fps or 30fps
GoPro allows users to record video with up to 240 frame rate. It's great for slow motion, but high FPS isn't recommended in low light scenes. We'd better select low frame rate like 24fps, 25fps, or 30fps, thus slowing down shutter speed and letting more light reaching camera.
3. Increase ISO
Do not play with ISO unless you have nothing to adjust to get brighter shootings. As we have already said, the brightness comes at the expense of video quality. More noise will be added. So don't crank up the ISO value too high. You're not suggested setting the ISO higher than 1600 while recording videos and 800 for photos. To access ISO, firstly you should turn on ProTune.
4. Increase Exposure Compensation
Exposure compensation can also impact the brightness of your footage. In low-light conditions, you can increase exposure compensation, +1.0 for example, by doing which your footage will be slightly lighter than normal.
In addition to adjusting some settings inside your GoPro camera for low light shooting, there are other things outside the camera you can do to make your photo or footage look brighter and better.
- Try to find a brighter spot to capture.
- Make the environment brighter by making use of external light source, such as a torch and a floodlight.
Easiest Post-production Software to Brighten up GoPro Footage
If you've tried all the GoPro settings and tips for low light shooting but still get dark footage, you can use VideoProc Vlogger - a piece of desktop-based easy-to-use video processing software - to improve brightness and fix pixelated videos caused by low light conditions. Now download this clean and lightweight program on your Windows or Mac computer and brighten up your GoPro footage.
VideoProc Vlogger - Lighten Your Dark GoPro Footage
- Tweak the brightness of footage to make video brighter or darker.
- Adjust contrast, saturation, hue and gamma.
- Correct fisheye effect by using the Lens Distortion Correction feature.
- Additional features: convert, compress, cut, crop, split, merge, rotate & flip, add filter, add watermark, insert subtitle, slow down (32x) and speed up (32x) footages, fix choppy videos and out-of-sync video audio, and more.
Step 1. Launch VideoProc Vlogger and load your GoPro footage to the Media Library by clicking the + icon on the main interface.
Step 2. Drag and drop the footage to the Video Track in the timeline.
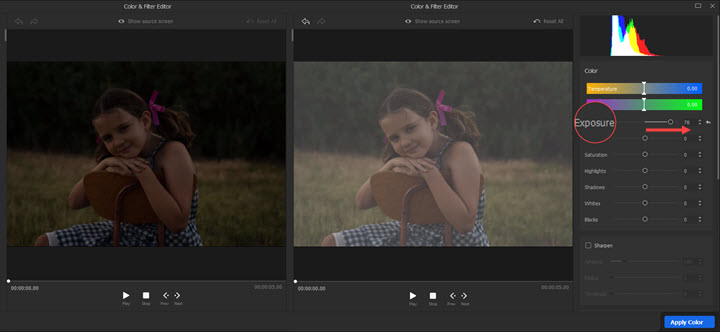
Step 3. Click Color in the toolbar to get access to the Color Editor. Drag the sliders behind the corresponding parameters to increase the video brightness. Here you can fix exposure, correct white balance, tweak contrast, saturation, and other parameters of your footage. You can also apply a 3D LUT to create an instant look.
Step 4. Hit the Apply button in the lower right corner to save your highlighted GoPro footage. Then click Export in the toolbar to export the video.


