Adding a watermark to the video is perhaps the lowest-hanging fruit to prevent your work from unauthorized use. And perhaps, your best shoot to get both viewed and protected. You are not alone.
Remember, to secure a video content, how eager you want to add a watermark is as much a video theft wants to get it removed. So, you need to know some tricks to wisely add watermarks to video. And here we have collected four methods with detail steps. Check them now.
Method 1: Add Watermark to Video Using VideoProc Vlogger
- Best for: Adding video, text, image, and GIF watermarks to video.
- Explain: VideoProc Vlogger is a professional yet simple video editor for Windows and Mac users, and you can add watermark to video within simple steps. What's more, you can edit your video easily like trim, split, speed up, slow down, add music, add filter, add effects, add overlay, and more.
Let's download VideoProc Vlogger and open it to add watermark to video.
Step 1: Launch VideoProc Vlogger and go to Media Library to upload your video and watermark files here.

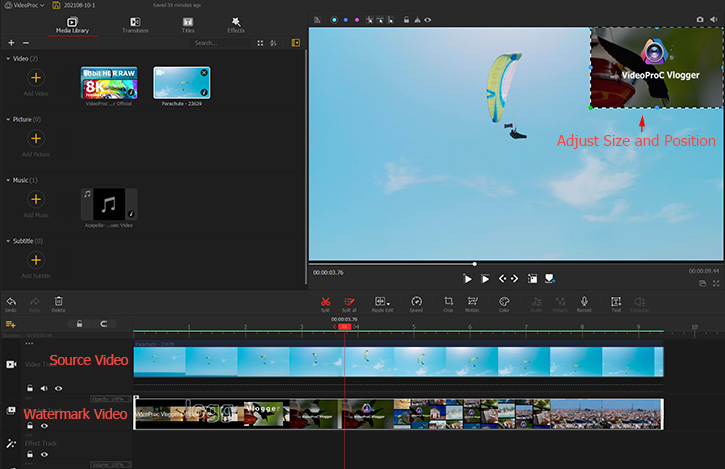
Step 2: Add video/image/GIF watermark to video.
Drag video to the Video Track and drag the watermark file to the Overlay Track. Then you can adjust the size and position of the watermark or adjust the "Scale" and the "Position" on the Inspector Panel.
Step 3: Add text to video.
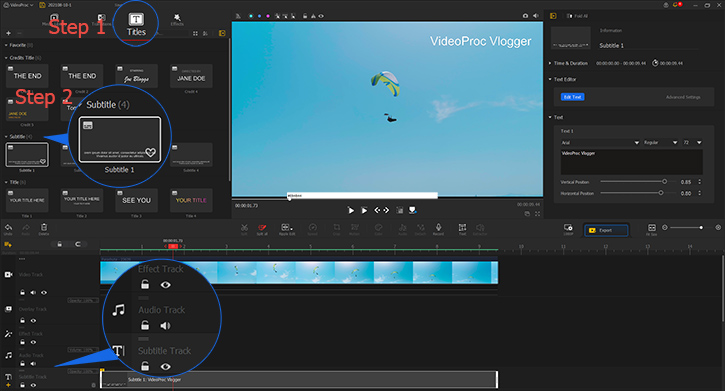
Drag video to the Video Track and drag the text watermark to the Overlay Track.
Method 2: Add Watermarks to Video Using VideoProc Converter AI
Note: VideoProc Converter AI and VideoProc Vlogger are two different software that developed by the same team. You can read this article to check the differences between VideoProc Converter AI and VideoProc Vlogger.
- Best for: Adding still text and image watermarks to video without re-encoding.
- Explain: VideoProc Converter AI is basically a simple video processing toolkit covering the functions of a basic video editor, DVD ripper, converter, recorder, and downloader. It offers one-stop solution to obtain videos from both online and physical discs and bake them into an ideal form of being as you desire. It can remove and add watermarks.
Let's download VideoProc Converter AI and launch it to add watermark to video.
Step 1: Run VideoProc Converter AI and go to "Video" tab and select the video you want to add watermark.

Step 2: Click "Video" to upload the video and click on the "Watermark" option.

Step 3: Click "Enable Watermark" check box > choose Text, Image or Time watermark > click Done.

Note: VideoProc Converter AI allows for at most 3 lines of text watermarks, and you can adjust transparency, position, size, font, and color of the text watermark. However, VideoProc provides only one watermark overlay, so you are unable to add both text watermarks and an image watermark at the same time.
By ticking "Auto Copy", your video won't be re-encoded for adding watermarks.
Method 3: How to Add Watermark to Video Using iMovie
- Best for: Adding animated text watermarks.
- Explain: Video editing software like iMovie provides the animated Title options to let users add text in scrolling style as watermark. The name of the text template is "Scrolling Credits" for vertical scrolling, and "Ticker" for right to left horizontal scrolling.
Step 1: Open iMovie and go to Titles.
Step 2: Find Scrolling Credits/Ticker under Title.
Step 3: Then drag the Title to the timeline above the video clip where you want it to be shown.
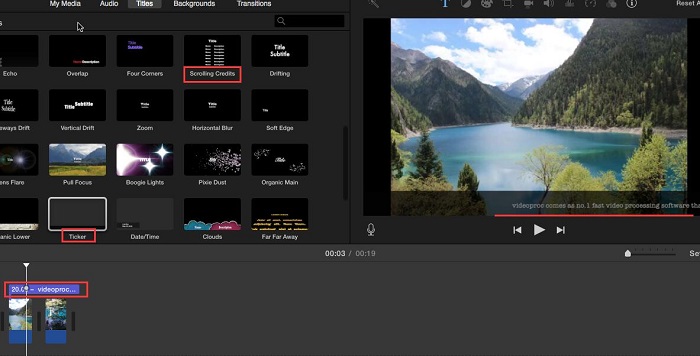
Step 4: Input the text you prepared and it's basically done.
By selecting the Title in the timeline, you can change the font, color, size, etc.
Note: In iMovie 10, one can no longer adjust the opacity of a title front as before, but there's a workaround solution in Apple community. And another issue is you cannot reposition the text to the center of the video.
Method 4: Add Watermarks to Video with Windows Movie Maker
- Best for: Adding both animated and handwrite text watermarks to videos.
- Explain: Windows Movie Maker is now replaced by Movies & TV application in Windows 11/10 with editing features relocated to Photos app, one can draw or input text to the video starting at a certain time.
Step 1: Find the video your want to add watermark in the folder.
Step 2: Right click and open with Photos.
Step 3: Click "Edit & Create" drop-down menu button and select "Draw" or "Add animated text".
By selecting Draw, you'll be able to use ballpoint pen, pencil, or calligraphy pen to handwrite a logo, image, or a text starting from the point of the time you seek appropriate.
The best part of using this "Draw" feature is that you can handwrite certain lines with the help of pausing video to make the watermark animated. See below:
By selecting "Add animated text", you'll be able to add to the video, the text in the desired text style and layout.
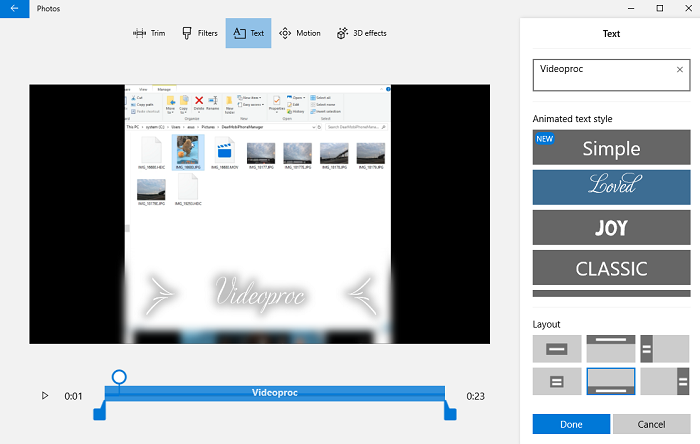
Note: It only allows for up to 140 letters input in the animated text box. And the style is all fixed.
Method 5: Add Watermarks to YouTube Videos in YouTube Studio
- Best for: Adding brand watermarks to YouTube videos with subscription button.
- Explain: Some YouTube creators are not familiar with the small tweak of adding watermarks directly to YouTube videos online in YouTube studio. For YouTube branding purpose, YouTube Studio should be your first choice.
Step 1: Go to YouTube Studio.
Step 2: Find Settings > Channel >Branding > Choose Image.
Step 3: Then you select a picture to be added to the video on the right lower corner.
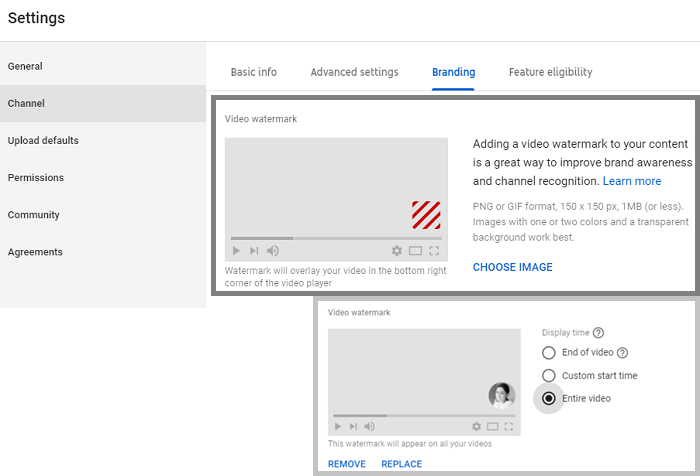
You can customize the display time for the image to show up at a random time of the video, at the end of the video, or lasts throughout the whole video.
Step 4: Click "Save" to apply the settings.
Note: YouTube Studio only offers the choice to add one image watermark to the video with a fixed position. One cannot adjust the opacity of the image, nor add text watermarks.
4 Tips on Adding Watermark in Video
Tip 1: the Position of Watermark in Video Matters.
There are over 73K watermark removers on the market, both online and offline. But the main stream watermark removing tactic is to use cropping, overlaying and blurring feature.
By cropping, one can crop out the watermark area as a whole, which won't affect video viewing, though it may change the aspect ratio. When your watermark is located in the margin place of the video, it can be easily removed. Therefore, do not put your watermark in the corner or near the margin. Watermarks on those places can be very easy erased or blurred without effecting the whole video view.

Tip 2: the Surface Area of the Watermark Covers
A big transparent watermark in the center of the video is always better than a small one, since for thefts, it should not bother too much to blur a small watermark in comparison with a big one. For instance, a big text watermark of VideoProc with 50% transparency.
To let the watermark cover larger surface area, full screen watermarks can be an extreme way to go. It may affect the viewing experience but can be one of the safest solutions to protect your property as it dramatically increases the tariff for others to remove it. Even if you've got time and energy, the amount used for removing the watermark is equally great for making a video on your own. Full screen watermark:

Tip 3: the Watermark in Video Can be Either Still or Scrolling
For advertising purpose, a watermark could be a brand name, a company logo in a still state, or better, a continuous running text throughout the length of the video, which can be used as a typical way to put much more info on screen while serving as both ad lines & watermarks. Vertical scrolling and horizontal scrolling can both be fine.
In this case, we are talking about adding animated text to video, which could require using a real video editing software.
Note: some users suggest making use of softcoded subs as watermarks. The drawback of using this method is anyone can disable the subtitle very easily, and plus, it is not in a continuous fashion.

Tip 4: Color of the Watermark Should be Chosen Wisely
The watermark should better contain as many colors as possible, and ideally, match at least some colors in the video, making it harder to remove without damaging the original video. The watermark removers on the market relies heavily on color and color details to distinguish watermark from the video and calculate what lies behind. Therefore, the opacity, should also either be very transparent and nearly indistinguishable from the background or very opaque, making it difficult to see what was behind it.


