According to 3M Corporation, our brain processes images 60,000 times faster than text. Making a music video can impress audiences in an entirely new way, and interpret the music from the perspective showcased in the video. For beginners and hobbyists interested in the film industry, making a music video is also a good way to harness your inner "shreditor": to be the shooter, editor, and producer for the entire project.
Making a music video is an enchanting and rewarding process. For anyone plan to learn about how to make a music video at home by yourself, we will walk you through the pipeline from developing the concept, drawing the storyboard, planning the shot to editing the music video and publishing it. Examples and tutorials are included.
Bonus Tips: For Audiophiles seeking top-notch sound quality, you will love the new Audio AI feature in VideoProc Converter AI, designed to remove background noise, hissing, wind, and more from audio and video files.
1. How to Make a Music Video: Starting from a Concept
Creating a music video isn't that daunting. Everything starts with a concept, and you can develop that concept into a story, elaborate on it, and see where it leads. If the music video you want to make is more about the artists performing it, you can put more effort into planning the shots, locations, etc.
1.1 Types of Music Video
Before venture into the editing part of how to make a music video, deciding the type is the first thing to do. It can be as simple as recording the performance, or as creative as making it into a short film with a storyline. Here are some types of music videos:
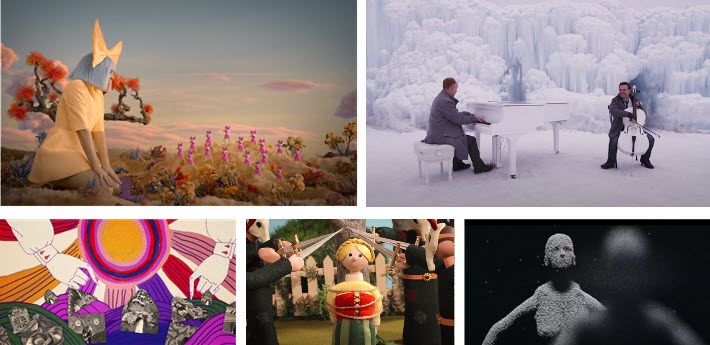
- Narrative: there's a plot, a story that goes on. It can be a reflection of the lyrics, or it is an independent story for its own sake. For instance, the music video of This Song Saved My Life from Simple Plan is made to highlight the impact of child trafficking, more for the cause of social change than to visualize the lyrics.
- Performance: the artist or the band performing the music. They can perform without an audience, or go opposite to film the gig in front of the crowd. An iconic example is Smells like Teen Spirit from Nirvana. The grimy aesthetic of the band is well delivered in this music video featuring the band playing, and that whimsical smile in the end with a close-up shot is unforgettable.
- Visual and conceptual: it can be avant-garde, exploring aesthetic possibilities and experimenting with a mixture of mediums. There won't be a distinct storyline, but more abstract graphics for visual entertainment or finding another way of expression, like what Amani did in Feathers Falling.
- Animation: it can be a narrative that tells a story, only through CG, 3D animation, stop motion or graphic animations instead of real people; or it can be abstract, for the sake of visual entertainment listed above. Burn the witch from Radiohead is a nice example of a music video made with stop animation.
- Lyric music video: the lyrics are overlaid as text on the video, with some effects added. This type is easier to make given the time and effort needed, since almost all the work can be done in the post.
It is not a rigid classification of music video types, and many productions are a mix. For instance, you can mix the performance with the narrative, featuring the artist singing the song, and stories as B-rolls.
The choices will come down to what you and the client (the artists) like, and how you prefer to present the music video. You can listen to the track carefully, let yourself keep drowning in the song, brainstorming the ideas, and come up with a plan that can represent how you feel, or how you want the audience to feel.
1.2 Put Together a Treatment to Make a Music Video
In music video making, a treatment is a document that presents and elaborates on the concept of the MV. It further develops from the initial idea into a creative outline, narrowing down the brainstorming into something workable. The treatment usually comes with visual elements and text.
Professionally as it may sound, a treatment still comes in handy if you are making your own music video, a "just for fun" project. It helps you to turn abstract ideas into functioning presentations, a visual reference to envision the music video in a nutshell. In the professional workflow, a treatment can be used to pitch to the client, the artists, and the crew members.
Below is a glimpse of a Music Video Treatment by Dano Cemy, the director of the music video No New Friends by LSD ft. Labrinth, Sia, Diplo.
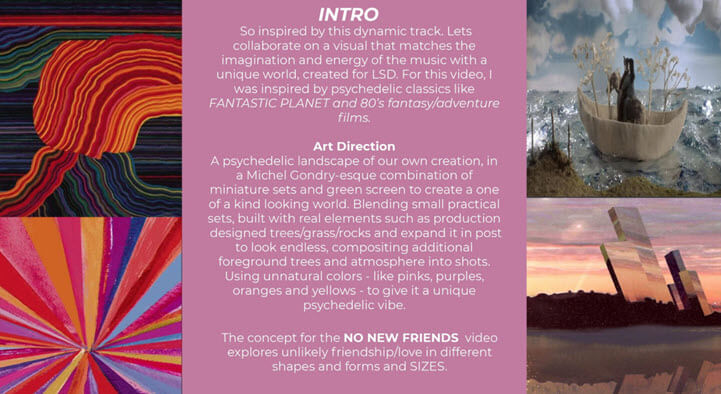
Reading the treatment with the picture collages (as the mood board), you will know the overall feel, and better understand how to make a music video by planning ahead.
Taking the intro slides of No New Friends as an example.
The overarching idea of this music video is to explore "unlikely friendship or love in different shapes and forms and sizes", by means of visual elements that "matches the imagination and energy of the music". It was inspired by psychedelic classics and presented by miniature sets and green screen techniques that blend the sets with reality.
Based on this concept and art direction, the following slides break the music video down into opens, verse, chorus, bridge, etc., with a description of what will happen in each scene.
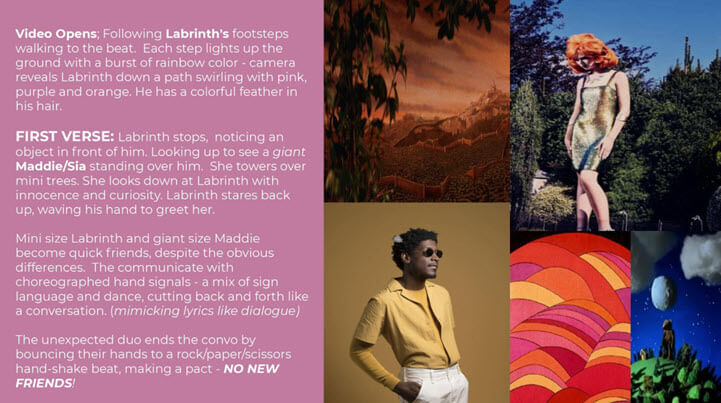
When you are trying to learn how to make a music video, you can get inspiration from others. Valuable music video treatment database as such are great resources to learn from.
1.3 Use a Mood Board to Make a Music Video at Home
Commonly used by creators, a mood board is an early stage between idea and visual rendition of the work. It communicates the general idea and feeling of a topic, in this case, the content of the music video. It borrows aspects from different fields intending to create something new. If you are wondering how to make a music video unique and epic, you will want to start planning the overall aesthetics.
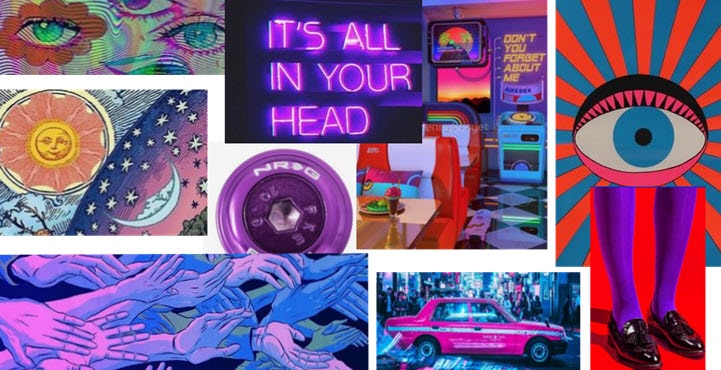
For instance, we decide to go psychedelic, and find that wavy lines, bold colors, eyes and hands go well together, and the colors are mesmerizing and intoxicating. They establish the overall feel.
The collages in the treatment in the previous part can also be seen as a way of moodboarding. If you are making your own music video for fun, you can follow the workflow of coming up with an idea, create a mood board, and write a brief idea on the mood board. It can be as fun as scrapbooking, and as less daunting as writing up a formal treatment.
2. How to Make a Music Video by Yourself: Planning the Shots
Learning how to make a music video also involves learning about storyboard making and shot lists transcription.
After you have elaborated the initial idea, and based the music video on the story, you can go on to plan the shots. You can create a storyboard to visualize the story, and then transcribe the storyboard into a shot list. Or you can write everything on the storyboard, and skip the shot list making.
Storyboarding and making a shot list are the best ways of communication, and can save lots of time and effort. Once you start rolling, you will want everybody, the artists, performers and the crew members to be on the same page.
2.1 Create the Music Video Storyboard
Storyboard is a series of sketches to visualize what will happen in the video. It helps you to draw out the story in comic book-style, reproducing the music video in your mind onto the paper.
Music Video Storyboard is a more structuralized presentation of your initial idea. You can assign the story into different scenes, and break down the scenes shot by shot.
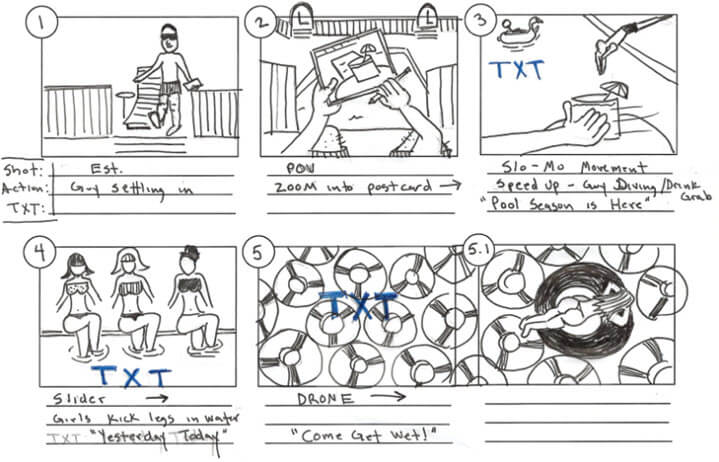
The drawing can tell us lots of information about the video, including the mise en scène, the plot, camera shot types (long shots, closeups, etc.), the framing (two shots, over the shoulder, point of view, etc.), and you can also add annotations alongside the sketches, such as the camera movement (pan, tilt, dolly, etc), or special props needed for that scene.
To make a music video by yourself , you will want to break down the lyrics, and assign them to the scene. It makes sense for a story that corresponds to the lyrics. For creative types, or stories that don't echo with the lyrics, it is also helpful as a cue for the duration of the scene.
You can number the scenes with 1, 2, 3 and label each shot within the scene as A, B, C. For instance, the third shot of scene 2 would be 2C.
Pro Tips: Experiment Editing Scenes from Storyboard
Once you finish the storyboard, you can go with a preliminary edit in the video editing software. It helps you to pace out the video and let the music guide the editing of scenes.
- Take a picture of each scene on the storyboard (or record them), and import the file into the editor.
- Cut and edit the media files as if you will be editing the final footage. Apply fake camera movement with keyframes in post, and see if it is ideal for what you have envisioned.
- Make adjustments to the storyboard accordingly. For instance, you might want to change the framing, or the camera movement.
If you also plan to make a shot list, you can experiment later and add the revisions on the shot list.
2.2 Make a Shot List to Make a Music Video
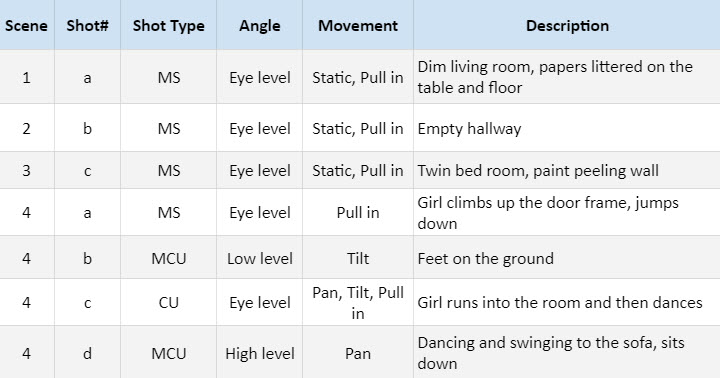
Once you establish the story on the storyboard, you can write more information on it, or transcribe it into a shot list. The shot list helps you to plan the shot more clearly, and can be used as a reference on set.
Pro Tips:
If you make some changes during the shot, make sure to take notes on the shot list. It will be a relief in the post-production.
To write up a shot list, you can include the following elements into it:
- Scene Number: mark with 1, 2, 3...
- Shot Number: mark with 1, 2, 3 or A, B, C...
- Shot Description: briefly describe what happens in that shot.
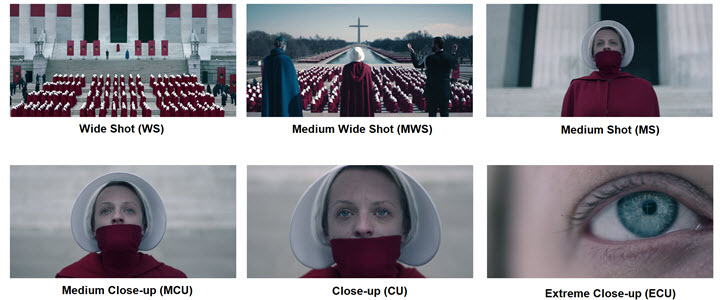
- Shot Type: Depending on how close the lens is toward the scene, there are Long shots (also known as wide shots), such as long shots (LS), extreme long shot (ELS); close-ups, such as extreme close up (ECU), close up (CU), medium close up (MCU); and there are medium shots.
- Framing: single, two shot, three shot, over the shoulder, POV, etc. You can also merge this column with the shot type.
- Camera Movement: Static, pan, tilt, dolly, roll, swish pan, etc.
- Camera Angle: low angle, high angle, eye level, birds eye view, knee level, ground level, etc.
You can also add additional columns into the shot lists. For instance, are there any VFX needed? Do you need a tripod, drone, dolly? List them out in Equipment. How about the props and costumes? Will you go multicam? Signaling it by marking out Camera A, Camera B, etc.
Here is an example of a shot list for a music video.
Pro Tips to Make a Music Video at Home :
If you are mixing stock footage with the music video, you can also color code the scenes and shots, to discriminate A rolls from B rolls.
You can learn to make music videos by learning from the masterpieces. Use the shot list template, and do a film analysis on the music video you like, fill in the blanks as if you are planning out the shots.
2.3 Location Scout, Crew, Prop, Costume
Location scout before filming the music video is important in pre-production. With the treatment and storyboard at hand, you need to make sure the location, be it interior or exterior, matches the overall feeling of the music video.
You can also revise the storyboard and related materials during location scouting, either due to new inspirations or location limitations.
Then you need to consider the mise en scène, find the casting and crew members, and prepare the props and costumes.

Sometimes, props and memorabilia can be so impressive and become symbolic for that music video. Think of Sia's black and white wig, Lady Gaga's bumblebee outfit in Paparazzi, and the letter written by Stan. If you are making a music video for hip hop, props such as luxury jewelry, fancy cars, gold chains and champagne all fit the vibe.
3. Start Filming the Music Video
After finalizing your shooting schedule, it's time to start filming. Issues such as lip-syncing, lightning, camera works, clapperboard and logs all need close attention.
3.1 Music Video Lip Syncing Issues On Set
If your music video is performance type, or a mix of a story featuring the performance as B-rolls, lip-syncing is an important issue to handle during the production and in the post.
Most directors will suggest you playback the music on set. The artist can sing along physically, and the raw sound from the set will not be used in the final production. In the post, use the studio recordings to sync with the video.
How to create slow motion movements of the lip while the track is playing at normal speed? Director Brett Ratner has explained how he did that in the making of Mariah Carey's Heartbreaker.
The trick is to playback the song at 2x speed on set, so that the singer sings along twice the speed of the original song. In post-production, slow down the video to 1/2 speed of the footage, so that in the final version of the music video, the song plays at normal speed, and the lip of the singer is in smooth slow motion.
Follow the detailed editing tutorial in part 4 on lip-syncing tips >>
3.2 Lightning and Camera Techniques
This is the part to squeeze your cinematography knowledge if you are on the one-person team to create your own music video. There are many things to consider in music video pre-production.
Decide whether you want to shoot in RAW, 4K or 1080p, landscape or vertical, using multiple cameras or only one.
If you are shooting indoors, make sure there's enough light. Low light footage will suffer from image noises, making your music video less cinematic-looking.
Camera movements and framing are important for the music video to be coherent and cinematic. You can refer to the storyboard and shot list for the camera works.
Below are some shot types:
3.3 Shoot More Footage Than You Need to Make a Music Video
In the storyboard and shot list, you have noted down the scene and the shot number of the music video. In the filming stage, you usually go with multiple takes to get the shot you want. Even if one take fulfills the requirement, you can experiment with more takes. By doing so, there is much room left for post editing.
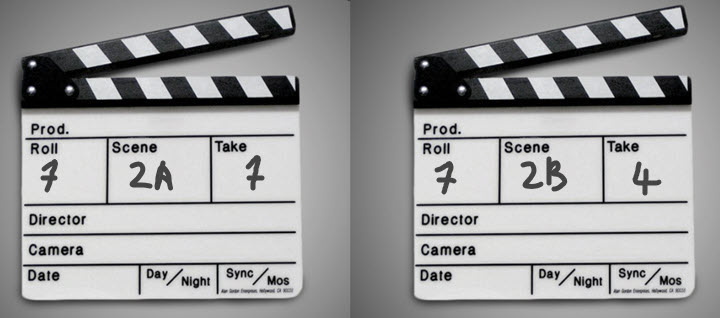
To make sure you don't get lost amid tons of clips, use the clapperboard to mark footage and assist A/V syncing. Start recording and clap the clapperboard. In the post, you will know which scene and shot this clip is for, and which take it is to get that shot.
You can also take notes on the shot list or the storyboard when filming. It will be a time saver for post editing since you can quickly glance at the shot log, knowing which are good takes, and which are bad shots to skip.
4. Post Production: Editing the Music Video
It's finally the part where the magic happens. To make a music video, we need to assemble the shots into scenes, and scenes into a coherent video. Before you put on the editor's hat, it's a good practice to back up footage and get organized.
4.1 Backup and Sort Out Your Footage
If you are wondering how to make a music video professionally in post-production, rule of thumb: keep at least three copies of the footage. One to work on, the other two as backups. For these two backup copies, make sure one of them never connects to the computer when the other is in use. A good strategy is to store the backups in different places.
For the working copy, you can organize them into folders, and rename them according to the information on the clapperboard.
4.2 Choose Music Video Editing Software
Depending on your skill level, editing needs and budget, there are several programs to choose from on the market. You can find detailed reviews on the Top 10 Best Music Video Maker. For beginners and hobbyists, VideoProc Vlogger is a nice choice.
VideoProc Vlogger is a video editing application for Windows and Mac users. It contains all the essential features of professional video editors, yet is designed with beginners in mind. The nonlinear speed editor (for speed ramping) is the first of its kind to adjust the speed flexibly with curves. There are more features that make it a nice choice for making MVs:
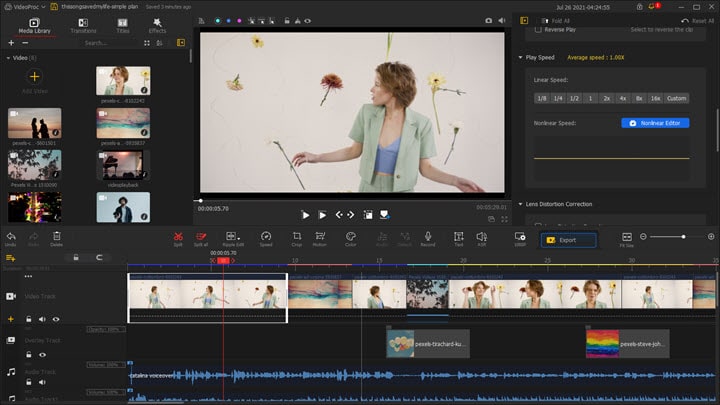
How to Make a Music Video Easily with VideoProc Vlogger
- Support 999 video and audio tracks, mix and create as you wish.
- Dedicated audio editing panel with audio filters, effects, 10-band equalizer, analyzer, etc.
- Cinematic transition, text, animation, video effects templates.
- Color grading, batch import LUTs, green screen, color blend, etc.
- Hardware acceleration for 4K, 10bit, HEVC and other demanding videos.
Video Tutorial: How to Make a Music Video with Low Budget
The underlying algorithm in VideoProc Vlogger guarantees efficiency and performance when editing the music video. You can smoothly edit and color grade 4K video resources, and retain the best quality to make your music video look professional, even if you are new in the field.
You can also use the creative features, such as the motion editor and blend mode to create enchanting music videos.
Video Tutorial: How to Make a Music Video ENERGETIC with Motion and Blend Modes Design
4.3 Edit Video, Add Transitions, Text, Effects
For beginners, you can follow the detailed steps below to make music videos. For advanced users, you can jump to the part of lip-syncing and the part of color grading.
Step 1. Launch VideoProc Vlogger, and create a new project.
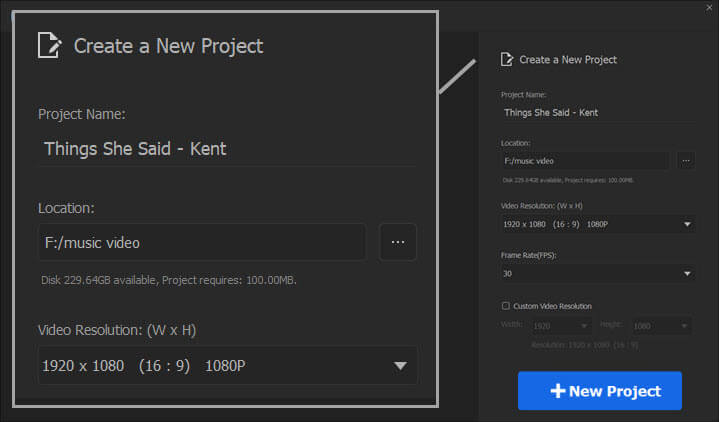
- You can name the project by the song title and artist.
- Specify the location to store the project.
- Choose music video resolution. 1080p is the most common option for YouTube and music platforms. You can also go with 4K and higher resolutions.
- Choose frame rate, 30fps is the mainstream option.
Step 2. Import video and music into the project.
Click the plus icon in the Media Library to add videos, audio files, and pictures.
Step 3. Drag studio-recorded music to the timeline.
- Add several audio tracks on the timeline.
- Drag the music to audio track 1. The music you are using is the high quality track recorded in the studio.
Step 4. Drag video files to the timeline.
- Assemble the footage on the timeline.
- If you have created a storyboard or shot list, and named video clips according to them, now you can assemble the clips on the timeline quickly, from scene to scene and shot to shot.
Step 5. Detach audio in the footage.
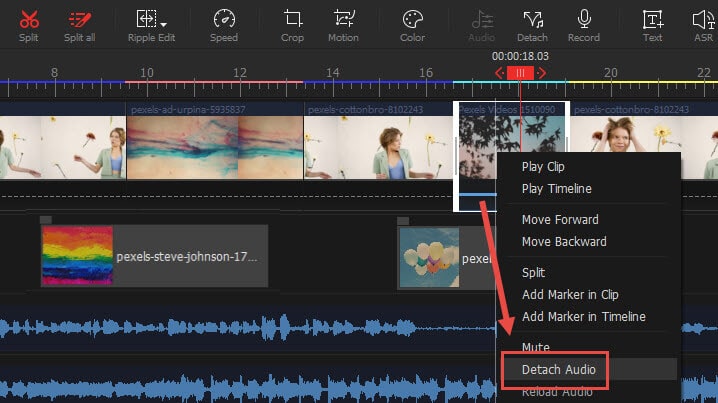
- If you shoot without sound (marked on clapperboard as MOS), you can skip this step.
- If the footage contains the audio on set, right-click on the footage, and click Detach Audio.
- The audio will be detached and added to the Audio Track.
Pro Tips:
You can use the waveform of that detached audio as a reference, when syncing studio track with the footage. You can mute that reference track or delete it later.
Step 6. Trim video clips.
Make sure Ripple Edit is enabled on the toolbar. Drag the edge of the clip to trim it.

Pro Tips:
Ripple Edit or Time Stretch? If you switch Ripple Edit into Time Stretch, when you drag the edge of the clip, it will change the speed of the video. The shorter the clip, the faster the speed.
Time Stretch is useful when the speed doesn't matter, meanwhile you want to make sure the whole clip fills up a certain time slot without sacrificing any content of the footage (no trimming). Or the speed does matter, and you are experimenting with it since you don't know the exact value to use.
Step 7. Add video effects, transitions and titles.
There are many templates in VideoProc Vlogger. You can easily drag the templates onto the clips.
Don't overuse them though. You can learn from other music videos, analyze how they deal with transitions and effects, take notes and improve your editing.
4.4 Lip Syncing Tips for Editing the Music Video
If you want to make a music video with slow motion effects, where the singer's movements and lips are in slow motion, but the music track is at the original speed, yet the lip sync with the music, the trick is to shoot in double speed, and slow down in the past.
Step 1. Import the footage, and split out the section where the singer is singing twice as fast on set.
Step 2. Detach the audio on set, mute this audio track or delete it.
Step 3. Click on the video clip, and set the linear speed to 1/2.
Note: If the on set performance is 3 times faster, then set the linear speed to 1/3.
Step 4. Align the studio track with the footage.
4.5 Color Grade the Music Video
In VideoProc Vlogger, you can color correct the video to deal with white balance, exposure, contrast and other aspects, making sure you have a good start to go for stylized color grading.
Select the clip and click Color from the toolbar. A separate window will pop up, and this is the color editor panel. You can use stock LUTs to make the music video cinematic in a click, and you can also import LUTs from other resources.
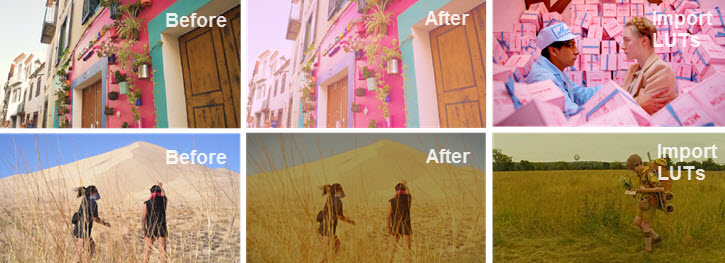
On the right side, there are parameters and tools to do your primaries and secondaries. You can read more on color correction vs color grading to better understand the workflow.
4.6 Export Music Video and Share
The most exciting part is to press that Export button and upload to YouTube or share to your friends. Here are a few tips to get the best result for specific cases.
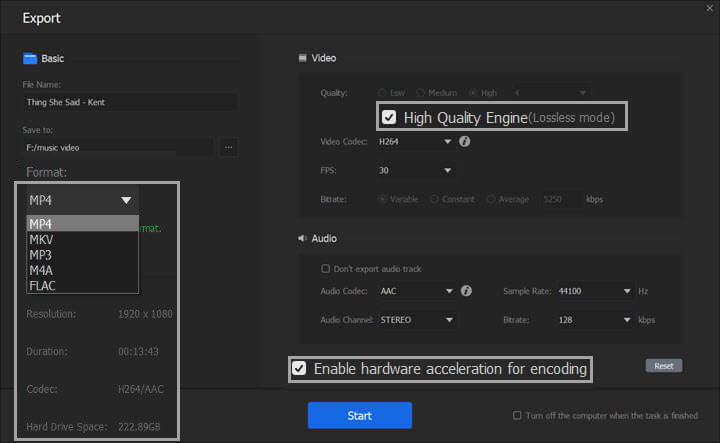
If you are exporting the demo for the client to have a rough idea of the music video, you can set quality to low or medium.
For the final production, you can select High Quality Engine for best quality.
You can enable hardware acceleration for encoding. VideoProc Vlogger supports full level hardware acceleration that takes advantage of your hardware to boost the performance.
Before publishing the full length music video, you can also create a trailer video to as a teaser for the audience.
How to Make A Music Video at Home: Hands-on Experience and Tips from VideoProc Vlogger Users
Making a music video can be fun and inspiring. You can plan everything ahead, or simply put on your shreditor's hat, go out shot something, edit, play around and ideas will bloom spontaneously.
Just as Ravien from Rockdale Recordings puts it, "My filming is often spur of the moment, usually when it's nice weather here in the UK!"
Ravien from Rockdale Recordings is truly the shreditor with a passion for his fantastic music videos. He is the shooter, editor, and producer for the entire music video project.
Using VideoProc Vlogger to create his music video, here are some of Rockdale Recordings' resourceful in-the-field tips on making a music video:
1. Film the Takes with Music Playing On-set.
To lip-sync when filming the music video, you can sing along with the music playing on a mobile phone, hidden in your pocket.
2. How to Make a Multi-Screen/Split Screen/Grids Music Video in VideoProc Vlogger
Step 1. Import audio files onto separate audio tracks in VideoProc Vlogger.
Step 2. Create new overlay tracks accordingly. For instance, you can add 4 new overlay tracks from each video clip.
Step 3. Drag video clips onto these new overlay tracks separately.
Tips: Before adding media to the timeline, you can use the Preview Window to select the best takes.
Step 4. Play the music and align the videos to the audio.
Drag video clips on each track to make them align with the song.
Step 5. Adjust the video size and position of each clip on the preview window, to make the multi-screen effects.
Tips:
- Besides dragging the corner of the video clip frame on the preview window, you can also adjust the position parameters in the Inspector Panel for the smallest nudge.
- If there are audio tracks (such as the main background music track) that you don't want to mess up when editing other clips, make sure to click the lock icon on that track to protect it.
VideoProc Vlogger works nicely for low spec computers, and for Apple Silicon Macs, this editor supports M1 chips natively to tap on the powerful engine.
Free download VideoProc Vlogger now to create music videos for free forever.

