It can be frustrating when you try to play MP4/AVI/MKV videos on VLC media player but find the video becomes pixelated, gray, or blurry. However, this error occurs occasionally. If you are encountering the VLC player pixelated video issue, read this post to figure out why VLC keeps pixelating your MKV/AVI/MP4 videos and learn the 6 proven and easy solutions to fix scrambled pixelated video playback in VLC.
Method 1. Convert Video to VLC Friendly Format
According to some surveys, 90% of the VLC player pixelated errors are caused by unsupported codecs.
If your MKV, MP4, AVI, or MOV video is encoded by a codec that VLC is not compatible with or the hardware cannot decode, then you're bound to meet VLC video pixelated, gray screen, A/V out-of-sync, and many other errors. Fret not as you can easily fix the error by converting videos to MP4 H.264 or other VLC-friendly codecs.
And among a variety of top video converters that are capable of converting videos for VLC, the simplest and the most reliable option is VideoProc Converter AI.

Reasons to Fix VLC Pixelated Video via VideoProc Converter AI
- Convert MKV, MP4, HEVC, and more to VLC-compatible codecs
- Support MP4, MOV, MKV, AVI, HEVC, and other 370+ input formats
- Rich encoding options. Gain complete control over the quality & size
- Reduce video size by over 90% with maximum quality
- Process videos at 47x faster speed, powered by full GPU acceleration
Step 1. Download and install VLC media player on Windows or Mac. Hit Video.
Step 2. Drag and drop the original MKV, MP4, AVI, or MOV video to the program and select MP4 H.264 as the output format.
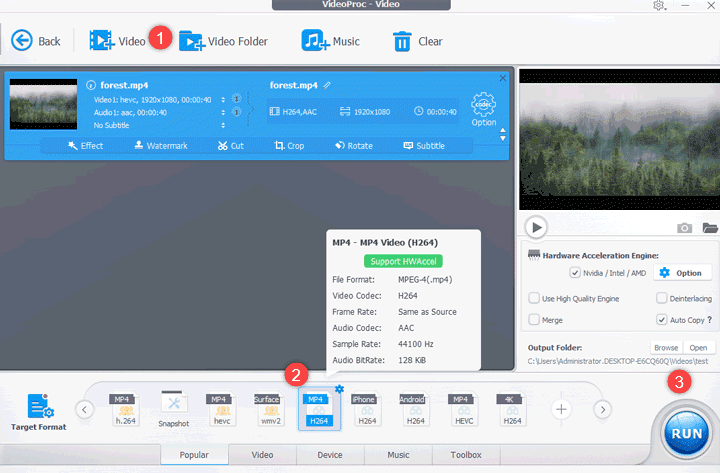
Step 3. Uncheck the option of Auto Copy and choose Run to start the conversion.
Method 2. Disable Hardware-Accelerated Decoding
By default, VLC media player makes use of hardware to decode certain videos (usually H.264/MPEG AVC and H.265/HEVC MP4 videos) with the aim to reduce the CPU usage and speed up the decoding process. However, sometimes it causes errors such as 4K choppy playback, gray screen flash, and video pixelated.
Step 1. Go to the top menu bar of VLC, hit Tool, and select Preference.
Step 2. Hit Input/Codecs to go to the Input & Codecs settings section.
Step 3. Go to the drop-down of Hardware-accelerated Decoding and choose Disable.
Step 4. Hit the Save button located on the bottom right to confirm the adjustment.

Method 3. Increase the File Caching Value
Some users reported that they fix the VLC pixelation error by increasing the value of file caching. This is because VLC preloads some portion of the video into the computer's RAM so it can play and access the video file easier. And the file caching value decides how much data VLC can store in the buffer before the playback starts.
Usually, increasing the cache value to 600ms or higher would be fine. However, it's worth noting that if you're running VLC on a computer with low memory, setting a high file caching value might cause the computer keeps freezing.
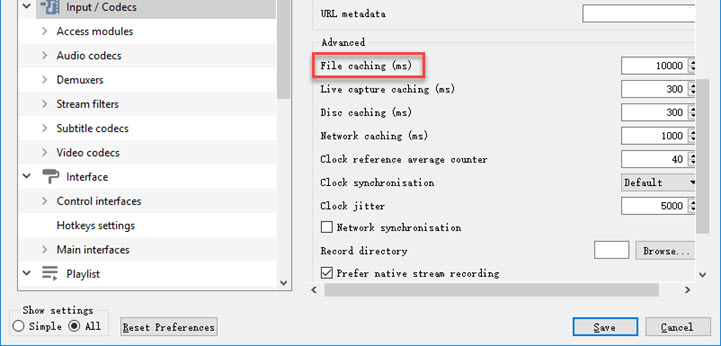
Step 1. Go to the menu bar of VLC, hit Tool, and select Preference.
Step 2. Find the Show settings option located on the bottom left and select All.
Step 3. Select Input/Codec on the left and then scroll down to find File Caching.
Step 4. Change the value of File caching to 600ms or higher.
Method 4. Send Videos to the Local Drive
Transferring the video files to the local drive might be a quick fix for users who meet the VLC pixelation issue when playing the videos from the external drive. From our experience, whether you want to edit videos on video editors like Premiere Pro or play the videos on media players like VLC, transferring the files onto the local drive with enough space can make your life easier.
Method 5. Disable Accelerated Video Output
If you're experiencing the VLC pixelation error on Windows XP or other old machines, then disabling accelerated video output might help you out. This solution is put forward by VLC. It’s mainly used for fixing the VLC only gives garbled video output issue but also works for getting rid of the video pixelation error.
Step 1. Go to the top menu bar of VLC, hit Tool, and select Preference.
Step 2. Hit Video. Find Disable on the drop list of Output and click on it.
Step 3. Hit Save. Play the MKV or MP4 video to check if the error is fixed or not.
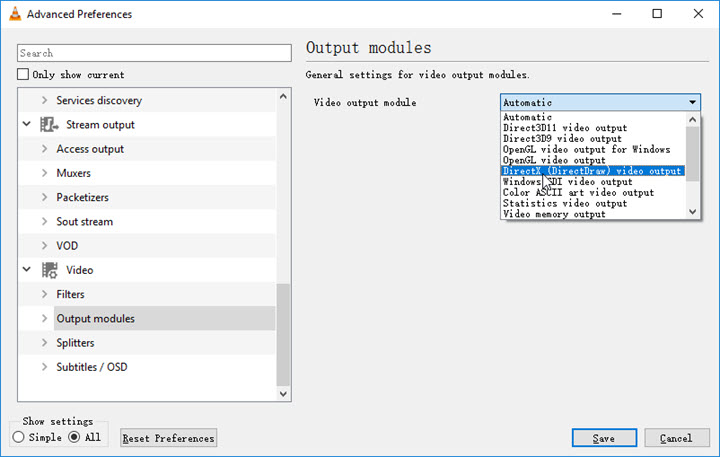
Method 6. Change the Video Output Module
There are chances you can fix the VLC video quality poor issue by changing the output module setting. However, to speak of which output module should you choose, there is no ironclad answer. You need to try the given options until finding the one that makes VLC play your video with good picture quality.
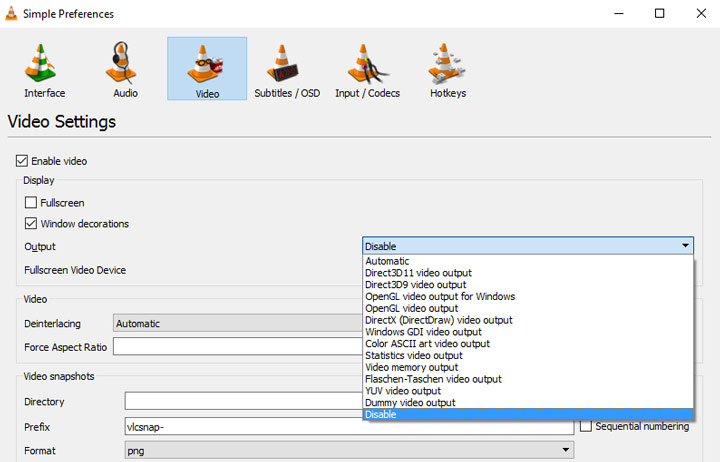
Step 1. Go to the menu bar on the top, hit Tool, and select Preference.
Step 2. Select Video on the pop-up Simple Preference panel.
Step 3. Go to Output and choose a different module on the drop-down list alongside.
Final Word
Hopefully, this post can help you understand why an MP4, AVI, or MKV video is heavily pixelated in VLC and how to get things fixed efficiently. Now, try converting the video to VLC-friendly format, disabling hardware-accelerated decoding, or any other methods we listed above to fix the VLC player pixelated video error.


