High-resolution images allow for greater flexibility during post-processing, enabling you to crop, resize, or zoom in on specific areas without sacrificing quality. However, obtaining high-resolution images is often challenging, as it requires either capturing photos with high-end cameras or increasing the resolution of existing images.
Fortunately, increasing the resolution of images has become more accessible and efficient with the advent of AI technology. In this post, we'll show you both traditional and AI image resolution increasers and how to use them easily.
Here are some terms mentioned frequently in the context. To get real high-res images, we should be clear about resolution, dimensions, pixels, and their relationship to image quality.
- Pixels: The smallest unites that make up an image. The more pixels an image has, the higher its resolution and the sharper the details.
- Image resolution: Determined by the number of pixels contained within the image, indicating the level of detail and clarity in an image.
- Dimensions: The number of pixels along the width and height of an image.
- PPI: Pixels per inch, indicating the pixel density of a digital image.
How to Increase the Resolution of an Image Using AI
Available for: Windows 11, 10, 8.1, 8, 7 (32-bit & 64-bit); macOS from macOS 10.13 to the latest version.
Price: Free trial; $39.95/yr for 3PCs or $65.95 for lifetime.
VideoProc Converter AI is a powerful video processing program to enhance old/low-res videos and images, thumbnails, and photos from any source in any format. Fueled by the latest AI image upscaling model, it can effectively increase image resolutions to 4K/8K/10K, producing sharper, more detailed, and visually stunning images. More importantly, it strikes a balance between resolution enhancement and computational resources, so that you can enjoy this AI feature on computers of all configurations.
On top of that, you can use VideoProc Converter AI to extract frames, take 4K snapshots, convert videos to JPG/PNG, edit videos, compress, download, record screen, and solve all your digital issues in one stop.
 Killer Features:
- Improve real-life and anime image resolution up to 10K (10,000px × 10,000px).
- Increase resolution without losing quality and fix pixelated images and videos.
- AI image upscaling, quality enhancement, denoising, video frame interpolation…
- State-of-art AI models to calculate and interpolate pixels for higher resolutions.
- Support JPEG, JPG, PNG, TIFF, BMP, HEIC, GIF, and hundreds of image formats.
- Lower system requirements than other AI apps. Smooth performances.
- Lightweight, safe, beginner-friendly. No limits on file size or amount. No watermark.
Step 1. Download, install, and start VideoProc Converter AI on your computer.
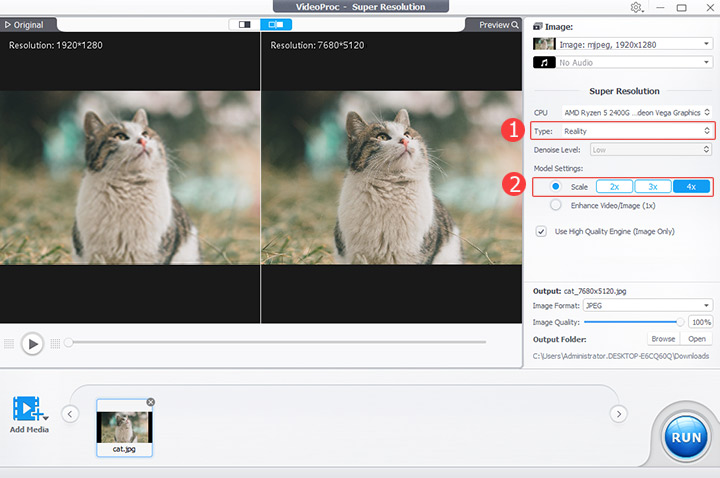
Step 2. Click "Image AI". Drag and drop one or a bunch of low-res images to it.

Step 3. Select the appropriate AI model. Gen Detail v3 and Real Smooth v3 are excellent options to consider.
Step 4. Set the scale to increase the image resolution by 2x, 3x, or 4x.
Tips:
Suppose you're increasing the resolution for multiple images, you can adjust other images in the same steps. Alternatively, you can click on the current image at the bottom and apply the changes to all the images.
Step 5. Click "RUN" to export. (You can load the image multiple times to scale it up until it reaches 10K.)
Review 1: Traditional upscaling stretches pixels, causing blurriness. VideoProc Converter AI Super Resolution intelligently reconstructs footage to look naturally high-res and artifact-free.
Review 2: Whether working with reality footage or animes, this software breathes new life into low-quality videos and vintage images, and achieves these enhancements without introducing any visual distortions.
![]() Excellent
Excellent ![]()
How to Increase the Resolution of an Image in Photoshop
Available for: Windows, Mac.
Price: $239.88/yr.
Adobe Photoshop is a powerful and widely used image editing software developed by Adobe Inc. It's a go-to tool for photographers, graphic designers, digital artists, and many professionals in creative industries. One of the key features of Photoshop is its ability to change the resolution of an image, which is particularly useful when working with low-resolution files that need to be printed at a higher quality or displayed on larger screens. This process is known as upscaling or resampling.
Step 1. Start Photoshop. Click File > Open to import a low-res image to it.
Step 2. Click Image > Image Size in the top bar.
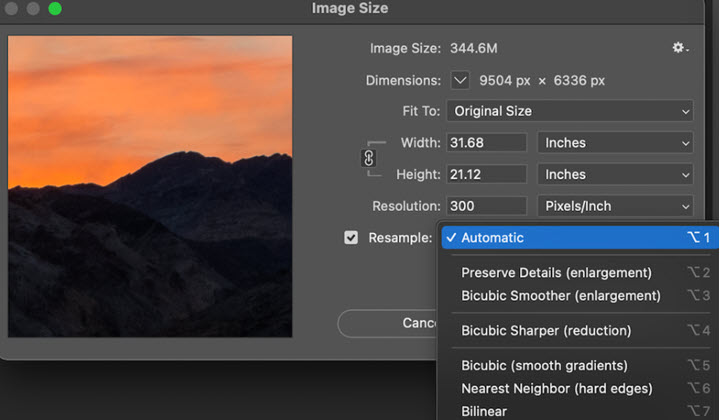
Step 3. To increase the image resolution, keep the measurement in pixels, and input the target number. Highlight the link option, and your image will be upscale in the original proportion. Otherwise, it will look distorted. To increase the DPI of an image, change the measurement to Inches.
Step 4. Enable the Resample option and choose the enlargement algorithm according to your specific needs.
- Preserve Details (enlargement): Especially useful when enlarging images with a lot of fine textures as it helps maintain sharpness and clarity. However, it may also introduce more noise or artifacts.
- Bicubic Smoother (enlargement): Best suited for enlarging images that require a smooth and consistent look, such as graphics or illustrations. The cons of Bicubic Smoother include its limited ability to retain fine details and textures during the enlargement process, resulting in a loss of sharpness and clarity in some cases.
Step 5. Save the changes, finish some settings, and export the image in a higher resolution.
Pros:
- Full image editing features.
- Precise control over the size and resolution of the image.
- Produce high-quality enlargements when used correctly.
Cons:
- Not cost-effective for users who need to upscale images only.
- Steep learning curve and challenging for beginners.
- Time consuming. You need to experiment many times until you get the ideal result.
- High-resolution upscaling requires a powerful computer system to perform smoothly.
How to Increase the Resolution of an Image Online
Available for: Devices with web browsers and internet connections.
Price: Free.
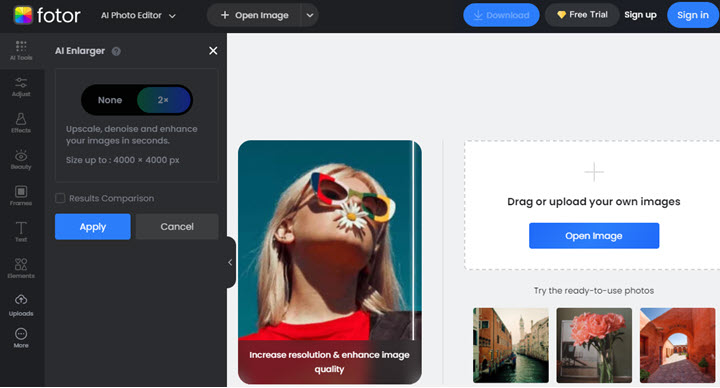
Also, some online tools allow you to change the resolution of images for free. They typically have a simple user interface where you can upload your image, select the desired resolution, and then download the modified image. If you want to keep the clarity while raising the image resolution, Fotor is a good option. Because it can convert photos to higher resolution (up to 4K) with AI.
Step 1. Visit the official website of Fotor. Open AI Photo Editor in its AI tool list.
Step 2. Load an image to it, and it will start enhancing automatically.
Step 3. Wait for it to process. Then you can use Results Comparison to check the work.
Step 4. Download the image with a higher resolution to your device.
Pros:
- Raise image resolution online for free.
- No installation and downloads.
- No installation and downloads.
Cons:
- Slow and unstable performances.
- Watermark on the final picture.
- No custom controls for pro users.
- Export images in JPG or PNG only.
How to Increase the Resolution of an Image for Free
Increase Image Resolution with Microsoft Paint
Available for: Windows 7, 8, 10, 11.
Price: Free
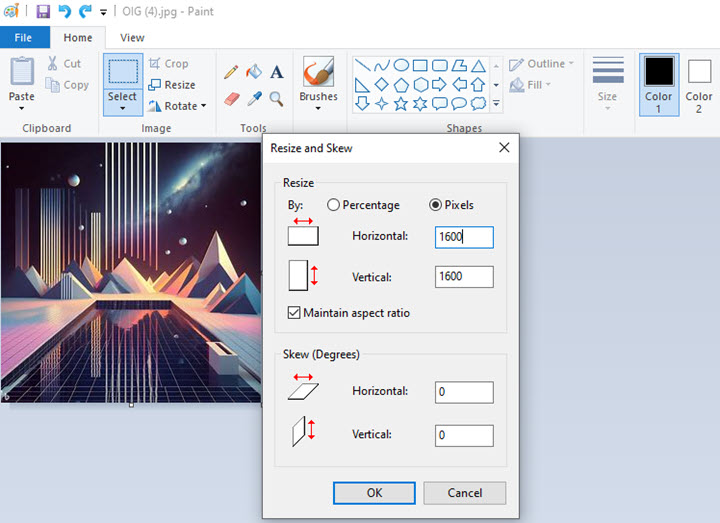
The Paint app comes natively on recent Windows PCs. It provides a series of basic photo editing features, including cropping, rotating, drawing, and resizing. To fix low-res images, you can increase the resolution by either percentage or pixels. The Paint 3D app on Windows also performs this task.
Step 1. Press the Windows key and S, and enter Paint to open it.
Step 2. Click File > Open to import a picture (JPG, JPEG, PNG, BMP, TIFF).
Step 3. Click Resize. Choose Resize by Pixels. Input the number of target pixels. Check Maintain aspect ratio if you want to resize the image without distortion. Click OK.
Step 4. Click File > Save as. Choose an output format, file folder, and filename. Click Save to export.
Pros:
- Free and simple.
- Instant preview.
- Maintain the original proportion after resizing.
Cons:
- Direct upscaling without AI pixel interpolation.
- Limited formats supported.
- Cannot resize images in bulk.
Increase Image Resolution with Mac Preview
Available for: macOS High Sierra or higher.
Price: Free.
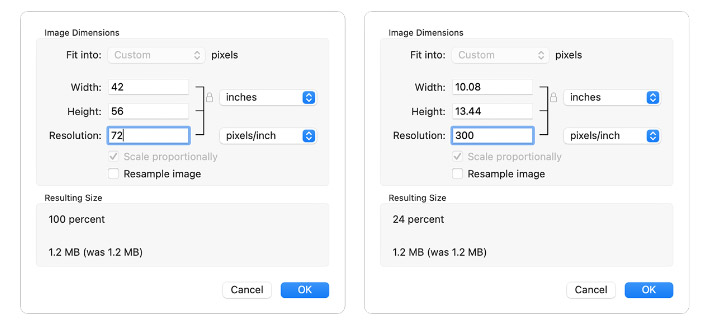
On Mac, the native image resolution increaser is called Preview. It offers two methods to make an image larger, resizing (enlarging pixels) and resampling (increasing the number of pixels). To improve the resolution of an image, we choose the latter. Here's how.
Step 1. Locate the image on your Mac. Right-click on it, select Open with, and choose Preview.
Step 2. Then choose Tools from the top menu, scroll down on it, and click Adjust size. Set Custom in the Fit into option.
Step 3. Enable Scale proportionally and enter a larger value of pixels in width and height. Check the Resample option.
Step 4. Click OK to apply the changes in the image resolution.
Pros:
- Free and easy to use.
- Quality will be maintained if the source image has adequate color info.
Cons:
- Limited image formats supported.
- No real-time preview or comparison.
- No batch processing.
How to Increase the Resolution of an Image on Your Phone
Available for: iOS 14.0 or later; Android 6.0 or up.
Price: Free and in-app purchases.
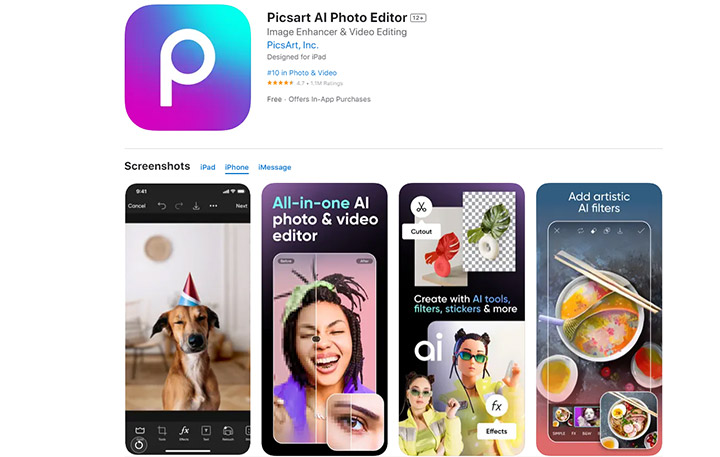
Picsart AI Photo Editor is a popular mobile application that offers a wide range of tools and features to enhance your photos. One of its key features is its image resolution capabilities, allowing you to edit and save your photos in high quality. During the process, it automatically improves the image clarity with AI.
Step 1. Launch Picsart on your iPhone or Android phone. Tap the plus icon to create an editing project.
Step 2. Tap Photo to choose a phone from your phone.
Step 3. Tap Tools and choose AI Enhance. Now it starts to enhance the image resolution intelligently.
Step 4. Drag the slider to adjust the strength of AI Enhance.
Step 5. Save or share the new image.
Pros:
- A simple and intuitive interface.
- Extensive editing tools: filters, effects, overlays, stickers…
- Instant social media share options.
Cons:
- Lack of accurate control over image resolution.
- Mastering all its features and tools may take some time and practice.


