"Blurry video uploads are common on social media. My problem is that whenever I upload a video to YouTube, Instagram, Snapchat, etc. the receiver sees the video very blurry/pixelated. So how to make a blurry video clear?"
- from a forum user.
There are lots of reasons that could cause video blurry and the main reasons are low resolution, different encoding, poor light and shaky videos. There is no doubt that you need to take steps to remove blur and improve video quality, and all those video blurry issues can be fixed with VideoProc Converter AI, an impressive all-in-one video solution that's capable of making blurry video clear and sharpening video quality easily. It is 100% safe and will never damage your computer or files. Just free download it to your computer and learn how to make a video clearer in 4 useful ways!
📌What's New: On April 17, 2025, VideoProc Converter AI has updated to V8.0, with upgraded AI performance for faster video upscaling and enhancement.
VideoProc Converter AI - Convert Blurry Video to HD
- Easily fix blurry video with various filters and contrast/brightness values
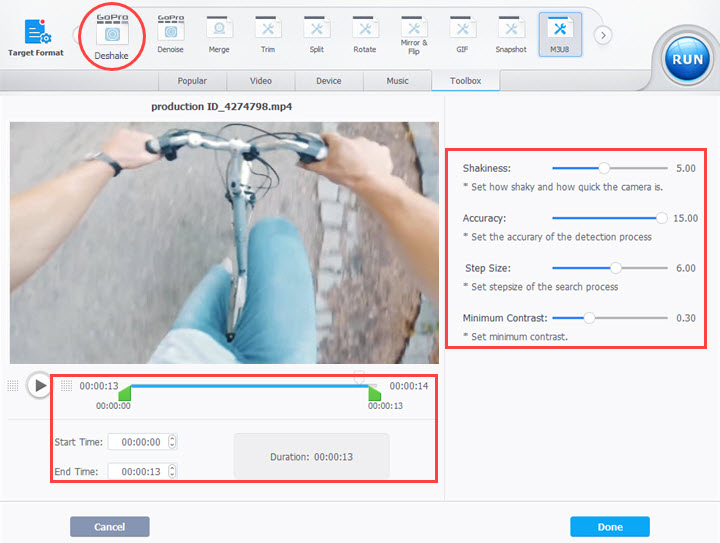
- Set shakiness, accuracy, step size, minimum contrast to stabilize video
- Increase video resolution to slightly change video quality
- The latest video encoding methods available for the highest possible quality
- Extra features: cut, merge, split, rotate, resize, compress, convert…
 Limited Time Offer:
 Purchase VideoProc Converter AI Lifetime License with 55% OFF discount coupon | $35.95
 was $78.90
 VideoProc Converter AI Lifetime License for Windows
 VideoProc Converter AI Lifetime License for Mac
Method 1. How to Make Video Clearer with Super Resolution
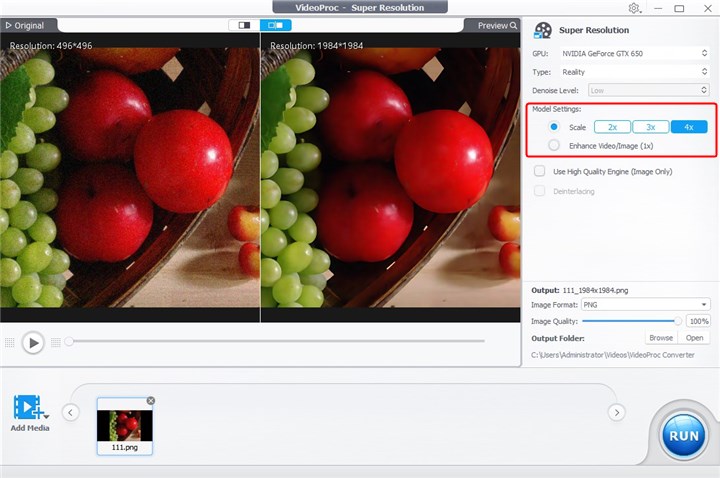
Super Resolution, an extraordinary technological feature in VideoProc Converter AI that promises to revolutionize the way we perceive and utilize video content. This feature is not just a mere enhancement; it's a game-changer that can breathe new life into your blurry videos. By extending the pixels and scaling them up by 200%, 300%, or 400% to reach up to 4K resolution, its AI video upscaling technology substantially improves the quality of low-resolution videos.
Step 1: Open VideoProc Converter AI and choose Super Resolution.

Step 2: Import your blurry videos here or drag it to the box.

Step 3: By increasing it by 2, 3, or 4x, you can increase the resolution and upscale the videos up to 8K at the original aspect ratio.
Method 2. How to Fix Blurry Video by Deshaking
Step 1: Drag and drop your shaky video into the main interface of VideoProc Converter AI to get it loaded.
Step 2: Switch to "Toolbox" tab in the bottom function area, and choose "Deshake".
Step 3: Click "Option" right beside the preview window, set the range of footage you want to deshake by inputting the "Start Time" and "End Time", and adjust the values of shakiness, accuracy, step size and minimum contrast. Then "Done".
Step 4: Choose an output format and RUN the video deshaking process.
Video Tutorial: Stabilize Shaky GoPro 4K Video
Tips: the steps of video stabilization begin in 0:40. [0:00 - 0:20] shows you the effect of deshaking.
Method 3. How to Make Video Clearer by Changing Resolution
Step 1: Import your video file in VideoProc Converter AI.
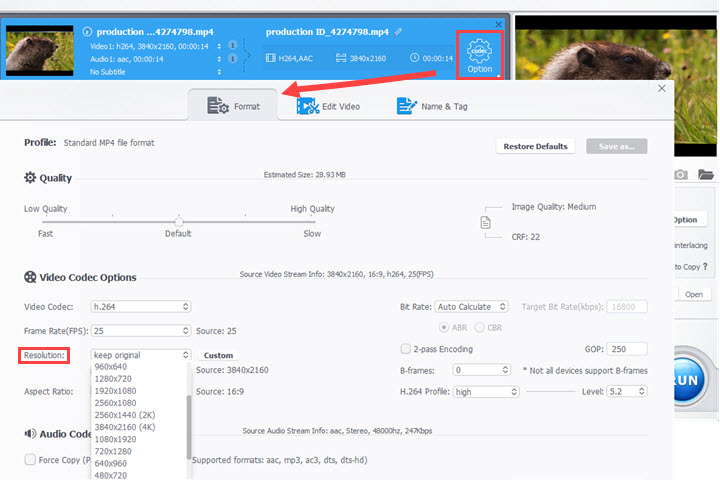
Step 2: Click "Codec Option", find "Resolution" under "Video Codec Option" area, and then choose your desired resolution from the drop-down list. You are also allowed to "Custom" video resolution. Then "Done".
Step 3: Choose an output format. Change the encoding method or not based on your need. Note that re-encoding a video would take you a little more time than remaining the original format. But when tackling some codecs like H.264 and HEVC, VideoProc Converter AI's level-3 hardware acceleration will boost the transcoding process.
Step 4: Specify the output folder to save your file and "RUN" the conversion.

Method 4. How to Make Video Clearer by Re-Encoding
Step 1: Load your source video by clicking "+ Video" and then move to the "Target Format" area.
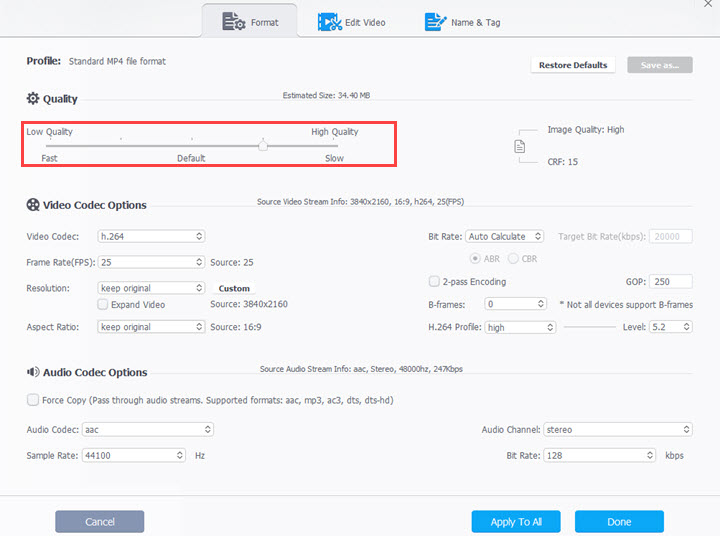
Step 2: Choose an output format and click "Option" to go to the "Quality" center.
Step 3: Move the slider between "Default" and "High Quality". You will see the values of CRF and Target Bit Rate are changing accordingly. Note that "High Quality" needs comparatively more time to process the encoding. Then "Done".
Step 4: Click "RUN" to sharpen video quality.
Bonus Tip 1: How to Clear up Blurry Video in iMovie
How to make a blurry video clearer? If you want to learn how to make a blurry video clear on iPhone or Mac, iMovie is definitely an option to go. It does not provide a tool that makes blurry videos clearer in one click. The workable method for iMovie users is to sharpen blurry videos by increasing the contrast.
Step 1: Create a new project and import your video to iMovie. Then drag and drop the video to the timeline.
Step 2: Click the color correction button above the preview window. Drag the half-moon sliders in the multislider control to increase the contrast.
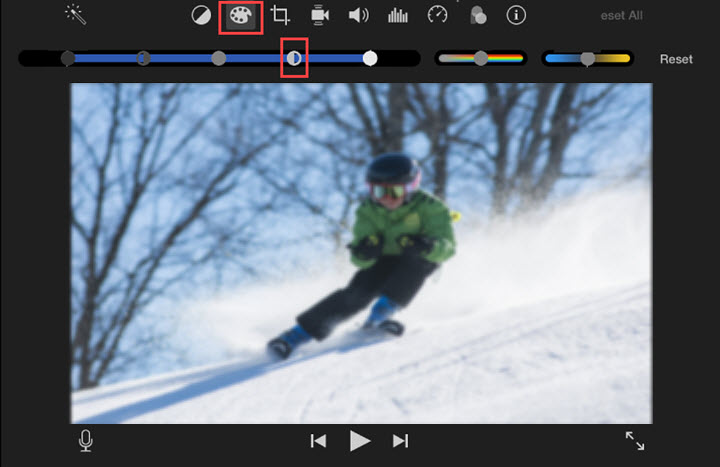
Step 3: You can adjust shadows, brightness, highlights, and saturation along with the sharpness adjustment to make your video look more natural.
Step 4: Save and export the fixed video.
Note: It is impossible to fix the blurry video in a perfect manner. The lower contrast cannot sharpen a blurry video, while the higher contrast will increase unwanted noise to your footage. The best way is to keep trying and finding a proper contrast to make the video clear as much as possible.
Bonus Tip 2: How to Clear Blurry Video Online for Free
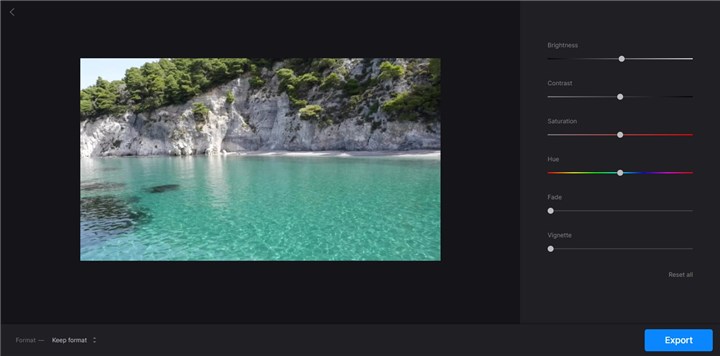
Want a video clear online? Online tools can free you from downloading and installing some programs on your computer. And to remove blur from video online for free, here we recommend you Clideo's Video Clearer tool. It is pretty much similar to iMovie in the way of fixing blurry videos. In it, you can adjust these parameters of the video file: brightness, contrast, saturation, hue, fade, and vignette, to make the job done.
But before we get into the detailed how-to steps, please note that there will be a Clideo logo on your finished video when you export it. By that you can use it for free, or you have to upgrade your account to Clideo Pro, which will cost you $9 per month or $72 per year.
Step 1. Go to this Clideo Video Clearer tool in your browser and upload your video by clicking on the Choose file menu. You can upload the files which are saved on your computer obviously, and also choose those files which are stored in your Dropbox and Google Drive.
Step 2. After importing finishes, then you will be in the editing page. There you can adjust the brightness, saturation, contrast, saturation, hue, fade, and vignette. Mostly, you can use brightness and contrast to make your video clearer.
When you're happy with your adjustments, click on the Export button.
Step 3. Choose the Download button to save the edited video on your computer or into your Dropbox or Google Drive account.


