Forward: Seeking how to compress a MOV file on Mac or online? Wonder how to shrink .mov file without lossing quality? If the answer is yes, then you've come to the right place.
MOV files are one of the most commonly used video formats, especially on Apple devices. They're often the go-to choice for high-quality video, whether you're recording with an iPhone or editing with software like Premiere Pro or Final Cut Pro. The catch, though?
MOV files can get massive because they often use high-quality but less-efficient codecs, like ProRes 422 or ProRes 4444. These codecs prioritize stunning video quality, but that comes with the downside of large file sizes.
😣 Managing, storing, and sharing large MOV files can quickly become a headache. For example, iCloud's 5GB of free storage can fill up fast with just one MOV file, and the 50GB iCloud+ plan ($0.99/month) can also be used up quickly if you have many .mov files. Sharing .mov files on social media is also tricky - on TikTok, for example, a 3-minute TikTok video must be under 500MB, but a 1-minute MOV can easily exceed 1GB.
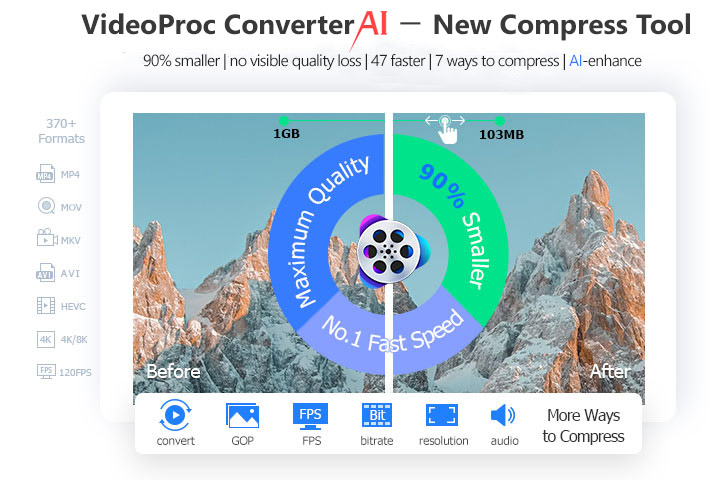
😁 The good news is, you can compress a MOV file by up to 90% without perceivable quality loss. And it's easier than you might think. In this post, I'll show you 7 simple ways to reduce size of MOV file to a manageable size, without compromising the picture quality.
- MOV is a popular video format developed by Apple, widely used on Apple dev
- MOV files tend to be large because they often use ProRes and other less efficient codecs.
- Large MOV files can be difficult to edit, upload, or share online.
- Compressing MOV files reduces their size, making them easier to edit, share, and play.
- The key is to shrinking MOV files without noticable quality loss, and it's easy to do with the ways covered in this post.
MOV Compressor Comparison on Output Size, Speed, and Quality
To fairly evaluate the real-world performance of these MOV compression methods, we conducted a functional benchmark focusing on three critical factors: control, speed, and quality.
Since different MOV compressor offers different levels of control, we grouped them based on whether they allow you to directly set the final file size (e.g., typing "75 MB") or if they only offer pre-set quality options.
Source Video: A 90-second 1080P MOV file, starting at 300 MB (High-Bitrate H.264/ProRes).
Target Compression Goal: 75 MB (a 75% reduction).
Method |
Control Type |
Operation Performed / Preset |
Final Size |
Time Taken |
Quality |
|---|---|---|---|---|---|
Direct Size Input |
Hit Compressor> Drag the slider to 25%. |
75 MB |
28 seconds |
No visible quality loss |
|
Method 2 |
Direct Size Input |
Hit Video Compressor> input 75 MB |
75.1 MB |
55 seconds |
Good quality |
Method 5 |
Direct Size Input |
Hit Advanced Options > input 75 MB |
75.0 MB |
120 seconds |
Visible quality loss |
Method 7 |
Target Selector |
Hit Output Settings > input 75 MB |
95.5 MB |
146 seconds |
Visible quality loss |
Method 3 |
Preset Only |
File > Export As > 720P (Lowest Preset) |
120 MB |
70 seconds |
Visible quality loss |
Method 4 |
Preset Only |
Share > Export File > Quality: Low |
150 MB |
90 seconds |
Visible quality loss |
Method 1. Compress MOV Files on Mac and Windows (Overall Best)
VideoProc Converter AI is consistently recognized as the best all-around tool for MOV compression, a fact supported by the speed and accuracy shown in our benchmark test. Its strength is giving you complete control over the final file size without sacrificing video quality.
The software handles almost all video files (370+ formats), including high-quality video types often produced by iPhones and professional editing software. The key to its success is its flexibility:
- Precision Size Control: Easily set a target file size (for example, 75 MB) by entering the value directly or adjusting a simple compression slider.
- Batch Compression: Shrink multiple MOV files at once by simply moving a slider, while still allowing individual control for each MOV file if needed.
- High-Quality Output: The application of the Maximum Quality Engine and the advanced x265/AV1 encoding technology lets you reduce video sizes by up to 90% without losing clarity.
- Full Control: Adjust advanced settings like GOP length, frame rate, and codecs to fine-tune the final size and quality.
It's the fastest option available. Thanks to Level-3 GPU acceleration, it can compress videos up to 47× faster than real-time playback. This means even 1 GB+ 4K MOV files can be compressed in just minutes.
Now let's download VideoProc Converter AI and then follow the steps below to reduce MOV file size on Mac and PC Windows:

Step 1. Import Your MOV Files
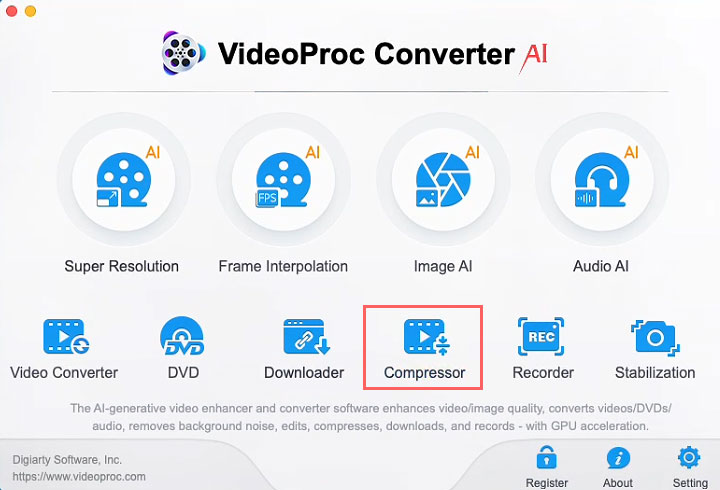
Install, and launch up VideoProc Converter AI. Click on Compressor.
Step 2. Compress MOV Files
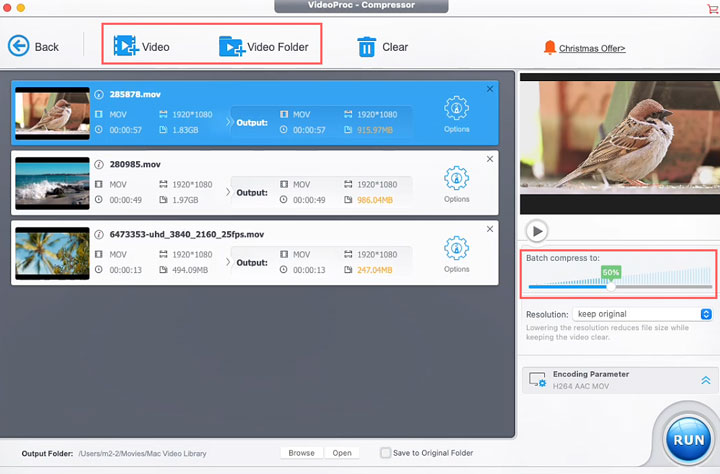
Drag and drop to import your MOV files. Adjust the slider to compress multiple MOV files at once. For example, setting it to 10% will reduce all the imported MOV files by 90%.
💡 Tips:
If you need to adjust an individual video, click the gear icon for that video to open its compression panel. Here, you can customize the settings just for that video, for example:
- Enter a target file size directly
- Move the compression slider
- Downscale the resolution
- And more

Step 3. (Optional) Set the Export Parameters.
You can skip these settings and use the default (MP4, H.264). But if you want, you can adjust the codec and format. For example, codec options include:
- H.264: The safest choice, works on almost all devices.
- HEVC: More efficient than H.264, so files can be smaller or higher quality, but not all devices support it.
- AV1: Even more efficient than HEVC, offering the best quality and smallest file sizes, but check if your device or platform supports it.
Step 4. Export the Compressed MOV Files
Check Use High Quality Engine for exporting the compressed MOV files with better quality. Hit RUN to start compressing the MOV files on Mac or PC Windows.
Bonus: More Ways to Make a MOV File Smaller
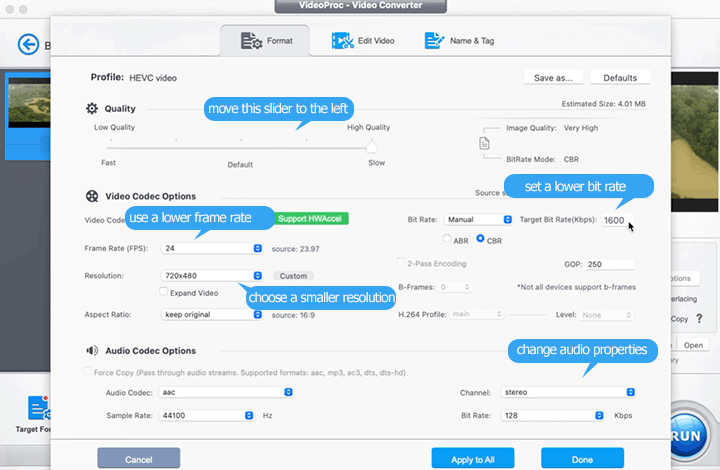
VideoProc Converter AI also offers a few other easy manners to compress a MOV file. After adding your MOV file to the program, go to the Target Format section, and then select a more efficient codec like MOV H.264 and MOV HEVC. Hit codec Option and then you can alter one or more compression parameters to further reduce the MOV file size.
- Move the cursor on the quality slider to the left
- Choose a smaller resolution such as HD 1080P and SD 720P
- Use a lower frame rate such as 24Fps and 30Fps
- Reduce the video bitrate to around 450Kbps ~ 6000Kpbs
- Decrease the audio bitrate to around 320Kpbs
- Remove the audio or convert the audio codec to AAC
Method 2. Compress MOV Files on Mac and Windows in VideoSolo
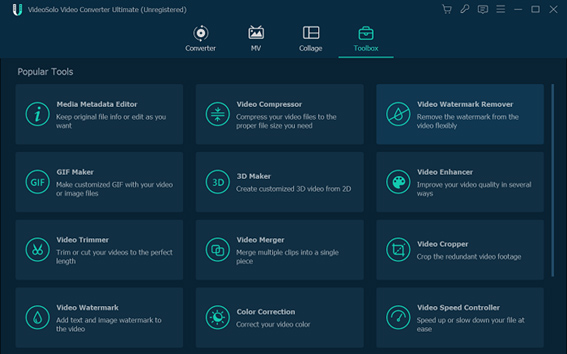
VideoSolo Video Converter Ultimate is a very powerful video editor. Among all the editing functions, its video compression feature is also very prominent. It helps you bulk compress video and audio files while maintaining very high output quality. During the compression process, you can also compress the video directly by adjusting the compression ratio and file size. In addition, depending on your needs, you can set the format, bit rate, resolution and so on. Follow the simple tutorials to have a try.
Step 1. Launch VideoSolo Video Converter Ultimate, then go to the "Toolbox" and choose "Video Compressor".
Step 2. Simply click "+" to add the MOV files that you want to compress.
Step 3. After adding the MOV files, you can go to "Change Source File" to adjust the file size and compress ratio according to your own needs. (Optional)
Step 4. After all the settings, you can click "Compress" to begin compressing MOV files on PC or Mac.
Method 3. Compress MOV File on Mac in QuickTime Player
Mac users? You're in luck as you can use the pre-build QuickTime Player to reduce size of MOV file on Mac with QuickTime for free.
Though I have to admit this media player has a very limited range of compression features. With it, you can't enter the exact bitrate value or frame rate value to make a .mov file smaller. From our test, QuickTime Player can work without errors only when being used to decrease MOV (MPEG-2/4 and H.264) files. Worse still, compressing a .mov file on Mac via QuickTime Player somewhat will cause horrible quality loss.
Step 1. Launch up QuickTime Player on your Mac.
Step 2. Press File on the top menu bar to find Import. Click this to feed the MOV file to QuickTime Player.
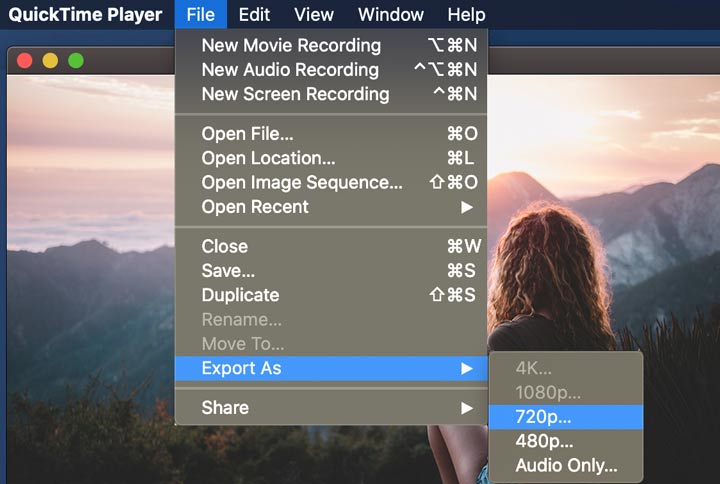
Step 3. Navigate to the menu bar and choose File again. Choose Export As from the drop-down menu of File.
Step 4. From the 5 options (4K, 1080P, 720P, 480P, and audio only), select the one that is lower than the original resolution.
Method 4. Compress MOV File on Mac in iMovie
Mac users can also take advantage of iMovie to compress MOV file size for free. This easy video editor can reduce the MOV file to half to the original size or even smaller. However, it is not the perfect solution to condense the MOV file for two reasons. In a nod to beginners, iMovie simplified the quality control options a lot, offering you only rough options like Low, Faster, and Medium to downsize the MOV file.
Besides, iMovie is a CPU-oriented program that might take around 90% of your CPU resource to compress MOV file to a smaller size. Anyway, let's take a look at the answer to how do I reduce the file size of a .MOV in iMovie.
Step 1. Open up iMovie. Press Project, click on the plus button on the top left of the window, and then you select Movie. Choose No Theme on the pop-up query box. Afterward, select Create.
Step 2. Drag and drop the file that comes with .mov as the extension name to iMovie.
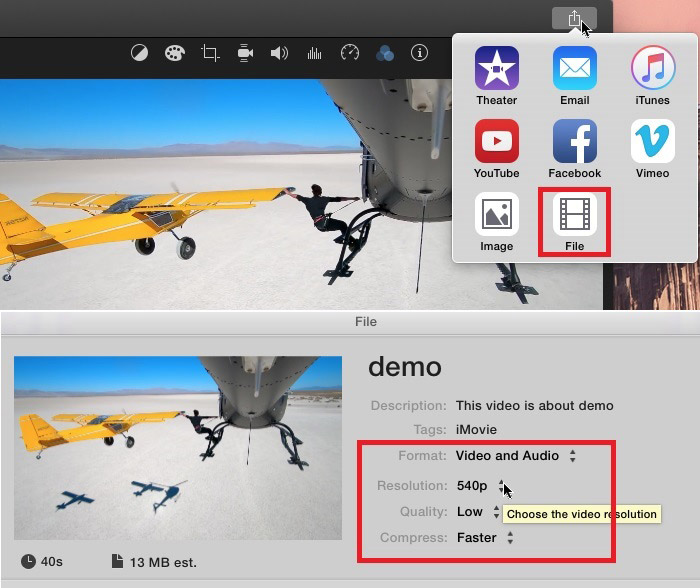
Step 3. Press File on the top menu bar, choose Share and select Export File.
Step 4. Now you've come to the setting panel for your video. There are 4 options to shrink the MOV file size.
Step 5. According to your demand, you can choose a resolution lower than the original MOV file; pick the desired quality level since the higher quality level equals a larger file size; set Faster as the compressed mode.
Step 6. Choose Next. Enter the name for the output file and define an output file folder. Next, you press Save. iMovie starts helping you reduce MOV file size on Mac.
Method 5. Compress MOV Files Online in Freeconvert
Freeconvert can compress MOV file less than 1GB to 60+ formats in relatively fast speed. Moreover, this handy online MOV compressor allows you to adjust the bitrate, codec, and several other parameters, so you have different ways to make a MOV file smaller on Mac and Windows.
Step 1. Open Freeconvert on your browser.
Step 2. Hit File, and then you chose the MOV file you want to compress for importing to the app.
Step 3. Choose MOV, MP4, or another format as the result video file type.
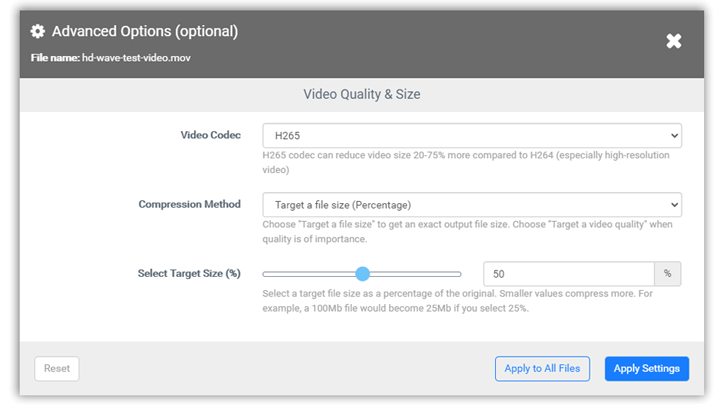
Step 4. Choose the tool icon to navigate yourself to the Advanced Options page.
Step 5. Select H265 as the Video Codec. Afterward, you can compress the size of the MOV file by selecting:
- Target a file size (Percentage) and then moving the size slider left.
- Target a file size (MB) and then entering the desired output MOV file size.
- Target a video quality/resolution/bitrate and then adjusting the corresponding value.
Step 6. Hit Apply Setting. Press Compress Now to compress MOV file online.
Method 6. Compress MOV Files Online in PS2PDF
PS2PDF Video Compressor offers a flexible way for people to compress MOV files online for free. The feature I love most about this online toolkit is it allows you to reduce the MOV file size by percentage. Surely, you can still adjust the resolution and constant rate factor to get a high quality compressed MOV file.
Unfortunately, PS2PDF cannot compress large MOV files. From our test, it won't recognize a MOV file with a size larger than 250MB. Another disappointing thing is the support of MOV output is absent. The extension of the video file will change from .mov to .webm or .mp4 after the compression.
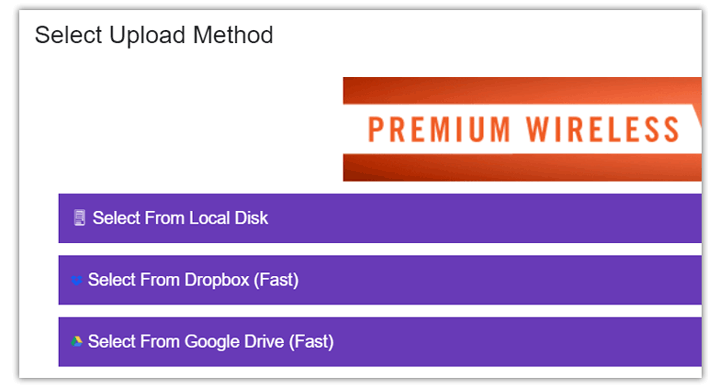
Step 1. Visit the official site of the PS2PDF compressor on your browser, press File.
Step 2. Choose Select From Disk, Select From Dropbox (Fast), or Select From Google Drive (Fast) to import the MOV to the online MOV compressor from local disk, Dropbox, or Google Drive.
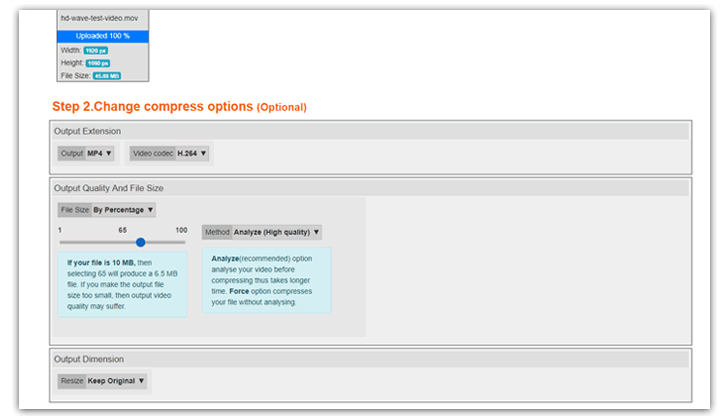
Step 3. Choose MP4 or WBEM as the output file container and select H.264 as the video codec.
Step 4. On the setting panel of Output Quality And File Size, you can make some adjustments for a better yield out.
- Choose By Percentage as File Size, move the cursor on the quality slider to adjust the compression ratio.
- Choose By Preset Quality, select the favored preset to shrink the MOV. A faster preset usually refers to a smaller outcome video size. You'll also need to assign a proper value for Content Rate Factor. Note: the smaller the content rate factor value, the slower the MOV compression speed.
Step 5. Press Compress Now to start to reduce the MOV file size online.
Method 7. Compress MOV Files Online for Free in Veed
VEED.io is a versatile online MOV compressor. This user-friendly platform allows you to reduce MOV file size directly from your browser, eliminating the need for additional software. With Veed video compressor, you can select your preferred resolution and image quality, ensuring your videos remain clear and professional.
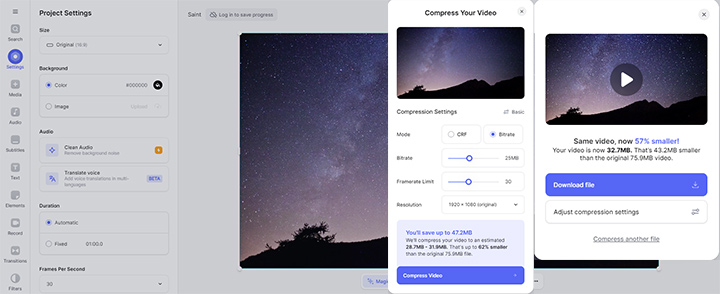
However, the file size control of the Veed video compressor seems inaccurate. When I set the target size to 25MB, the compressed MOV file size reached 32.7 MB. And the upload-download process is time-consuming. In addition, if you make any other edits to the video, the output .mov file will have a watermark and quality restrictions.
Step 1. Visit Veed video compressor in your browser.
Step 2. Click Choose MOV File to upload an MOV file. Batch compression is not supported.
Step 3. Adjust compression settings according to your needs.
Step 4. Start compressing by clicking the Compress Video button.
Step 5. Download and save the compressed MOV file to your device.
FAQs
1. What Is a MOV File?
Apple initially created MOV in 1998 as a container format to use in QuickTime player. A MOV file or the file with .mov as the extension is QuickTime(QT) file format. The data inside a MOV file might include video compressed in codecs like HEVC, MPEG-4, and H.264/AVC, audio codec compressed in codecs like AAC and MP3, and countless other media data.
2. Why Is My MOV File So Big?
MOV is a video container format which has nothing to do with the final file size. The thing that makes your MOV file large is the media data inside the capsule. A MOV can hold video data encoded by the advanced lossy codec like HEVC and H.264, the lossless codecs like Motion JPEG, and the low compression efficient codecs like Apple ProRes and Cinepak. Since the big file size is one of the key features of the latter two codecs, it's no surprise your MOV file is bulky.
3. Does compressing a MOV file always reduce its quality?
Not necessarily. While compression inherently involves reducing data, advanced video compressors like VideoProc Converter AI utilize efficient codecs (e.g., H.265/HEVC) and smart algorithms that can drastically shrink file size (up to 90%) with no visible quality loss. The key is to choose a powerful tool that offers precise control over settings like resolution, bitrate, and codec, allowing you to balance file size and visual fidelity effectively.
4. Are there any limitations when using free or online MOV compression tools?
Yes, free and online tools often come with limitations. Common drawbacks include:
- File size limits: Many online tools restrict uploads to a few hundred MBs or 1GB.
- Noticeable quality loss: They may use aggressive compression settings that degrade video quality.
- Slower processing: Online tools depend on your internet speed and server load.
- Limited control: Fewer options to customize output settings (codec, bitrate, resolution).
- Privacy concerns: Uploading sensitive videos to third-party servers.
- Watermarks: Some free versions add watermarks to the output.