MTS files are less popular than MOV and MP4 files these days. From time to time, you may meet playback errors or video editing errors when the files are MTS videos. So, how to convert MTS to MOV on Mac and Windows computers? Before we get started, here are some quick facts about MTS.
Developed by Microsoft, MTS video file (abbreviated for MPEG Transport Stream) are widely used in digital camcorders, such as those from Sony, Canon, JVC, Panasonic, etc. This container format stores high-definition video streams, including 720×480, 720×576, 1280×720, 1080i, 1080p, as well as standard definition videos. Though these days, we have higher resolutions such as 2.7K, 4K and even 8K that are stored in MOV and MP4 containers.
MTS file may be a headache these days, for instance:
- QuickTime won't play MTS files sometimes
- MTS file is not supported on iPhone and iPad using the default player
- Video editing software such as Final Cut Pro, Premiere Pro and iMovie may freeze on MTS files
Here are 3 easy ways to convert MTS to MOV, let's get started.
Method 1. How to Convert MTS to MOV with VideoProc Converter AI
The easiest way to convert MTS to MOV format is to use a professional converter named VideoProc Converter AI. It is developed by the leading company in video processing, Digiarty Software, Inc., and are loved by 5.2 million users from 180 countries.
VideoProc Converter AI — Convert MTS to MOV and More
- Convert MTS/M2TS/TS and 370+ popular and rare formats
- Convert DVD, Camcorder, AVCHD videos to MOV/MP4/MKV etc.
- Option to enhance video quality, fix low light, upscale resolution
- Toolkit to edit, merge, record, download videos besides conversion
- Full-level hardware acceleration tech: 47x faster conversion speed
![]() Excellent
Excellent ![]()
Follow these steps to convert MTS to MOV in VideoProc Converter AI:
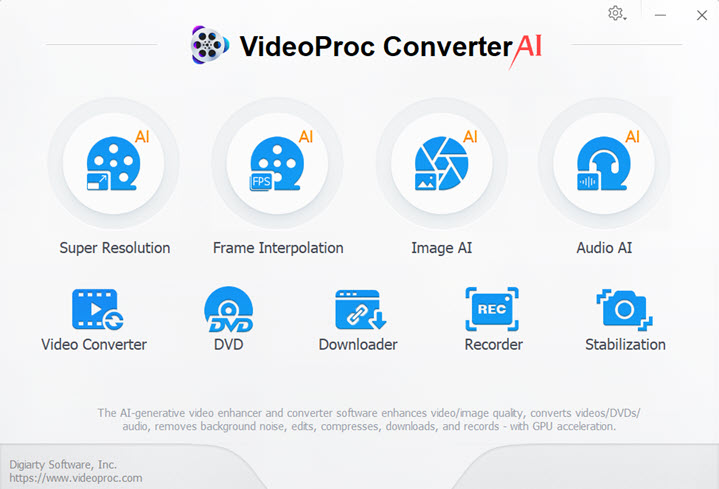
Step 1. After downloading and installing VideoProc Converter AI, go to the Video section from its main interface.
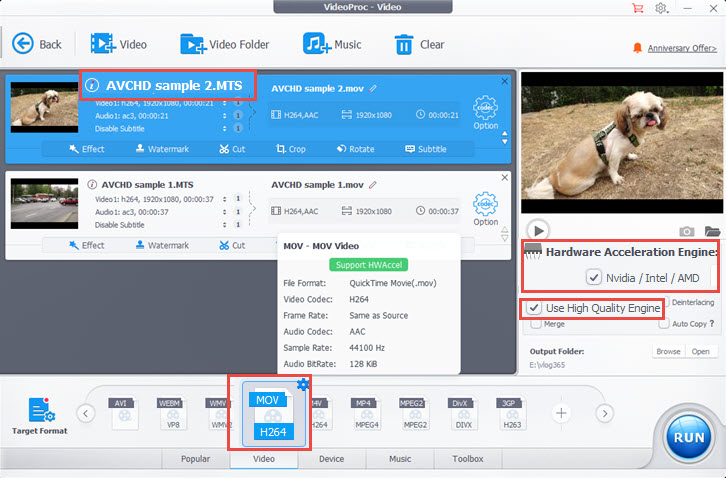
Step 2. Add MTS file into VideoProc Converter AI.
You can also add TS, M2TS, and many other video formats. VideoProc Converter AI supports batch conversion to save your time.
Tips: You can add multiple MTS/M2TS/TS files into VideoProc Converter AI.
Plus, you can also tick the Merge option at the right side (above the Run button). When the Merge option is enabled, all the videos will be merged into one. As we already know, the camcorder usually split one video into many scattered MTS files. The merge option here is quite handy to join them into one.
Step 3. Choose MOV profile as the target format.
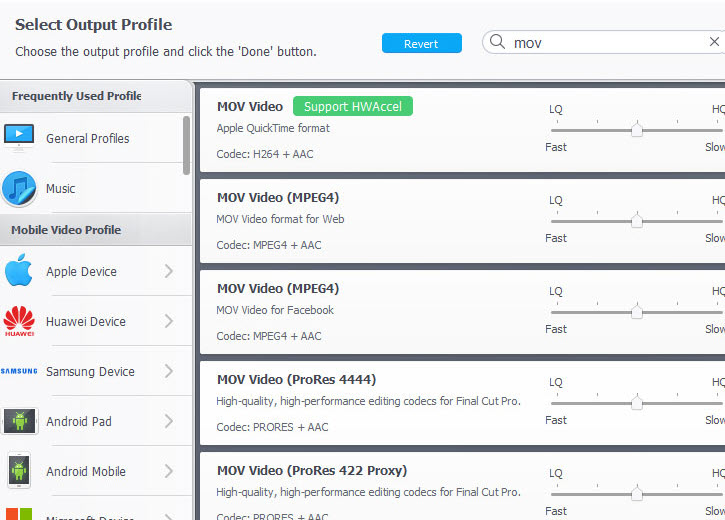
At the bottom of the interface, you shall see the Target Format section. Under the Video tab, you can find the default MOV H264 profile. Click to select it.
Tips:
For your convenience, VideoProc Converter AI has 420+ output formats built-in, which are designed for many devices, platforms and general usage. Besides MOV H264, you can also select other MOV profiles for your specific scenario.
To name a few: MOV video for Facebook, MOV video for Web, 4K MOV profile and MOV ProRes for further editing in Final Cut Pro and other video editing software.
Step 4. Click the Run button to convert MTS to MOV.
Above the Run button, you can also tick the option "Use high-quality engine". It will ensure the video has the best quality while remaining reasonably small in file size.
Plus, you can enable Hardware Acceleration to take advantage of the Nvidia/Intel/AMD hardware on your computer, thus boosting the conversion speed. VideoProc Converter AI supports full-level hardware acceleration tech.
Tips:
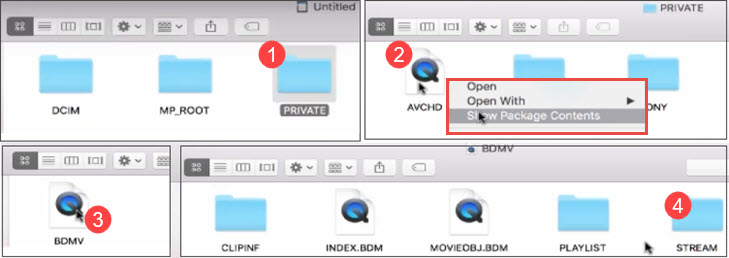
M2TS and MTS files are generally found AVCHD folder from camcorders and other cameras. Using VideoProc Converter AI, you can also convert AVCHD to MP4, MOV, MKV, AVI, FLV and 420+ formats.
The MTS files inside the camera storage can usually be found here: PRIVATE > AVCHD > BDMV > STREAM.
For Mac users, the AVCHD folder is viewed as a bundle (package). You can right-click and hit Show Package contents to view the MTS files inside.
VideoProc Converter AI Makes Video Conversion a Breeze! Learn More
Method 2. How to Convert MTS to MOV with VLC Media Player
Many of us are using VLC media player to play movies and music, but do you know that it has a hidden conversion feature? Although it doesn't support as many video formats as the tool in method 1, MTS to MOV conversion is supported.
Follow the steps below to convert MTS to MOV in VLC.
Step 1. Install VLC media player from its official site.
Step 2. Launch VLC and click Media > Convert/Save from its menu.

Step 3. In the newly opened Window, click the Add button under the file tab.
Step 4. Go the path where you store the MTS file, and add the video into VLC.
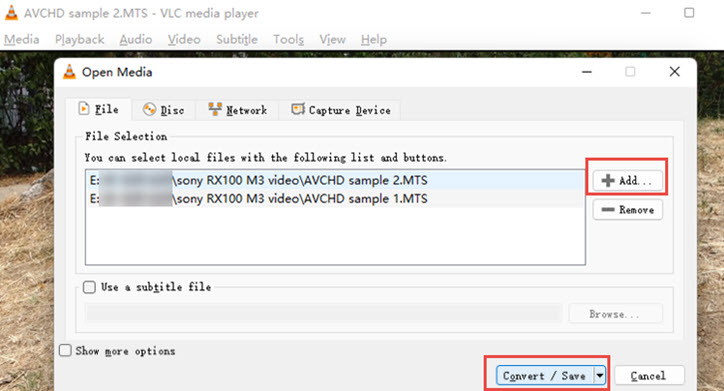
Step 5. Click the Convert/Save button at the bottom to open up the new dialogue window.
Step 6. In the profile section, click the wrench icon, and select the MP4/MOV option.
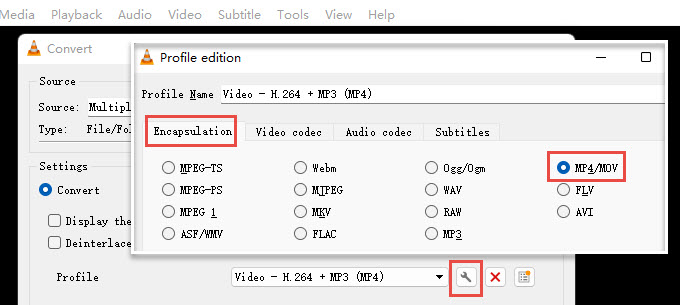
Step 7. Click the browse button to designate an output directory.
Step 8. Click the Start button to convert MTS file.
Remember to change the .mp4 container to .mov when saving the file.
If you are on Mac, the workflow is similar, except that some options use different names. Plus, if you don't love the workflow of VLC on Mac, you can also use one of these best video converters for Mac to transcode files.
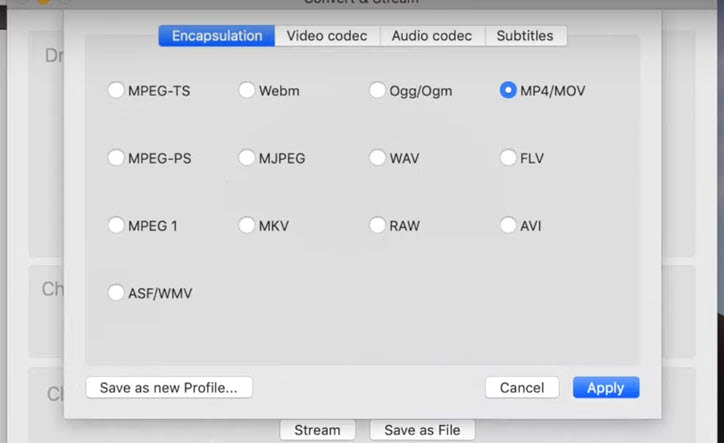
Step 1. Go to File > Convert/Save (Shift+Cmd+S)
Step 2. Click the Open Media button to load MTS files.
Step 3. Click the Customize button, and under the Encapsulation tab, choose MP4/MOV option.
Step 4. Under the Audio codec option, choose "Keep original audio track".
Method 3. How to Convert MTS to MOV QuickTime with CloudConvert Online Tool
For short videos, you can also use an online converter to transcode MTS to MOV QuickTime format. CloudConvert Online tool is a trustworthy one, given the fact that it doesn't have Ads pop-up during the conversion.

Besides MOV, it also supports MP4, MKV and image formats such as PNG and JPG.
Follow these steps to convert MTS to QuickTime MOV:
Step 1. Go to the MTS-to-MOV conversion page on CloudConvert here:
https://cloudconvert.com/mts-to-mov
Step 2. Upload your MTS video to its server.
Step 3. Adjust codec settings if needed.
For instance, you can choose the video quality by tweaking the CRF value. Lower value corresponds to better quality and consequently longer conversion time.
Step 4. Click the Convert button.
The method works nicely for short videos, as it takes a shorter time to upload and download. For large videos, it may exceed the free trial limit on the one hand, and it can crash or stuck during uploading and downloading process, on the other hand.
Note: CloudConvert free trial offers 25 conversion minutes per day, where "conversion minutes" is a term that can be understood as credits.
FAQs
Will re-wrapping MTS video files as MOV result in quality loss?
No. If you use the correct settings and make sure there are enough bitrates of the video, there won't be any perceivable quality loss. The MTS container supports MPEG-1,2,4, H264/AVC and VC-1 codec, while MOV permits H.264, H.265/HEVC, Apple ProRes MPEG-2, XVID(MPEG4-ASP), etc. As they both support certain codec, you can remux the video without transcoding to preserve 100% quality.
How to Play MTS file in QuickTime Player?
Sometimes you will encounter playback error using QuickTime player for MTS files. In such a case, you can resort to the converters introduced on this page. Converting MTS to QuickTime compatible MOV or MP4 will solve the problem.
How to batch convert MTS file for video editing?
Batch converting MTS files to video-editing-friendly formats helps save time and improve efficiency. It is especially true for Mac users. Without a dedicated converter, you may need to un-pack the AVCHD folder, and convert MTS file one by one. Using VideoProc Converter AI introduced in method 1, you can batch convert MTS file or directly import the AVCHD folder to convert.


