Wondering how to record screen on Mac with audio? Screen recording is not difficult but is an essential daily routine for some. Gamers may want to capture an epic boss kill, while students may need to record a Zoom meeting.
However, the software variety is less diverse on Macintosh. QuickTime is great for video capturing but not audio. MacOS doesn't allow QuickTime screen recording with internal audio. Is there any easy software to record screen Mac with audio? Here in this article, we list some of the best screen recording software to help you record screen on Mac with audio easily.
1. Use a Screen Recorder for Mac
- Best for: Record screen on Mac with system sound and microphone
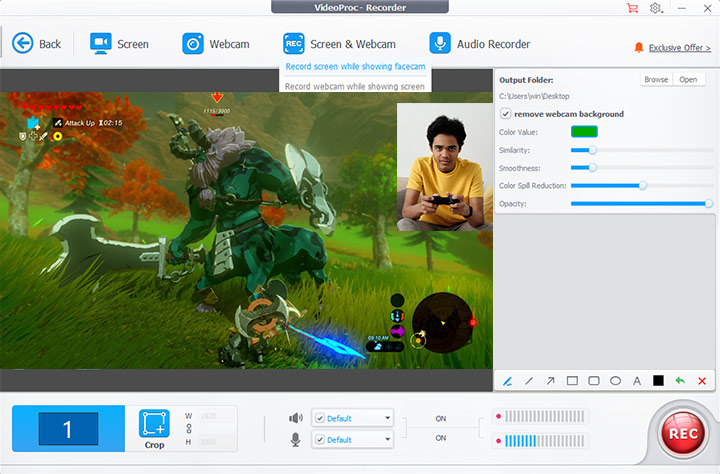
As said, the preinstalled software is easy to use but barely satisfactory. A dedicated screen recorder for Mac is always a more reliable choice. VideoProc Converter AI is screen capture software you can't miss. It's a versatile video processing tool with a built-in screen recorder. You can easily record gameplay, webinars, live streams, or anything else on your screen with external or internal voice.
Here's how to record HD or 4K screen on Mac with audio using VideoProc Converter AI.
- Download and install VideoProc Converter AI. It supports macOS 10.13 and later with Intel and Apple silicon.
- Launch the program and bring up the Recorder from the welcome screen.
- Set recording settings. Click Desktop to record your entire Mac screen. Use the Crop button to specify the area if you want to record part of the screen. Also, there are options to record webcam, system sound, and microphone at the same time.
- Click REC to start recording.
- Click the STOP button when the recording is complete.


VideoProc Converter AI — Built-in Screen Recorder Mac
- Free and super easy to use with no time limits; good customer services
- Record the entire or part of the screen with system audio
- Various recording formats, including MOV, MP4, FLV, MKV, etc
- High-quality recordings in 4 modes: screen, webcam, PiP, audio
- Handy tools to make simple edits with screen recorded
- One-stop video and audio converter for Mac, DVD converter, and downloader
2. QuickTime Screen Recording with Audio
Key Takeaway:
- Good built-in app to record Mac screen with microphone
- Require third-party software to record internal audio
- Recordings can be very large in size with the MOV format
QuickTime might not be the best for recording internal sound, but it's handy when recording presentations or tutorials where the narration matters. It's preinstalled with every version of macOS. Whether you want to screen record MacBook Pro with audio, MacBook Air, or any other Mac machine, you are covered.
Besides, please note that QuickTime can only record in MOV format, and the recordings tend to be bulky. To record Mac screen with internal audio using QuickTime player, you may need to download third-party software like BlackHole or Soundflower.
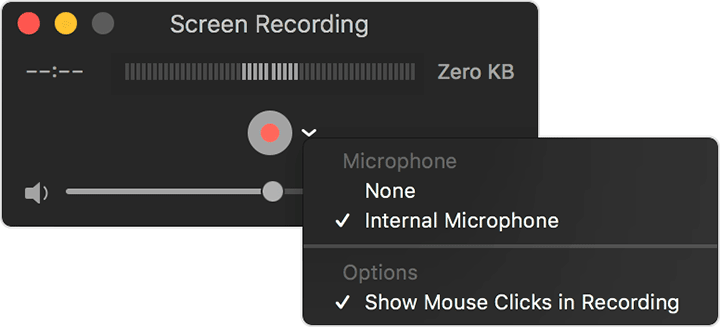
- Open QuickTime Player.
- Go to File > New Screen Recording from the top menu bar.
- Click the arrow icon to set recording settings. Choose whether to record microphone and mouse clicks.
- Click the Record button to start recording.
- Press Command, Control, and Esc together to stop recording in QuickTime.
3. Streaming Recording Mac with OBS
Key Takeaway:
- Best open source app for recording and live streaming
- Complex settings require a little steeper learning curve for beginners
- The default MKV recording format can be changed to MP4 and others
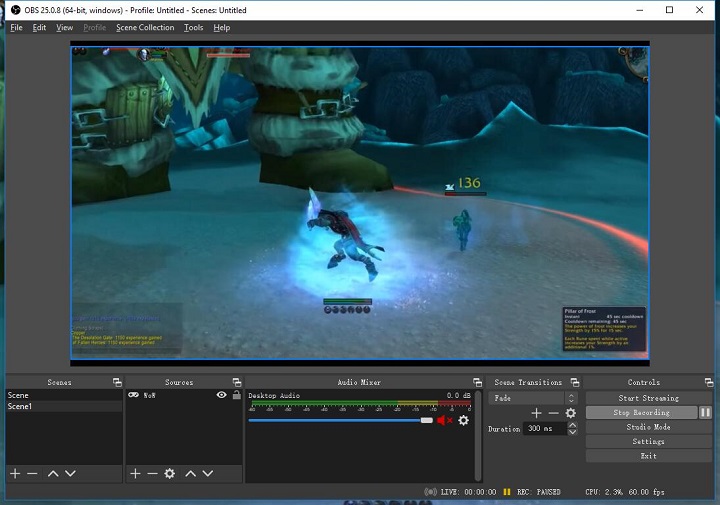
OBS is another free screen recorder for Mac. Designed for screencasting and live streaming, it's popular among game streamers and YouTube tutors. For streaming, you can set up an unlimited number of scenes you can switch between seamlessly. Thus, it could be taxing on CPU and memory. Compared with other screen recording software, there is a little steeper learning curve for beginners.
- Download and install OBS Studio on your device.
- Launch the program. OBS should add a scene automatically in the Scenes section. If not, click the + icon to add one manually.
- Go to the Sources box, then click the + icon and select Display Capture to create a new source. Click OK in the pop-out dialog box to use the default settings. If you are using multiple monitors, select the one you want to record from the drop-down list.
- Click File > Settings > Output from the menu bar. Click the Browse button to set the recording path. Your screen recordings go here on your Mac.
- Start recording using the Start Recording button.