In today's digital world, knowing how to record audio has become an important life skill. Whether you want to start a podcast, create YouTube videos, save an important work meeting, or keep some memories alive, Windows 11 gives you the tools to get started with ease.
In this guide, we'll show you 3 ways to record audio on Windows 11 with professional quality. Follow along as we explore each method in detail. We'll get you started with capturing quality audio on your Windows 11 PC and turning your recordings into something worth sharing.
How to Record Audio on Windows 11 with VideoProc Converter AI
VideoProc Converter AI is a versatile screen recorder running on Windows 11, 10, 8, 7, and Mac. Along with the screen recording, it records internal audio from apps and systems and audio from microphones. And it offers a full list of recording settings to adjust the format, quality, file location, and so on, and enables you to save audio from the screen recording in MP3, M4A, WAV, AAC, FLAC, and any formats you need.
Aside from being the best screen recorder, VideoProc Converter AI has been packed with converting, editing, compressing, and downloading features. And it’s worth noting that it runs smoothly and fast on all recent computers with its Level-3 Hardware Acceleration.
Now download and install VideoProc Converter AI to record audio on Windows 11 with ease!
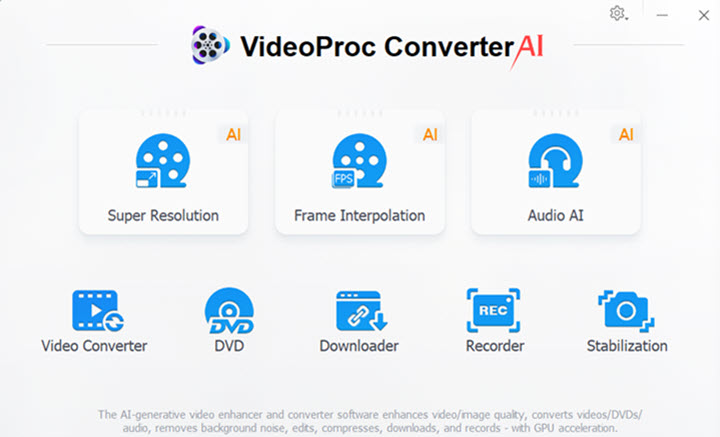
Step 1. Open VideoProc Converter AI and select "Recorder" on the main interface.
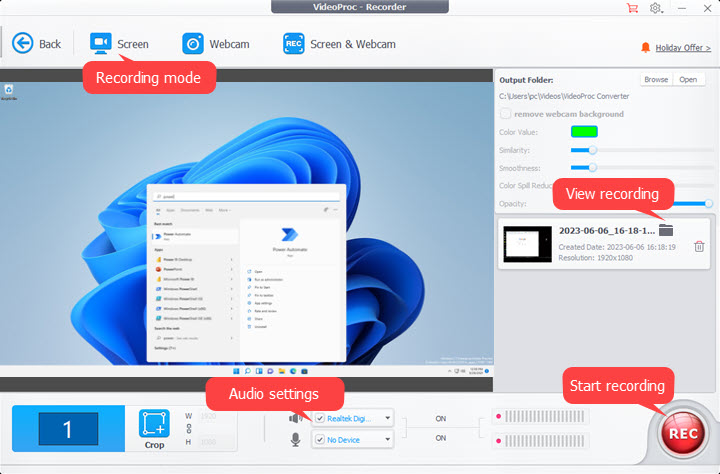
Step 2. Select "Screen" on the top section. Then move to the audio settings. Choose the external and internal audio sources that you want to record.
Step 3. Play the audio or start speaking with your mic. Click "REC" to start recording. Stop recording when the audio is over. Click the file folder icon to find the recording file.
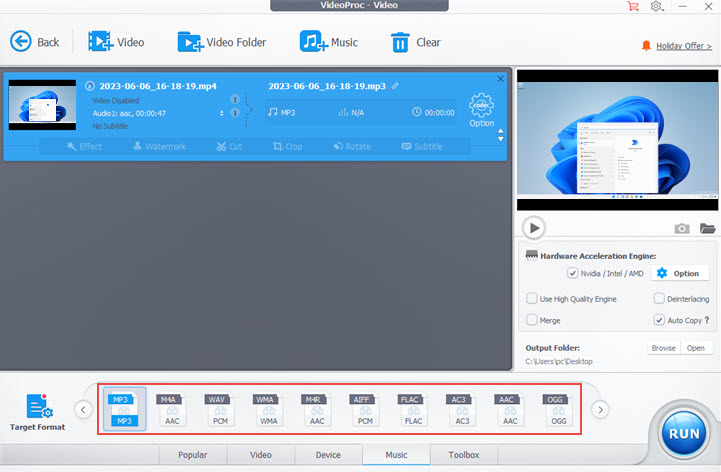
Step 4. Exit from the Recorder center. Click "Video" on the main interface. Drag and drop the recording file to it. Click "Music" at the bottom bar to select an audio format, such as MP3. Click "RUN" to export. Now you get an audio recording file with the internal sound or mic sound on Windows 11.
How to Record Audio on Windows 11 with Sound Recorder
In the past, you can record audio on Windows 10 with its built-in Voice Recorder. But then Microsoft remove this app and re-designed a new app called Sound Recorder to record audio from an external microphone on Windows 11. Compared to its predecessor, Sound Recorder allows you to switch the mic, choose the audio format, and adjust audio recording quality but canceled the quick editing features like trimming.
Step 1. Open Sound Recorder. You can find it by searching Windows.
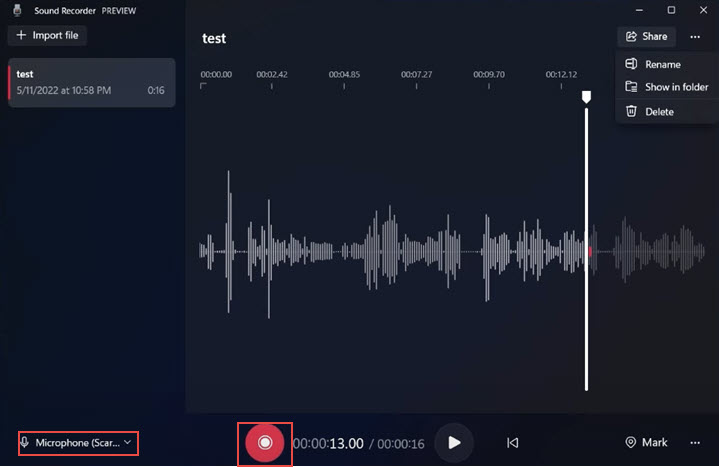
Step 2. Click the mic icon to choose the input audio. Hit the red record icon to start recording. During the recording, you can pause, and add markers. Hit the red button again to stop recording audio.
Step 3. Click Share > Show in folder, and you can find the audio file just saved.
Note:
Sound Recorder only records audio from microphones connected to your Windows 11 PC, and CANNOT record internal sounds from systems or apps.
How to Record Audio on Windows 11 with Game Bar
Game Bar was designed for recording game highlights and Xbox player chatting in Windows 10 and Windows 11. As it can be activated outside of games, it’s often used as a basic screen recorder. If you are looking for free software to record screen with audio on Windows 11, try Xbox Game Bar with the following steps.
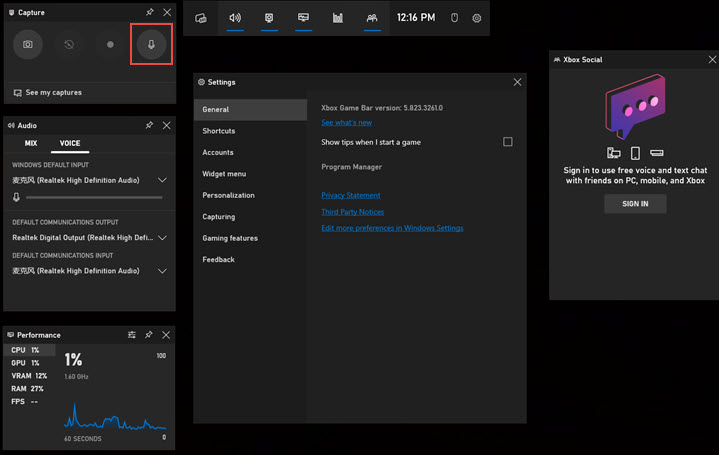
Step 1. Press the Windows logo key and G on your keyboard to launch Xbox Game Bar.
Step 2. Enable audio recording of the microphone. Go to Audio > Voice to choose the microphone.
Step 3. Click the recording button to start and end the recording process. Click "See my captures" to find the recording file just saved. Now you can preview the screen recording with sound on Windows 11.
Note:
Game Bar cannot record audio only. You have to use other tools, like say, VideoProc Converter AI, to extract audio from the screen recording after screen recording in Windows 11.
FAQ
Did Microsoft remove Voice Recorder in Windows 11?
Specifically speaking, Voice Recorder was replaced by Sound Recorder in Windows 11. The latter comes with a new visualization for audio while recording and previewing, more recording formats, and devices to change within the app. You can find Sound Recorder by searching Windows.
Where are Sound Recorder files stored in Windows 11?
To check the file path, click the Share icon on the top right corner, and select Show in folder. Audio recordings are saved within the Sounder Recorder app. Once you uninstall it, the recordings will be deleted.
Why is Sound Recorder not working on Windows 11?
The Sound Recorder app needs permission to access the microphone. Make sure it has access to Windows privacy settings. It could also be an outdated app; update it from the Microsoft Store. Corrupted system files may cause issues, run DISM and SFC scans to repair. Audio hardware problems could also be a culprit; ensure the microphone and audio drivers are working properly.


