There are times when you need to remove vocals from a song; for example, when you cannot find a suitable original accompaniment but want to make a Karaoke version of a song; when you need to split one or more audio tracks/parts for re-mix, mashup or further editing; when you want to isolate some instruments like bass, drums and piano to create minus one or a cappella.
Unlike a video, audio and music cannot be seen (although technically you can if you use a music visualizer). Yet unlike our ears which can distinguish different sounds easily, tools cannot hear and would not be that smart. But the truth is each sound has a signal wave. Things will be much easier if you know knowledge about common ranges of audio frequency or say, spectrum, especially in music. Please see the following information.
Audible band: 20-20000Hz
Human voices: 500-1000Hz
- Male: reference sound range: 64-523Hz; Bass: 82-392Hz; Baritone: 123-493Hz, tenor: 164-698Hz;
- Female: reference sound range: 160-1200Hz; Bass: 82-392Hz; mezzo-soprano: 123-493Hz; soprano: 220-1.1KHz.
It sounds technical. But you don't have to be that professional if only you make use of some good audio editing software applications.
The following text will introduce 6 vocal removers (even free vocal isolation software) that can help you get rid of lyrics or singing from a song completely. Let's dive in!
1. VideoProc Converter AI – An All-in-One Toolkit with AI Vocal Remover
Price: Premium (5 minutes free audio exporting)
Operating System: Windows, MacAmong all the vocal removal tools, VideoProc Converter AI is the most recommended since it utilizes advanced AI to accurately analyze and separate the vocal and background music parts. You can choose to keep either the instrumental track or the vocal track for different uses.
It can extract vocals from audio and video files, supporting 370+ formats like MP3, WAV, FLAC, AAC, M4A, M4R, MP4 (HEVC, H.264, AV1), MKV, MOV, AVI, FLV, and more. Compared with online vocal removers, it is safer, faster, and friendlier for batch processing. It also has Noise suppression to help remove unwanted background noise in songs or videos.
Better still, VideoProc Converter AI is a one-stop multimedia software integrated with an AI video/image enhancer, video/audio/DVD converter, downloader, compressor, recorder, and editor.
Let's download and try this beginner-friendly software.
VideoProc Converter AI — Not Only Removing Vocals
- All-in-one software: AI-enhance, convert, process, download, and record.
- Remove vocals or background music from songs or videos.
- Reduce unwanted background noise from video/audio files.
- Embrace 370+ video/audio formats. Batch processing supported.
![]() Excellent
Excellent ![]()
How to Automatically Remove Vocals from Audio/Videos in VideoProc
Step 1. Free download and install VideoProc Converter AI on your PC or Mac.
Step 2. On the main interface, choose Audio AI. Then drag your source audio or video into the interface to load the file. It supports batch inputs and processing.
Step 3. Tick Vocal Remover on the right operation panel. Choose "Keep Instruments" (which means removing the Vocals). Then click "Preview 15s" to start AI interfering, and you can listen to the processed segment to preview.
Step 4. Under Export Settings, you can select Video Codec, Audio Codec, Quality Level, GOP, and Output Folder.
After all settings, hit the big RUN button to start removing vocals from a song.

2. Audacity - A Free Way to Reduce, Split and Isolate Vocals
Price: Free
Operating System: Windows, Mac, Linux
Audacity is a popular free and open-source audio editor and recorder. Starting in 1999, it has long been a solid solution for many DJs and music lovers. It can be used for multitrack mixing, scrubbing, playing MIDI, cutting, normalizing, fading in/out, adjusting pitch, changing speed, analyzing spectrum, reducing noise, and so on.
As for removing vocals, it provides several ways, including reducing vocals, isolating vocal tracks, and splitting audio tracks in the same software.
Case 1: How to Remove Vocals from a Song for Free in Audacity
Best for: center-panned vocals (i.e. the vocals are panned in the center channel of stereo music). This works for most cases.
Step 1. Download, install and open Audacity.
Step 2. Drag a song into the board as a new project.
Step 3. Press Ctrl + A or the header on the left to select the track, go to Effect, and tap Vocal Remover.
Step 4. Choose one of the three options as your Removal choice, and click on Preview. Try them one by one and click OK until you've chosen the most ideal one.
Step 5. To remove the vocals, you'd better know the general range of vocals in the song. Enter two values between 0 and 200000, for example, input 100 as the lowest frequency and 12000 as the highest.
Tips: Things are different in different songs, so it's better to figure out the specific range of vocal frequency in the song you are going to process.
Step 6. Tap File and choose Save Project and then export as MP3 or another audio format.
Cons:
- In some cases, you can still hear some reverb on it.
- You cannot remove layered vocals.
Case 2: How to Remove a Mono Vocal Track in Audacity
Best for: vocals that are recorded or mixed in mono (one channel). This works for most songs from the 1960s.
Step 1. Load the song you wish to edit by drag-or-drop or File > Open.
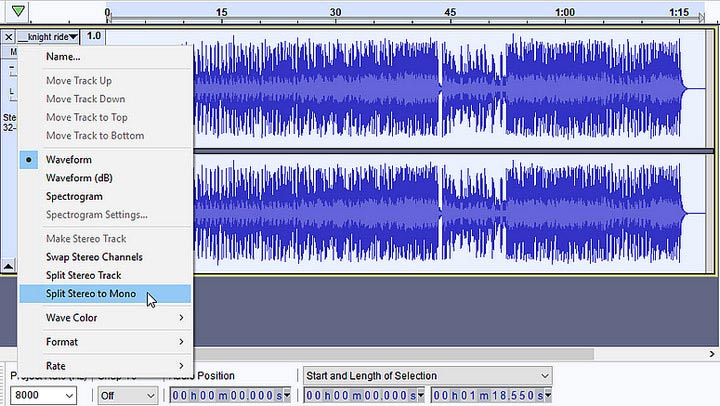
Step 2. Go to Track Control Panel, tap the downward arrow, and click on Split Stereo to Mono
Step 3. Delete the vocal channel by clicking X.
Cons:
- This works only for most songs from the 1960s.
Case 3: How to Isolate Vocals in Audacity
Best for: a Stereo Vocal Track
Step 1. Load the audio file.
Step 2. Select the soundtrack and go to Track Control Panel, choose Split Stereo Track to convert the stereo track to mono.
Step 3. Select the bottom track, go to Effects and choose Invert.
Step 4. Find the drop-down arrow next to the audio file name, and delete the unwanted channel.
Cons:
- You will sometimes hear echo, reverb or backing singers and generally anything that is still stereo.
- You may lose some bass in the music because bass is also usually mono.
3. Logic Pro – A Non-destructive Audio Track Editing App of Apple
Price: Free
Operating System: Mac
As the fundamental of GarageBand, Logic Pro is another audio editing software application developed by Apple Inc. It provides scores of software instruments, audio effects, and recording features. It can edit MIDIs and supports Apple Loops.
How to Isolate Vocals and Invert Phase on Mac in Logic Pro
Step 1. Get Logic Pro on your macOS and open it.
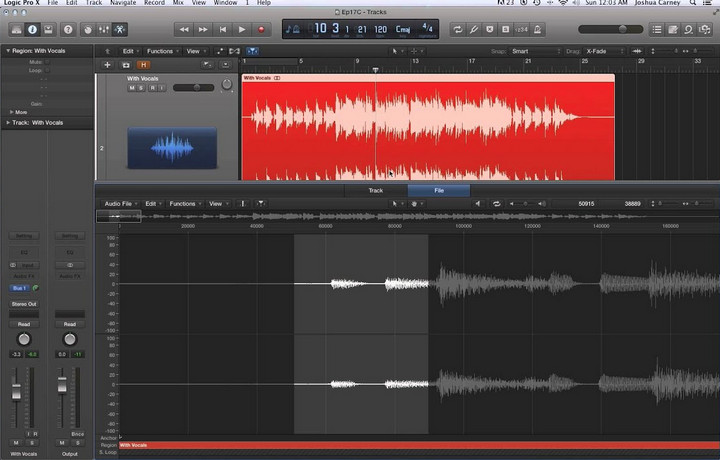
Step 2. Drag to add a music file to the session, duplicate the track, and make them parallel.
Step 3. Insert an effect, go to Utility, choose Gain, and then stereo will do exactly the same for our audio track to soak up both of these gain controls visible in our session.
Step 4. Swap the left and right channels and invert the phase thus canceling the vocal track using Phase Cancellation and getting the Karaoke track.
4: GarageBand – A Free Music Creation Studio by Apple Inc.
Price: Free
Operating System: Mac, iOS
GarageBand is a professional yet free music creating app on Mac and iOS. It is a one-stop digital audio workstation to play, record, create and share self-created music. Differently, it has a large library that embraces different sounds, instruments, and voices, so one can produce works even without an instrument.
To remove lyrics in a song in GarageBand, which is different from vocal (volume) reduction, it is easy and is similar to the last case in Audacity above.
How to Isolate Vocals in GarageBand
Step 1. Open GarageBand, tap File to open one of your recent projects, or click Audio to add a song.
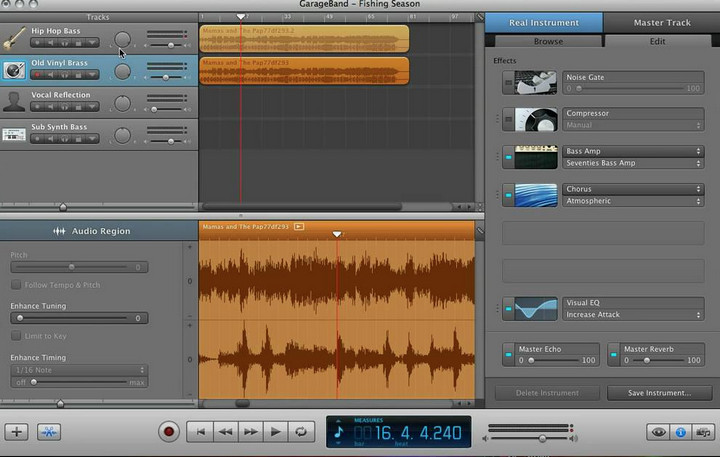
Step 2. On the interface hit the eye icon, and then find Effects, open Graphic Equalizer, and choose Manual.
Step 3. Open the equalizer in a separate window to adjust the volume of each frequency band. Then reduce the frequency range of the human voice in the song. You can refer to the vocal frequency here.
Step 4. This step is to invert the track: tap the audio > Command + C & Command + V to make a duplicate, and then move the audio to the left or right to make the two parallel. Turn the Pan dial fully left on the first track and fully right on the second track.
Step 5. Delete the middle tracks and then click on Save As to save the inverted files as the new audio track.
Cons:
- GarageBand cannot run on Windows OS.
- This method may not work on old digital recordings.
5. Celemony Melodyne – A Note-based Audio Editing Software for Professionals
Price: $99 for essential, $299 for assistant, $499 for Melodyne 5 editor
Operating System: Windows, OS X
Not everyone knows of Melodyne, because it is only popular among musicians and professionals. By editing directly on notes (instead of waveforms), this plug-in audio editor enables you to edit volumes, pitches, intonation, sibilants, duration, timing, vibratos, format, rhythms, grooves, etc. All complicated factors and parameters in music can be recognized by this tool and can be edited in a straightforward way.
Melodyne uses a Polyphonic algorithm to identify and extract vocals from a song. It is best for a stereo-mixed version. Let's learn how.
How to Separate Vocals from Background Music in Melodyne
Step 1. Download, install and open the latest version Melodyne.
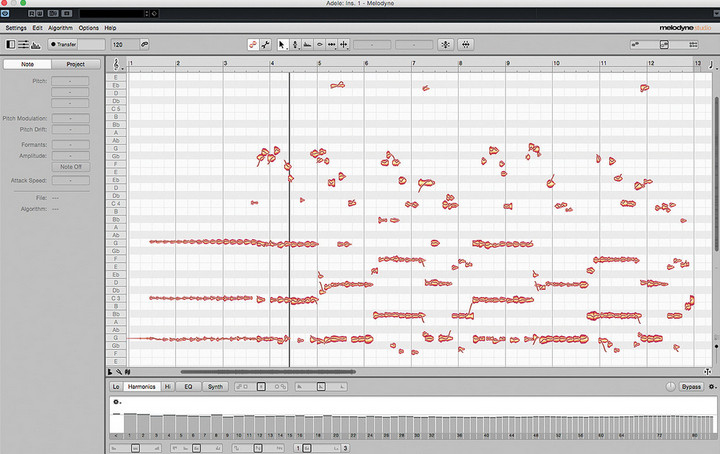
Step 2. Add the audio file into the dashboard, click on transfer to let the editor analyze your audio. Make sure that Polyphonic algorithm has been chosen.
Step 3. Wait until you see a collection of note blobs and watch them, find some regulation, and try to detect which is the vocal track according to the approximate pitch range. Regularly, they are the bigger blobs since the vocals are usually louder. Listen to them to make sure.
Step 4. Delete the blobs that carry vocals.
Cons:
- This vocal isolator is paid and expensive.
- You may lose some instrument elements, depending on different songs.
- The vocals may sound unnatural, depending on different songs.
6. Remove-vocals.com - An Online Service to Do the Tricks Free
Price: Partly free. You can edit 7 songs free per week.
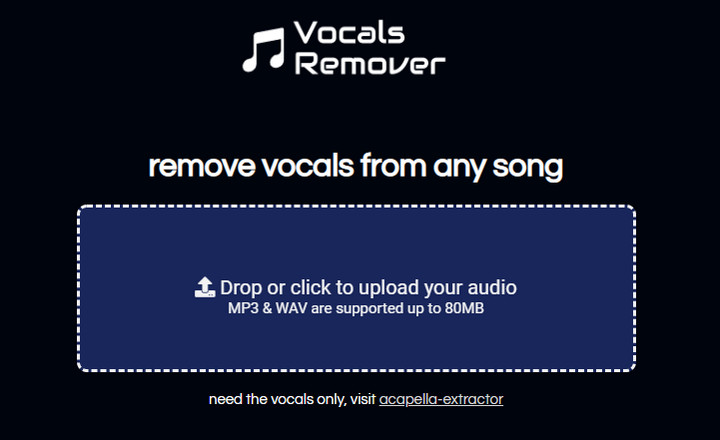
This is the best karaoke converter that is free and easy to use. Like most online tools, this vocal remover is a no-brainer. You don't have to download any software or register. It uses AI technology to analyze and process your audios. The outcome is good if you just need an accompaniment.
How to Remove Vocals from Music Free Online
Step 1. Open https://www.remove-vocals.com/en/ on your browser.
Step 2. Drag an audio file from your computer to the server, it may have the following notices: The server is a bit busy… You can number x in line. Hang on (keep this page open)!
Step 3. It starts processing without noticing and the notice goes as: The band is re-recording without the singer… This could take a minute or two (keep this page open)...
Step 4. After the vocals are isolated, click on the blue Download the Instrumental button to save this accompaniment wav file onto your computer. If necessary, please save the URL because your files will be kept for 24 hours.
Cons:
- Only supports MP3 (a lossy format) and WAV (a lossless format).
- Has a limit of 10 minutes in length and 80MB.
- Although free, it asks for donation and credits purchase during the process.
- There may be some chorus or concord left in the file, and you cannot adjust it manually.
Is It Possible to Split Instruments in a Song? How?
Instead of vocals, some people need to split instruments in a music file to turn them into different tracks to make a minus one or a capella.
Indeed, the theory is similar to that of removing vocals. But you need to know the range of frequencies of different instruments. Please look at the tables below:
Musical instrument
- Bass/Bass guitar: frequency response: 700-1KHz; twang: 60-80Hz
- Electric bass: bass at 80-250Hz; twang: 250-500Hz
- Electric guitar: 65-1.7KHz; loudness: 500Hz, fullness: 240Hz
- Wooden guitar: bass string: 80-120Hz, piano box sound: 250Hz
- Drum: Bass drum: 27-146Hz, bass: 60-80Hz, percussion sound: 250Hz
- Snare drum: fullness: 240Hz, loudness: 240Hz
- Floor drum: fullness: 80-120Hz
- Hanging hairpin: 130-2.6KHz
- Accordion: fullness: 240Hz
- Piano: bass 80-120Hz
- Trumpet: 146-2.6KHz, fullness: 120-240Hz
- Violin: 174-3.1KHz, fullness: 240-400Hz, twang: 1-2KHz
- Cello: 61-2.6KHz, fullness: 300-500Hz
- Viola: 123-2.6KHz
- Flute: 220-2.3K
- Piccolo: 494-4.1KHz
- Oboe: 220-2.6KHz
- Clarinet: 146-2.6KHz
- Bassoon: 55-2.6KHz
- French Horn: 73-2.8KHz
- Trombone: 65-2.6KHz
- Tuba: 43-2.6KHz
Key Takeaways
We have introduced 6 different ways for vocal removal. But one method or tool does not apply to all songs. The truth is, most songs have layered vocals, and vocals are mixed, for example, with bass, kick, and snare. So you should try more than one way listed in the post for different cases. But even so, outcomes are not always as we expected. There would be echoes and stuff. In a few cases, you may also have to do more manual settings, such as raising or lowering the frequencies of vocals or some instruments in the songs. Just give them a try and wish yourself good luck.
FAQ
Is it legal to remove vocals from a song?
It is quite clear that it is illegal if you re-edit copyrighted music for commercial use without having the permission of the copyright owners. Especially, you are not lawfully allowed to remove the vocals from others' copyrighted songs and share them on YouTube, Facebook, Podcast, or other media platforms.
What is phase cancellation?
Phase cancellation is one of the most common technologies used for vocal removal. Indeed, it is a phenomenon that happens when two or more similar waveforms are against each other and cancel out each other if the combined (identical) waveforms are out of phase. Playing two similar signals will either have an increase in amplitude or totally be silent.
How to turn a song into an instrumental?
Turning a song into an instrumental is the same as removing vocals from a song. So just follow the song to Karaoke converters listed in the article.

