Unintended sounds come for all—hums from electrical equipment, poor room acoustics, low-quality equipment, environmental noise, etc. Removing these noises in your recordings can instantly enhance clarity and professionalism, whether you are a podcaster, musician, or recording voice notes. Adobe Audition can remove background noise with different tools, but getting started might feel overwhelming.
Here, you'll follow a simple noise reduction process: analyze and identify the noise, then remove it. This two-step approach keeps things easy for beginners by recognizing unwanted sounds and choosing the right tool to reduce them. We'll show you how to remove background noise in Adobe Audition with the most effective tools to achieve clean and polished audio.
Pro Tip:
Adobe Audition offers a lot of effects to remove background noise, but getting started might feel overwhelming. VideoProc Converter AI offers a faster, AI-driven background noise remover to reduce repetitive work with high-quality audio outputs. To show you what I mean, here are some examples of before and after noise reduction.
| Noise type | Before | After |
|---|---|---|
| Hiss noise | ||
| Street noise |
1. Use the Spectral Frequency Display
The Spectral Frequency Display in Adobe Audition lets you visually locate and target unwanted sounds based on their unique frequency signatures. Use the Spectral Frequency Display to identify specific noises as visible patterns at certain frequencies. While you may not hear the noise, you can actually see it on your screen. This display itself doesn't remove noise; instead, it helps you pinpoint it for precise editing. Here's how to enable the Spectral Frequency Display.
- Double-click the audio in the Files panel to open it in the Waveform Editor.
- Click the Spectral Display button in the toolbar.
- Use your mouse or the button to zoom in or out the time (x-axis) and the frequency (y-axis).
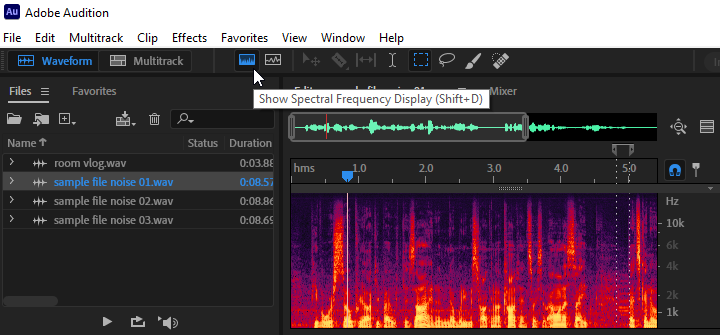
Tips: Brighter colors represent greater amplitude components. Colors range from dark blue (low‑amplitude frequencies) to bright yellow (high‑amplitude frequencies).
2. Use Sound Remover
The Sound Remover effect in Adobe Audition is designed to remove distinct, recurring noises by analyzing a sample of the unwanted sound. Use Sound Remover when you have specific and isolated noise patterns, like a siren or door slam, that need to be minimized without affecting the main audio. Here's how to remove background noise in Adobe Audition with the Sound Remover effect.
- Select an area on the waveform with only the noise to remove using the selection tool.
- Right-click and select Learn Sound Model in the context menu.
- Deselect the area, then use the Time Selection Tool to select a clip containing the noise.
- Go to Effects > Noise Reduction/Restoration > Sound Remover from the top menu bar.
- Adjust the effect as you play the clip to hear the changes.
- Click Apply when you are happy with the results.
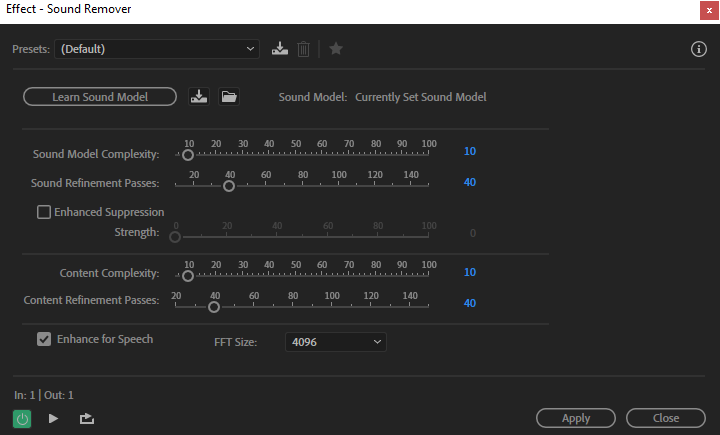
Tips: Enable "Enhance for Speech" for audio files containing speech.
3. Use Noise Reduction
The Noise Reduction effect in Adobe Audition works well for removing steady noises, like a constant hum or air conditioning. Use Noise Reduction when you have a consistent background noise that runs through the entire recording, which you can easily identify and capture. Here's how to remove background noise in Adobe Audition using the Noise Reduction effect.
- Select a portion of the recording where only the noise is present.
- Right-click and select Capture Noise Print to analyze the noise.
- Deselect the analyzed portion to apply it to the entire audio.
- Go to Effects > Noise Reduction/Restoration > Noise Reduction.
- Stick with the defaults or adjust settings for the best balance between noise removal and audio quality.
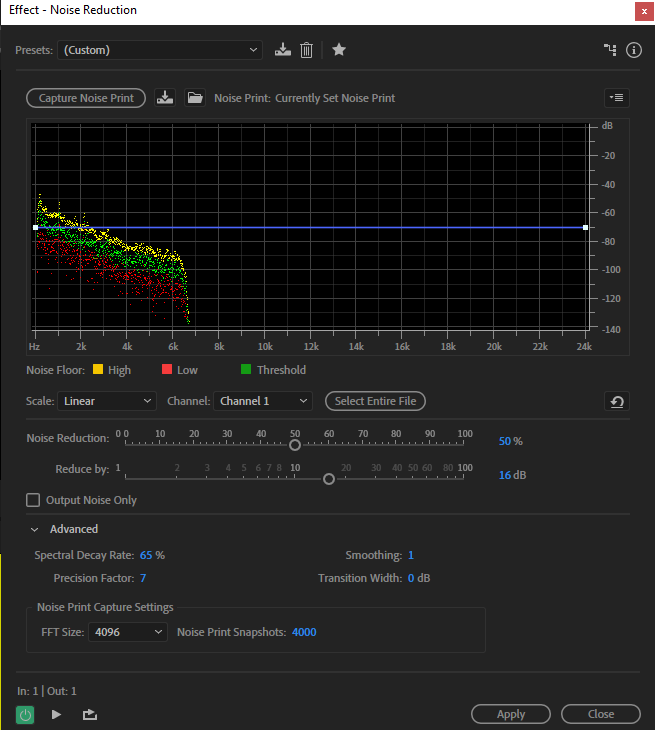
Tips:
- Noise Floor shows the amplitude of detected noise at each frequency.
- Noise Reduction controls the percentage of noise reduction in the output signal.
- Reduce By determines the amplitude reduction of detected noise. Values between 6 and 30 dB work well.
4. Use Adaptive Noise Reduction
The Adaptive Noise Reduction effect is ideal for removing varying background noise levels, such as crowd chatter or shifting wind sounds. Use Adaptive Noise Reduction when dealing with uneven or inconsistent noise that changes in volume or frequency over time. You don't have to take a profile of the noise, as it continuously adapts to fluctuations in background sound. Here's how to use Adobe Audition to remove background noise.
- Open your audio file.
- Go to Effects > Noise Reduction/Restoration > Adaptive Noise Reduction.
- Adjust parameters while previewing audio.
- Click Apply to save the changes.
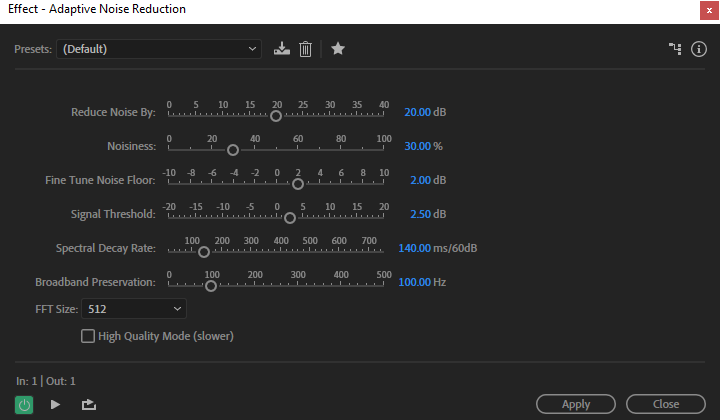
Tips:
- Reduce Noise By determines the level of noise reduction. Values between 6 and 30 dB work well.
- Fine Tune Noise Floor allows manually adjusting the noise floor above or below the automatically calculated floor.
- Spectral Decay Rate determines how quickly noise processing drops by 60 decibels. The more you apply, greater noise reduction with fewer artifacts you have.
5. Use Hiss Reduction
The Hiss Reduction effect in Adobe Audition is tailored to reduce high-frequency hissing sounds, often found in old recordings or recordings with poor-quality equipment. Use the Hiss Reduction effect when you have a consistent, high-pitched hiss running through your audio. It can greatly lower the amplitude of a frequency range if it falls below an amplitude threshold called the noise floor. Here's how.
- Open your audio file.
- Sample the audio with the hiss using a selection tool.
- Go to Effects > Noise Reduction / Restoration > Hiss Reduction.
- Click the Capture Noise Floor button.
- Enable Output Hiss Only to hear hiss and see if the effect is removing any desired audio.
- Click Apply when you are happy with the results.
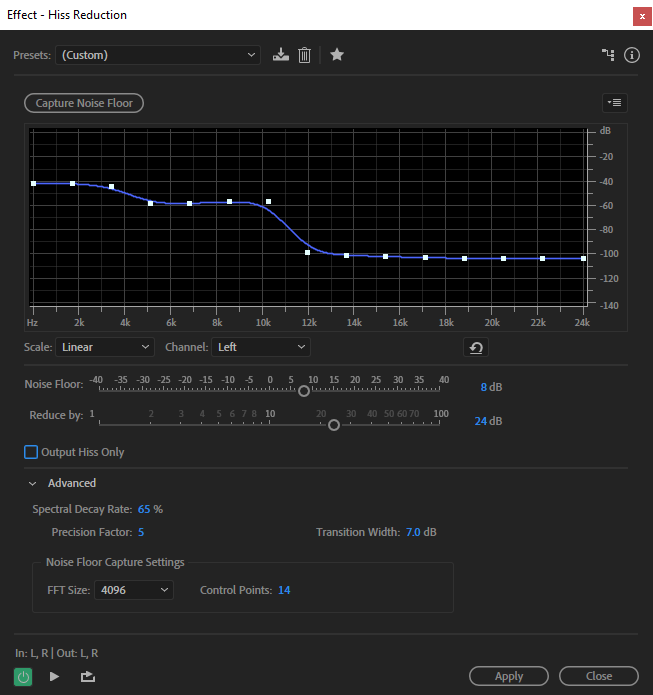
Tips: The Noise Floor means that any sound below the threshold will be removed and any sound above it will remain untouched. So after capturing the noise floor, you may want to lower the control points on the left (representing the lower frequencies) to make the graph as flat as possible.
6. Use the DeHummer Effect
The DeHummer effect can eliminate low-frequency hums, such as electrical interference from equipment or AC power sources. Use the DeHummer effect when you hear a steady, low hum at fixed frequencies, often around 50 Hz or 60 Hz. Here's how.
- Open the audio file.
- Go to Effects > Noise Reduction / Restoration > DeHummer.
- Choose a preset to quickly address typical audio problems.
- Lower the Number of Harmonics to remove the hum but keep the voice.
- Use the Gain setting to control the amount of reduction applied to the hum.
- Preview and fine-tune until the hum is minimized without affecting the desired audio.
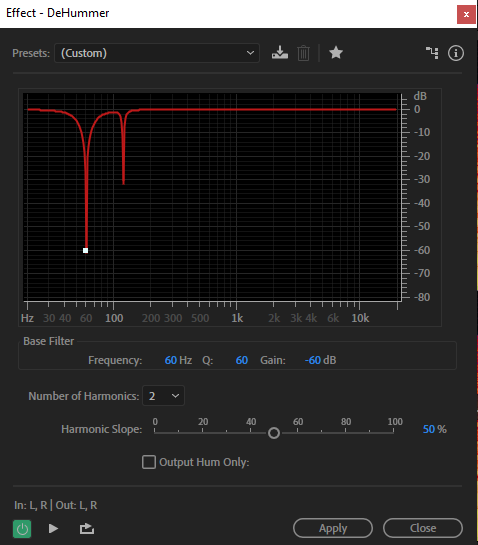
Tips: Generally, you'll only need to adjust the options of Frequency and Number of Harmonics. To remove the AC hum from the power line, set the frequency to 60 Hz for North America and 50 Hz in most parts of the world.
7. Use Automatic Click Remover
The Automatic Click Remover is ideal for removing sharp clicks and pops, often found in vinyl recordings or audio affected by digital glitches. Use Automatic Click Remover when you have sporadic clicks or pops disrupting the smoothness of your audio. It offers the same options as the DeClicker effect, but you can combine it with other background noise removal effects. Here's how.
- Go to Effects > Noise Reduction / Restoration > Automatic Click Remover.
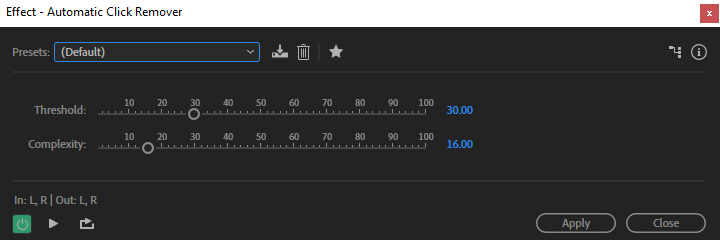
- Adjust Threshold to determine how many clicks and pops to include. Lower settings detect more but may include audio you want to keep.
- Set Complexity to determine how much processing to apply.
- Preview the changes and click Apply to save.
8. Use Auto Heal
Auto Heal is the quickest repair of small and individual audio imperfections in selections of four seconds or less. It analyzes the surrounding audio and seamlessly fills in the gaps. Use Auto Heal when you need to fix minor, isolated issues that stand out in an otherwise clean recording. Here's how.
- Paint on the noise with the paintbrush, marquee, or lasso selection tool.
- Go to Favorites > Auto Heal in the top menu bar.
- Adobe Audition will automatically process the selected area, blending it with the surrounding audio.

9. Use the Vocal Enhancer
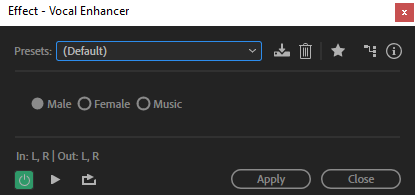
The Vocal Enhancer is a quick preset to improve the clarity and presence of spoken voices, making it ideal for podcasts, voiceovers, and interviews. The Male and Female modes automatically reduce sibilance and plosives. The Music mode optimizes soundtracks so they better complement a voice-over.
Use Vocal Enhancer (Effects > Special > Vocal Enhancer) when you want to make vocals stand out or sound more polished, especially in recordings where voices are overshadowed by background noise.
10. Fix Distorted Audio in the Diagnostic Panel
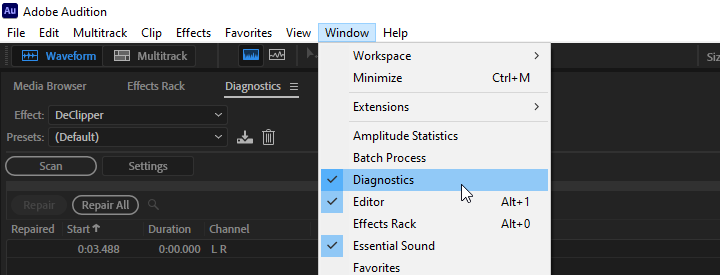
Distortion occurs when audio levels are too high, causing clipping and loss of detail. The DeClipper effect can help restore clarity by reconstructing clipped waveforms. Use the DeClipper effect when your audio sounds harsh or overloaded due to excessive volume. Here's how.
- Open your audio file.
- Enable the Diagnostics panel by clicking Window > Diagnostics.
- Select DeClipper from the Effect drop-down menu.
- Use Scan to detect clipped areas.
- Click Repair All to process them.
11. Use the Essential Sound Panel
The Essential Sound Panel in Adobe Audition provides an accessible way to apply common audio adjustments quickly. It's particularly useful for those working with voice recordings, such as podcasts, dialogue, and interviews. For those familiar with Adobe Premiere Pro, you'll recognize a similar Essential Sound Panel available there. It's especially helpful for those who aren't audio experts but need professional-sounding results. Here's how.
- Drag and drop the audio clip to an empty track in a multitrack session.
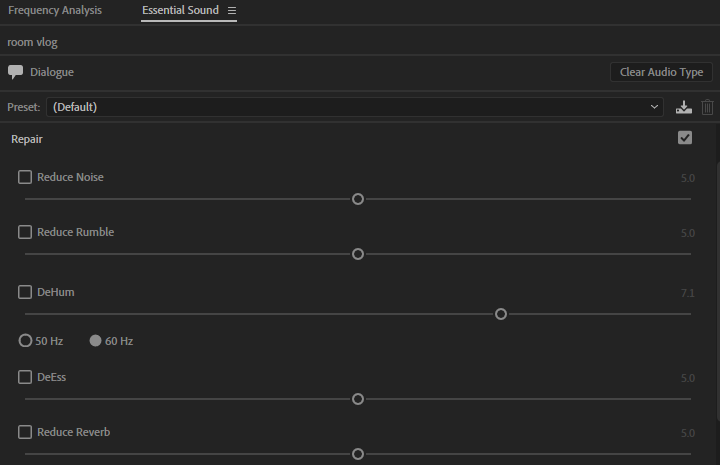
- Active the Essential Sound panel by clicking Window > Essential Sound.
- Select the audio clip and select the clip type as Dialogue.
- Click to expand the Repair Sound check box.
- Use the slider to adjust the property that you want to change.
Tips:
- Reduce Noise controls the level of the noise reduction in the background.
- Reduce Rumble reduces very low-frequency sounds and plosives below the 80-Hz range.
- DeHum reduces single-frequency noise from, for example, electrical interference.
- DeEss removes harsh, high-frequency ess-like sounds such as sibilance.
- Reduce Reverb eliminates the reverb from audio recordings.
12. AI Background Noise Remover
While Adobe Audition offers robust noise reduction tools, sometimes an AI-powered background noise remover can make the process more automated and deliver faster results.
VideoProc Converter AI provides an easy solution for AI Noise Suppression. It simplifies the process, saving time and ensuring high-quality audio with minimal effort. You don't need to manually take a profile of the noise then remove it. The advanced AI algorithms will do the heavy repetitive work, so you can focus on the creative part.

VideoProc Converter AI - AI Remove Background Noise Automatically
- AI automatic detect & remove background noise for clear sound quality
- Remove unwanted hum and hiss, fans, air conditioner, or other noises
- Support 370+ codecs and 420+ formats, FLAC, MP3, AAC, MOV, AVI…
- Batch process multiple video and audio files simultaneously
- Can run on a low-configuration computer even with only a CPU
After downloading and installing VideoProc Converter AI on your device, you can follow the steps below to remove background noise from your video and audio files with AI.
Step 1. Go to Audio AI from the welcome screen.
Step 2. Import your file and enable AI noise suppression.
Step 3. Choose a model and adjust the intensity of noise reduction.
Step 4. Export the denoised files.
Tips:
- Move the Noise Attenuation Limit slider to adjust the level of noise suppression between 0 through 100. The further to the right the slider is, the greater the value, the more noise reduction you'll get. Set to 6-12 for little noise reduction and 18-24 for medium reduction.
- Set the Post-Filter Threshold to control how much additional noise is removed after the initial noise suppression process. A lower threshold (0.01-0.02) provides lighter filtering, preserving natural sound for quiet environments, while a higher threshold (0.03-0.05) applies stronger filtering, useful for moderate noise, such as background hum or distant chatter.
- Use the Volume Control slider to adjust the value of Gain if the volume is lower than expected after the noise removal.
Quick Reference: Use Cases for Audio Cleanup Effects
| Tool | Best Use Case |
|---|---|
| Spectral Frequency Display | To visually identify specific noise patterns for targeted reduction. |
| Sound Remover | For distinct noise patterns (e.g., sirens) that need precise removal. |
| Noise Reduction | Ideal for steady background noise, like hums or air conditioning. |
| Adaptive Noise Reduction | For noise that varies in volume or frequency, like crowd noise. |
| Hiss Reduction | To target high-frequency hissing in recordings. |
| DeHummer | For low-frequency hums, such as AC or electrical interference. |
| Automatic Click Remover | For removing sharp clicks or pops, common in vinyl or digital glitches. |
| Auto Heal | For minor imperfections, like small clicks or pops. |
| Vocal Enhancer | To improve vocal clarity and presence, especially in dialogue. |
| DeClipper | To repair distortion from clipped audio peaks. |
| Essential Sound Panel | For quick, all-in-one noise reduction and enhancement. |
| AI Background Noise Remover | For fast, automated noise reduction using AI, ideal for quick cleanup. |
Conclusion
Now you've learned how to remove background noise in Adobe Audition. It offers a wide range of noise reduction tools that can handle various audio issues, from removing hums and clicks to enhancing vocals and tackling distortion. Following the analyze, identify, then remove approach, even beginners can achieve polished results with these tools.
For those looking for a faster, AI-driven background noise remover, VideoProc Converter AI provides a powerful one-click noise reduction option. With the right tool and techniques, you'll have everything you need to transform noisy recordings into clear, crisp audio.


