Although we don't always realize it, we are more sensitive to audio quality than the imagery. No matter how great your visuals are, background noise like wind, traffic, or static ruins the viewing experience. It's a common problem. Clear sound quality is always crucial, whether you are working on a vlog, a documentary, or a commercial project.
Fortunately, Adobe Premiere Pro offers several ways to tackle these issues. So here in this guide, we'll introduce how to remove background noise in Premiere Pro for clean and professional-quality sound, plus an AI-powered solution.
Pro Tip: While Premiere Pro offers built-in noise reduction tools, sometimes we may still want a simple yet decent alternative due to complexity or the need for faster solutions. Unlike manual methods, VideoProc Converter AI largely simplifies the process with advanced AI, saving time and ensuring high-quality audio with minimal effort.
To show you what I mean, here are some examples of before and after noise reduction. Take a closer look >
| Noise type | Before | After |
|---|---|---|
| Wind noise | ||
| Hiss noise | ||
| Street noise |
1. Using the DeNoise Effect
Premiere Pro offers a wide array of audio effects. The DeNoise effect is a fast and effective option to clean up the audio. Here's how to reduce background noise in Premiere Pro with the DeNoise Effect.
Step 1. Open the project and add an audio.
Place your audio or video clip with embedded audio on the timeline. Click and select it.
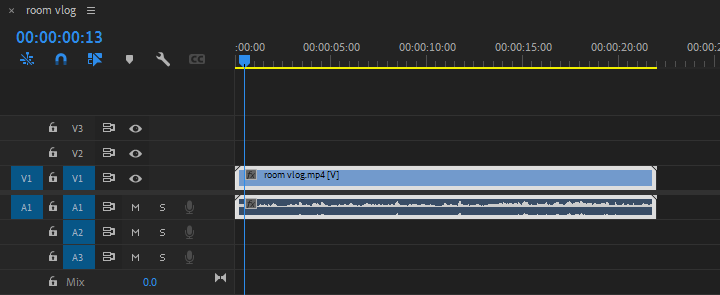
Step 2. Add a DeNoise effect in Premiere Pro.
Go to Effects > Audio Effects > Noise Reduction/Restoration > DeNoise. Drag and drop the DeNoise effect onto your audio clip.
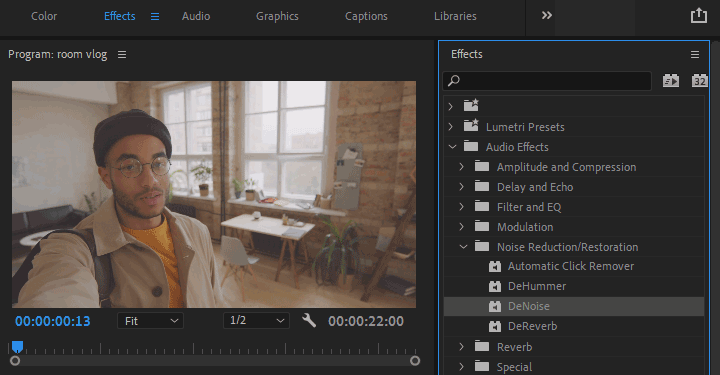
Step 3. Adjust the level of the noise reduction.
Locate the DeNoise effect in the Effect Controls panel. You can leave the default preset or fine-tune the intensity of the DeNoise effect.
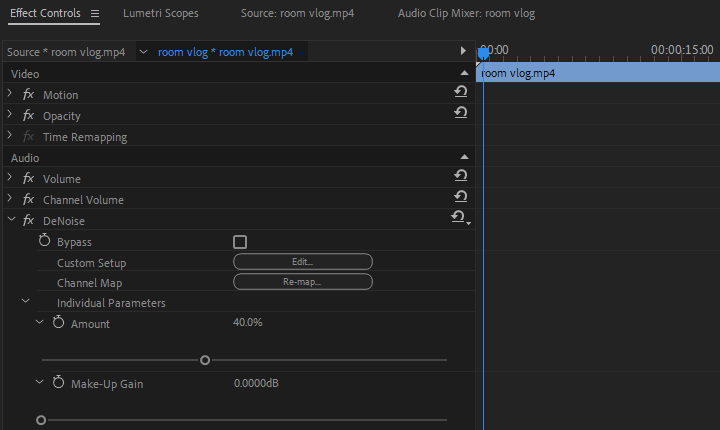
To do so, click the Edit button to bring up the Clip Fx Editor. Here, you can choose a preset (Default, Light Heavy Noise Reduction, and Heavy Noise Reduction) and drag the Amount slider to change the intensity of noise reduction.
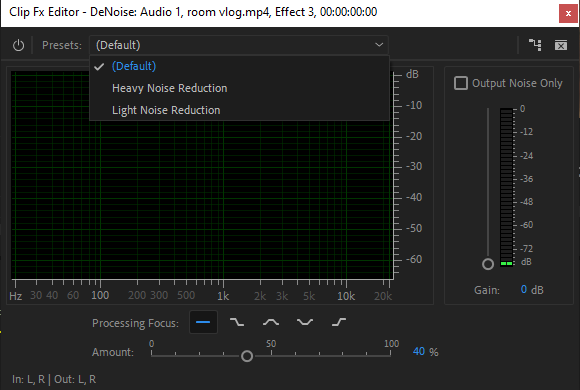
Audio effects affect unwanted noise, also the vocals and background music in the entire audio clip. So if the volume is lower than necessary, you can use the Gain slider on the right to increase the value of Make-Up Gain. Close the window when you find the sweet spot.
Tips:
- If you can't find the Effect Controls panel, you'll need to first click to enable it from the Window > Effect Controls.
- Start with a lower reduction percentage to preserve audio quality, and always play the clip to hear how the changes affect it.
- You can create your own presets for quick reuse. To do so, right-click the DeNoise effect in the Effect Controls panel and select Save Preset.
2. Using Essential Sound Panel
Another background noise removal tool in Premiere Pro is the Essential Sound panel. This panel provides various tools for audio mixing and repair. It works with presets based on different types of audio, so you can easily classify audio clips and make adjustments to remove background noise, enhance dialogue, and unify sound levels. It's especially helpful for those who aren't audio experts but need professional-sounding results.
In the following we'll show you how to remove background noise in Premiere Pro with the Essential Sound panel.
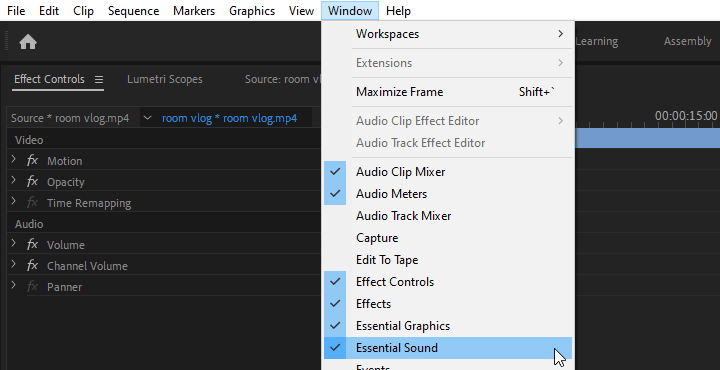
Step 1. Enable the Essential Sound panel.
Go to Window > Essential Sound and check it. The Essential Sound panel will appear.
Step 2. Assign a type to your audio clip.
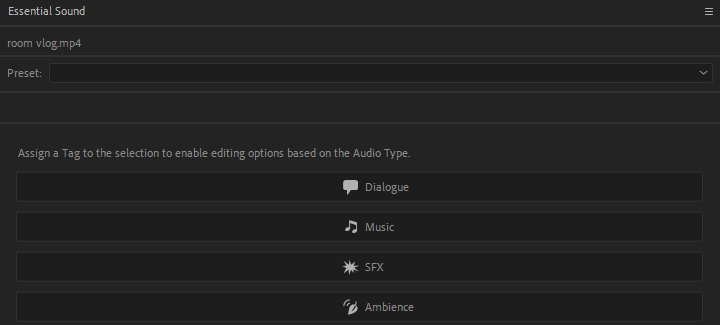
Select the audio clip in your sequence. Premiere Pro allows you to classify your audio clips as Dialogue, Music, SFX, or Ambience. Go to Essential Sound panel > Dialogue to assign the clip type. It's based on the International Broadcast Loudness scale for dialogue.
Step 3. Unify the loudness level throughout the clip.
Click to expand Unify Loudness and click Auto Match. This will automatically match clips to a standard average loudness for Dialogue but it's not a prerequisite.

Step 4. Remove background noise from audio.
Expand the Repair section and select the check-box for Reduce Noise. Move the slider to adjust the level of the noise reduction between 0 through 10 as you play back the audio clip. The further to the right the slider is, the greater the value, the more noise reduction you'll get. Don't go too far or your audio may sound distorted and unnatural.

Tips:
Besides the noise, the Repair section has options for reducing rumble, hum, and "ess" sounds to clean up the audio. You can enable these options as needed.
- Reduce Rumble: reduce very low-frequency sounds and plosives below the 80-Hz range, such as those from a turntable motor or an action camera.
- DeHum: reduce single-frequency noise from, for example, electrical interference — in the 50-Hz range (common in Europe, Asia, and Africa) or the 60-Hz range (common in North and South America).
- DeEss: reduce harsh, high-frequency ess-like sounds such as sibilance.
- Reduce Reverb: reduce the reverb from audio recordings.
Step 5. Improve the clarity and use creative effects.
Click to expand the Clarity section. Premiere Pro allows you to improve dialogue audio clarity by compressing or expanding the dynamic range, adjusting the frequency response, and processing the enhancing male (Low Tone) and female (High Tone) voices. You can select the check-box for the property that you want to change as needed, and then use the slider to adjust its level.

3. Using Enhance Speech Feature
The Enhance Speech feature in Premiere Pro is designed to remove background noise with AI and improve the quality of your dialogue recordings. It can clean up your recording and make it sound like it was recorded in a professional studio. Here's how to remove background noise in Premiere Pro with Enhance Speech.

Step 1. Select the audio clip containing dialogue on the timeline.
Step 2. Locate the Essential Sound panel > Enhance Speech Premiere Pro.
Step 3. Click Enhance to start the analysis.
Step 4. Adjust the amount of enhancement by dragging the Mix Amount slider.
Note:
- Enhance Speech remains a beta feature in some releases. You'll have to install the Premiere Pro (Beta) app on your desktop through Creative Cloud.
- While you can use Enhance Speech with minimum specification hardware, it will perform much faster on macOS 13 or higher with Apple silicon processors and Windows devices with recommended spec graphics cards.
- Recordings with a very low signal-to-noise ratio make it difficult to identify spoken words correctly and may lead to unexpected or unprocessed words or syllables.
- Enhance Speech does not perform well on audio from a "beamforming" microphone, commonly used in smartphones like newer iPhones or Android devices.
4. Alternative AI Noise Reduction Tool
While Premiere Pro offers built-in noise reduction tools, sometimes we may still want a simple yet decent alternative due to complexity or the need for faster, more automated solutions.
VideoProc Converter AI provides an easy and AI-powered background noise remover that you are looking for. Unlike manual methods, its AI Noise Suppression simplifies the process, saving time and ensuring high-quality audio with minimal effort. This is especially useful for those who want fast results without needing advanced audio editing skills. Plus, it supports batch processing. You can easily handle multiple recordings for podcasts, vlogs, webinars, or interviews simultaneously. Even better, VideoProc's AI audio cleaner supports a wide range of formats, including OGG, MKV, and other formats that Premiere Pro does not support yet.

VideoProc Converter AI - AI video/audio background noise removal
- AI automatic detect & remove background noise for clear sound quality
- Remove unwanted hum and hiss, fans, air conditioner, or other noises
- Support 370+ codecs and 420+ formats, MP4, MOV, MKV, FLAC, MP3, AAC…
- Batch process multiple video and audio files simultaneously
- Can run on a low-configuration computer even with only a CPU
After downloading and installing VideoProc Converter AI on your device, you can follow the steps below to remove background noise from your video and audio files with AI.
Step 1. Import your file and enable AI noise suppression.
Launch the software and go to the Audio AI module from the main interface. Drag and drop your files to the program. Select the check-box of Noise Suppression and select an AI model.

Step 2. Adjust the intensity of noise reduction.
Move the Noise Attenuation Limit slider to adjust the level of noise suppression between 0 through 100. The further to the right the slider is, the greater the value, the more noise reduction you'll get. Set to 6-12 for little noise reduction and 18-24 for medium reduction.
Set the Post-Filter Threshold to control how much additional noise is removed after the initial noise suppression process. A lower threshold (0.01-0.02) provides lighter filtering, preserving natural sound for quiet environments, while a higher threshold (0.03-0.05) applies stronger filtering, useful for moderate noise, such as background hum or distant chatter.
Use the Volume Control slider to adjust the value of Gain if the volume is lower than expected after the noise removal.

Step 3. Export the denoised files.
Set the audio codec and quality level according to your needs. Click RUN to process and clean up your audio.

Audio Recording Preparation
While noise reduction tools can improve audio, the best way to ensure clean sound is to prevent background noise during recording. Here are some tips:
- Choose a Quiet Environment: Record in a room with minimal background noise.
- Use a Quality Microphone: Invest in a directional or lavalier microphone to capture clearer sound.
- Soundproof Your Space: Use foam panels or soft materials to absorb ambient noise.
- Monitor Audio Levels: Test and adjust your recording levels to avoid capturing noise.
By following these recording practices, you can significantly reduce background noise before editing even begins. This not only saves time during post-production but also ensures the highest possible audio quality from the start.
Conclusion
That's all about how to remove background noise in Premiere Pro. Background noise can detract from the quality of your video projects, but with the right tools in Premiere Pro, you can achieve professional-sounding audio. Whether you are using the DeNoise effect, Essential Sound Panel, or Enhance Speech Feature, each method offers a way to improve clarity.
If you are looking for a faster, AI-powered alternative, VideoProc Converter AI is a great choice for simplifying the process. By combining these techniques with good recording practices, you'll always have clean, crisp audio.


