In the dynamic world of video production, having a well-defined workflow is essential for ensuring the success of your projects. A video production workflow is the sequence of steps and processes involved in creating a video, from the initial concept to the final delivery. By establishing a structured approach, you can streamline your creative process, improve efficiency, and deliver high-quality results consistently.
Why You Need a Video Production Workflow
Video production is a multifaceted endeavor that requires careful planning, coordination, and execution. Whether you're creating a corporate explainer video, a cinematic short film, or a social media-friendly content piece, a robust workflow can make all the difference.
A video production workflow is crucial for ensuring efficiency, consistency, and quality in your projects. It helps streamline the production process, minimize errors, and meet deadlines effectively. By having a structured workflow, you can allocate resources efficiently, assign tasks to team members, and track progress throughout the production cycle. This ensures that everyone is aligned and working towards the same goal, leading to a more cohesive final product.
Moreover, a defined workflow aids in maintaining quality control by establishing standards and guidelines for each production stage. These processes include scriptwriting, filming, editing, and post-production, ensuring that the final video meets your standards and objectives.
An Efficient Video Production Workflow: 5 Stages
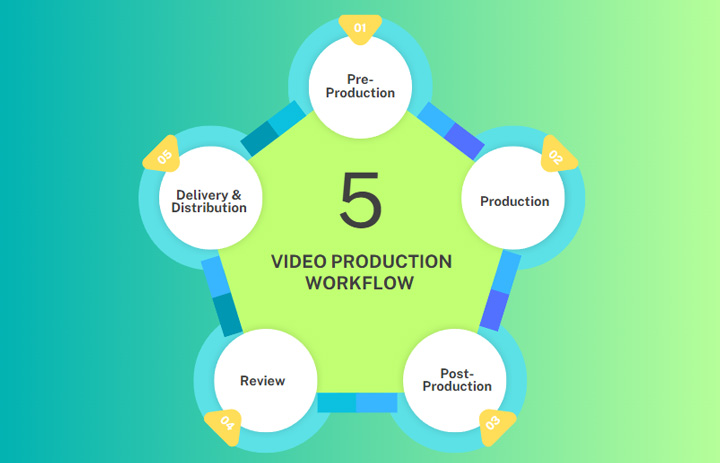
1. Pre-Production
Pre-production is the first and one of the most crucial phases of the video production workflow. It lays the foundation for your video and sets the stage for the remaining production stages. This usually includes the following steps:
• Define Your Message and Target Audience
Your video should have a clear, concise, and compelling message. This could be promoting a product, informing about a service, or telling a story. While defining this, consider your target audience. Who are they? What are their interests and preferences? Knowing your audience helps in crafting a message that resonates with them and attracts their attention.
• Identify the Video Format
With your audience and message in mind, choose the video format that will best convey your ideas. This could be an explainer video, an instructional video, a documentary-style video, an animated video, or even an immersive 360-degree video. Each format serves a unique purpose, offers different engagement levels, and requires varying production techniques.
• Allocate Costs Across the Workflow
Creating a detailed budget is a crucial step in pre-production. Evaluate the likely costs of script development, hiring staff, location fees, equipment rental, props, post-production, and distribution. This helps you allocate resources efficiently, ensuring you spend where it counts most while preventing budget overrun.
• Create a Production Timeline
Time is an asset in video production. Construct a production calendar outlining each phase of the process - from initial brainstorming and scriptwriting to shooting and post-production. This timeline becomes your guide, setting deadlines for tasks and sequencing activities efficiently.
• Write Script and Storyboard
Write a script that outlines the dialogue, narration, and visual elements of the video. This script serves as the foundation for the video's storyline and structure. With the script in place, the next step is to create a visual outline to guide the production process. This visual outline can take the form of a storyboard, which is a series of sketches or illustrations that depict each shot in the video. It can also be a shot list that describes the details of each shot, or a mood board, which is a collection of images and visual references that capture the desired aesthetic and tone of the video.

• Casting and Location Scouting
The next step is to find the right people to participate in your project, whether that's actors, interviewees, or a video editor. Once you've identified the right participants, you'll need to prepare or scout the shooting location, handle casting and any necessary licensing or permissions, and outline your contingency plans in case anything unexpected comes up.
• Asset Preparation and Management
The pre-production stage is also a time to collect and organize all the necessary digital assets for the video production, including creating digital mockups, gathering reference materials, and compiling any other visual elements that will be used during filming. By taking the time to properly prepare and manage all digital assets upfront, the production team can ensure that everything they need is readily available and easily accessible throughout the filming and post-production stages.
2. Production
The production stage is where all your planning in the pre-production phase comes to life. It's here where the video is physically filmed and the raw footage for your project is created. From the performances of the actors to the expertise of the camera crew, everything unfolds during this phase. The quality of production immensely affects the final output, influencing how well the audience receives the video. The production involves various tasks such as:
• Set Up for Production
Before starting to create the footage, ensure that all the necessary equipment is ready and working properly. If you're going to shoot the footage using cameras, specify the camera model, determine the location where you'll set up the camera, plan the camera angles, subject movements, and lighting to capture the video content effectively, and consider any other techniques needed to ensure high-quality footage. If your video is being made using software, such as a how-to tutorial for a specific application, you might need to select the appropriate screen recording software for your project, clear up the desktop for preparing the workspace, etc.
• Create the Footage
When it comes to creating the footage, it's important to stick to your storyboard and shot list. Pay careful attention to details like camera angles, movements, and transitions to ensure each shot is captured correctly. Flexibility is crucial in handling any unexpected challenges that may come up during filming. Stay organized by keeping track of the shots you've finished and what still needs to be done. Effective communication with your team is key for providing guidance and feedback to achieve the desired result. Aside, effective communication with your team is essential for providing guidance and feedback to achieve the desired outcome.
• Collect B-roll & Voice-overs
The production plan should also include capturing supplemental B-roll footage and voice-over recordings. B-roll refers to secondary footage that can be used to add visual interest, provide context, or transition between scenes. This could include shots of relevant locations, objects, or activities that complement the main video content. Additionally, you may need to record voice-overs to provide narration, explanations, or additional context. Coordinating the capture of b-roll and voice-overs during the production stage, rather than leaving them for the editing phase, can help streamline the post-production process and ensure you have all the necessary elements to assemble the final video.
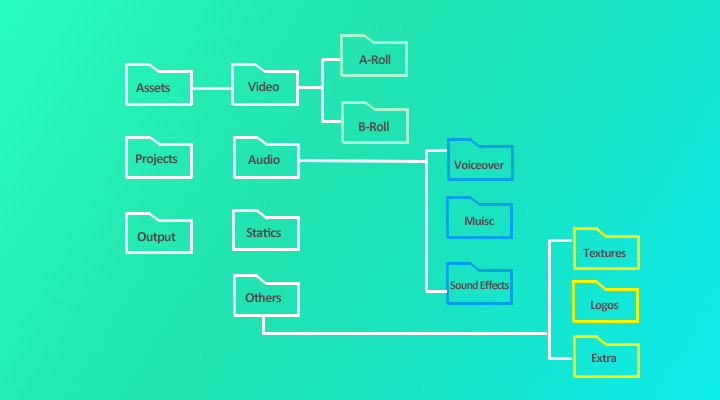
• Organize and Backup Original Material
Gather all the raw footage, audio files, and any other assets used during the production stage. Carefully organize the files into a logical folder structure, making it easy to locate and access them. It's suggested to backup copies of the original material, ensuring that you have a secure and redundant storage solution in case of any data loss or hardware failure.
3. Post-Production
Now, we come to the post-production stage. This is where we edit the rough videos into compelling pieces of art.
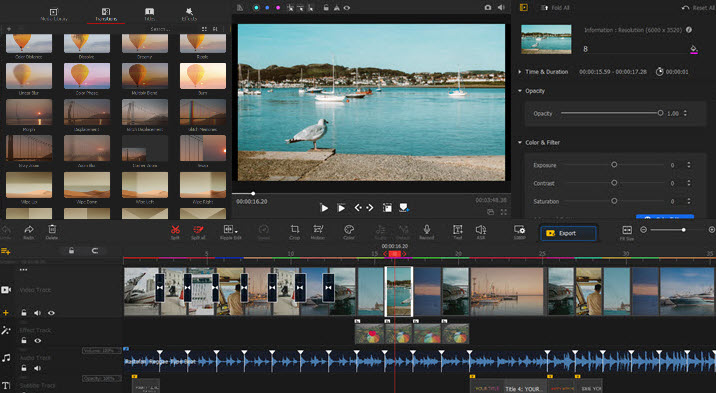
• Pick a Capable Video Editor
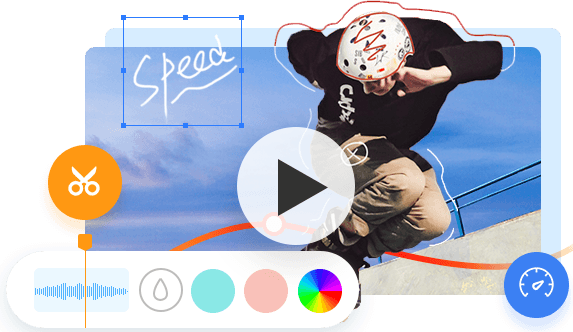
To edit videos, you need a decent piece of video editor. In my experience, VideoProc Vlogger is the best option among an extensive list of video editing programs. Developed by a reliable team called Digiarty, this easy video editing software supports 999+ timeline tracks and provides users with trim, merge, split, crop, speed change, and loads of quick editing tools to touch up videos easily. Take a look at its highlight features:
- Clean and self-explained interface. No learning curve for beginners.
- Preset a number of appealing titles, transitions, effects & filters, and 3D LUTs.
- Keyframe, speed ramp, motion crop, beat detection, and more advanced features.
- Ready resolution settings for uploading on YouTube, TikTok, Facebook, etc.
- Edit 4K HDR/8K videos from GoPro/DJI/DSLR smoothly while keeping low CPU usage.

• Edit the Video
Let's start by importing the source footage (recordings, voice over, assets, etc) into VideoProc Vlogger. Review the raw footage. Select the best takes or clips that align with your creative vision and then you can proceed by following the steps outlined below or incorporating additional editing techniques to edit videos.
- Remove any unwanted or subpar footage.
- Rearrange the remaining clips to create a cohesive narrative.
- Correct color to ensure consistent and visually appealing color tones throughout the video.
- Color grade the footage to set up the mood and enhance the overall aesthetic.
- Add transitions, visual effects, and other elements to create a polished and professional-looking.
- Add sound effects, background music, and any necessary dialogue or voiceover.
4. Feedback
Share the edited video with key stakeholders, such as the director, producer, or client, for feedback and input. Incorporate their suggestions and comments, making revisions to the video as needed. Repeat this iterative process until the video meets the desired quality and aligns with the project's goals.
5. Delivery and Distribution
During this stage, you export your video and distribute it to reach your target audience and chosen platforms. It's an important step where you showcase your project and analyze its performance and impact. Key tasks during this stage include:
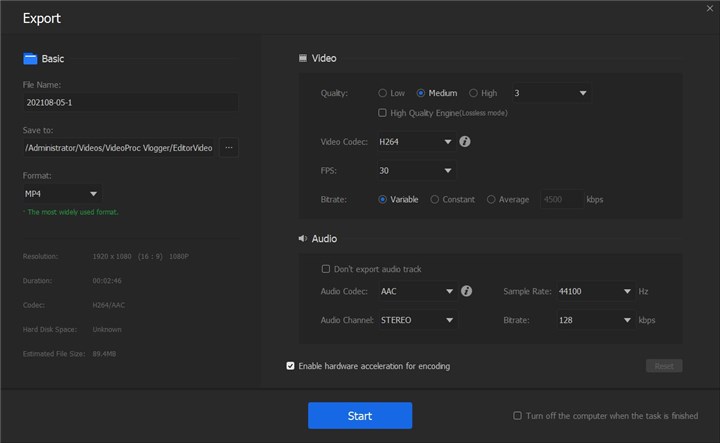
• Export the Video
Once you've thoroughly reviewed and refined your video, it's time to export it in the appropriate format and resolution. The specific video specs you'll need will depend on the platforms you plan to upload to, but the MP4 (H.264 + AAC) format is the most widely used and can be exported directly from VideoProc Vlogger.
Advanced tips:
If you're editing your video with a different video editing program, such as Premiere Pro and DaVinci Resolve, you may end up with a large file size that's not suitable for online uploading and streaming. In such cases, it's recommended to compress the file size using a reliable video compressor like VideoProc Converter AI. This tool can reduce the file size by over 90% without compromising the quality of your video, making it easier to share and stream online.
• Establish Metrics for Success
Before distributing your video, it's vital to define key performance indicators that align with your project goals. These metrics can include views, engagement rates, click-through rates, shares, conversions, and more. By setting clear metrics, you can measure the impact of your video and determine its effectiveness in achieving your objectives.
• Upload the Video
When uploading your video, it's important to properly tag it with informative titles, detailed descriptions, and relevant keywords. This can significantly improve the video's discoverability and search engine optimization (SEO), making it easier for your target audience to find and engage with your content.
As previously mentioned, optimizing the file for the target platform is essential to provide the best viewing experience for your audience. This process involves adjusting the video's resolution, aspect ratio, file format, and codec to align with the platform's specifications. Tools like VideoProc Converter AI can be incredibly useful for converting your video to meet the required formats and settings, ensuring compliance with the platform's technical requirements.
• Promote the Video
Promoting your video through different channels can help you reach a wider audience and maximize the visibility of your creation. For instance, you can promote your videos on active social media platforms like Facebook and Instagram to share your video with your existing followers and engage with potential new viewers. Running targeted advertising campaigns is also a common and effective way to reach specific demographics and increase the overall reach of your video content.
5 Video Production Workflow Best Practices
1. Understand Your Audience
Before you begin, invest time to understand your target audience. What resonates with them? What kind of narrations, VFX, and sounds do they respond to? This knowledge will make your end product more impactful.
2. Streamline Your Process
Take note of the tasks that always show up in your video making process. Are there any tasks you find yourself doing over and over? Can you automate some of these or perhaps come up with a standard way to do them? By turning these frequent tasks into a normal routine, you'll save time, boost your efficiency, and give your team more time to dedicate precious creativity to the production of the video.
3. Assign a Production Manager
Assigning a production or project manager when making a complicated video production is essential for ensuring the project runs smoothly and efficiently. A production manager is responsible for overseeing all aspects of the production process, from pre-production planning to post-production editing. They help coordinate the various elements of the project, such as scheduling, budgeting, hiring crew members, and managing logistics. In other words, having a dedicated manager in place helps ensure that deadlines are met, resources are allocated effectively, and the overall vision of the project is realized successfully.
4. Continually Review and Revisit
Continually reviewing and revisiting the progress of a video production is crucial for ensuring that the project stays on track and meets its objectives. By regularly assessing the work being done, identifying any potential issues or obstacles, and making necessary adjustments, the team can maintain quality, efficiency, and alignment with the project's goals. This ongoing monitoring and evaluation process also allows for feedback to be incorporated, creative ideas to be refined, and any changes in circumstances to be addressed promptly.
5. Set Realistic Deadlines
Being realistic when setting deadlines is crucial in video production to ensure a smooth and successful project execution. Video production involves numerous complex tasks and processes, each with its own set of potential challenges and dependencies. Unrealistic deadlines can lead to rushed work, compromised quality, and increased stress levels for the team. By setting realistic deadlines, the production team can accurately estimate the time required for each phase, account for potential delays or unforeseen circumstances, and allocate resources effectively.