Adding voiceover narration is one of the best ways to make your videos more engaging and impactful. A friendly and clear narration can explain concepts and build trust and emotional connections with viewers instantly. If you want to start a YouTube channel, become an online instructor, share your plan video with your clients, or just take your videos to the next level, learning voiceover skills is essential.
In this beginner's guide, we'll show you how to voice over a video from script preparation to post video editing. After regular practice, it can even become an enjoyable creative experience and help forge your own unique style.
Preparation for Recording a Voice-Over
Like any performance, voiceover work requires diligent practice and technique to sound natural and connect with audiences. If this is your first time doing a voice-over video, here are some practical tips to pick before starting recording.
#1 Write a script.
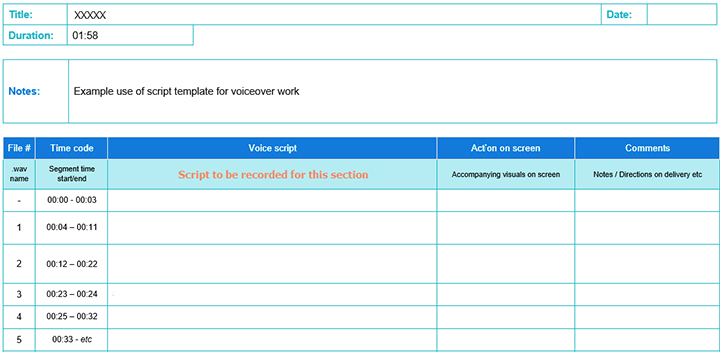
A voice-over script should go hand in hand with the video content. Not only does it make beginners more comfortable and fluent in the recording, but also delivers the overall message and tone of the video.
With a clear theme in your head, you should make the script short yet concise. This would help you concentrate on the messages you are going to portray. Then, to make the voice-over more natural, just write the script as you speak in daily life, or use the tone fits your video, and avoid language that's overly flowery. After that, link sections together logically, and add pauses to emphasize a matter.
#2 Find a quiet place away from noises and echoes.
Despite that you can remove background noise in post-editing, it needs pro skills and much audio production knowledge, thus may cost more time and energy. Moreover, a quiet place can prevent you from being distracted or interrupted. You can do voiceover in a soundproof room or do it when no one makes noises around you.
As for echoes, it's harder to fix in post-editing. So choose a small room or do some test recordings in different areas of the room to find the spot that provides the least amount of discernible echo.
#3 Use a pop filter to reduce plosive sounds.
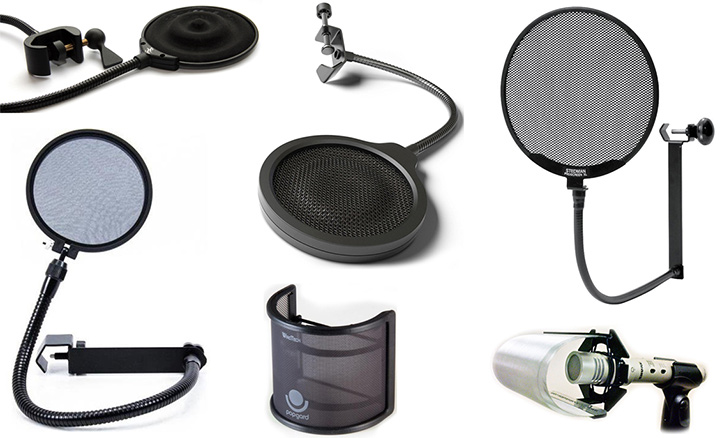
When you pronounce letters p, t, d, t, and k during the recording, a blast of air from your mouth that hits the mic's diaphragm results in a low-frequency boom and ruins your recording. And a pop filter was designed to reduce and even eliminate harsh sounds. Pop filters are circular frames with woven nylons stretched. Also, you can remove popping noises by wrapping a sheet of tissue or a foam windscreen on your mic.
#4 Record a few seconds of "room tone" without speaking.
"Room tone" refers to the ambient noise floor of the environment. Even in a quiet room, there are small amounts of noise from the hum of electronics, air vents, outside sounds, etc. To capture room tone, start recording with your microphone in the position you'll use for the voiceover. Then remain silent for around 5-10 seconds. During editing, you can use this room tone clip to fill in pauses or patch over cuts where you edit out unintended sounds. Adding just a small amount of room tone helps make edits seamless and sound more natural.
#5 Check sound levels and practice your script to ensure clear audio.
It's worth investing time in sound checking and practicing before you voice over a video. Get levels right, find the sweet spot in front of the microphone, and polish your read-through. Because issues are more easily addressed with additional recordings, rather than relying entirely on editing fixes in post-production.
How to Record and Add Voice-Over to Your Video
Instead of using separate voice-over software and video editing software, you may prefer a one-stop solution to record, add, and edit your voice recordings and videos. And that's when VideoProc Vlogger comes to help.
VideoProc Vlogger is a free video editor developed for users of all levels. With its streamlined but powerful feature set, VideoProc Vlogger makes videos and voice over a seamless process. You have everything you need to record footage, organize clips, apply filters and transitions, adjust audio, add voiceovers, and export your video in just a few clicks.

VideoProc Vlogger – Make a Video with Voice-Over Seamlessly
- Add pre-recorded and real-time voice-over in high quality.
- Intuitively edit the volume, speed, pitch, and recording duration.
- Advanced audio editor: equalizer, effects, filters, audio analyzer.
- Cut, re-sequence, crop, add texts, 60+ transitions and filters...
- Smooth 4K and HD video editing backed by Level-3 Hardware Acceleration.
Download VideoProc Vlogger and voice over a video with ease!
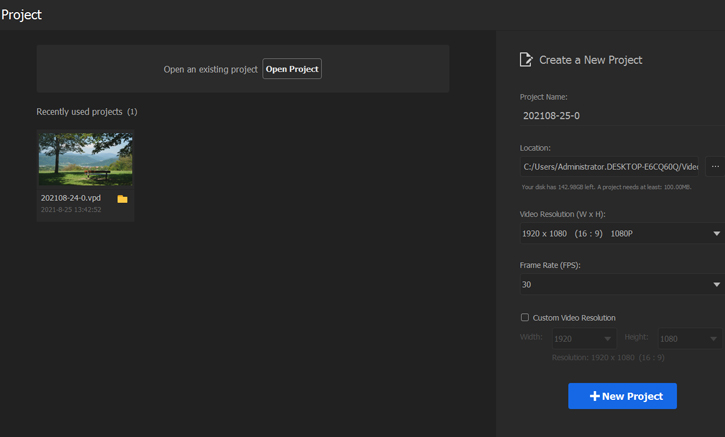
Step 1. Create a new project.
Launch VideoProc Vlogger. Finish several project settings or keep them default, and get into the editing workplace.
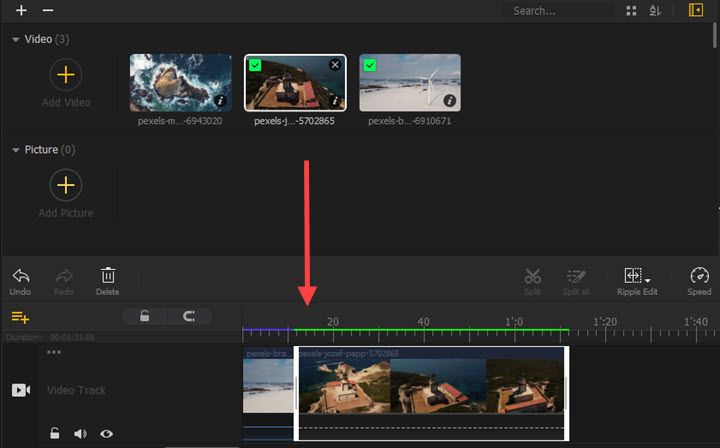
Step 2. Import your video to VideoProc Vlogger.
Drag and drop your video file to its media bin in the top left section. Then drag and drop it to the Main Track in the timeline.
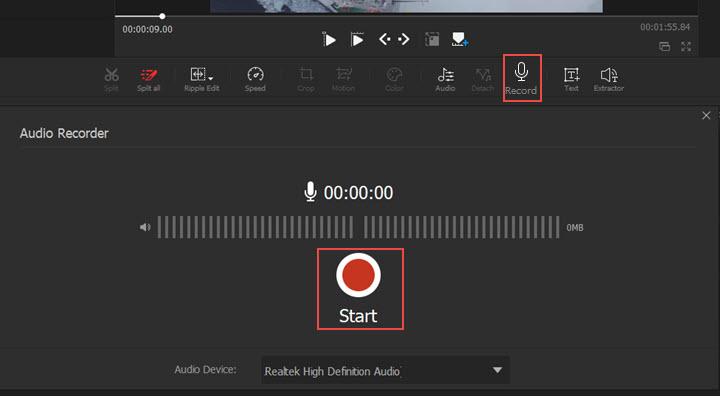
Step 3. Record your voice in VideoProc Vlogger.
Place the playhead where you want the voice-over to start. Click "Record" in the toolbar. Choose an audio device. Click "Start". Now just keep speaking along with the video playback. Then click "Stop" and "Save".
VideoProc Vlogger saves your narration in .wav format. You can preview it by clicking the play button next to its filename. If you are not satisfied, you can discard it and do a voice-over again.
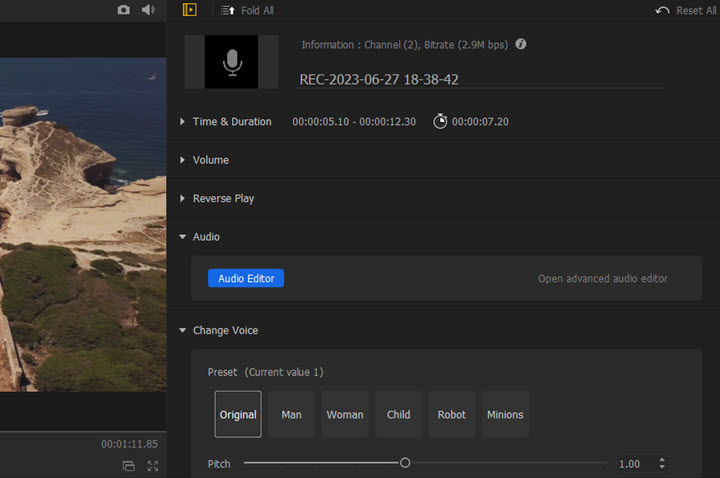
Step 4. Edit the voice-voice and video.
Your narration will be saved in the Media Library automatically. Drag and drop it to the Audio Track in the timeline. Now you can move to adjust its position, split, delete, adjust volume, change voice pitch, and apply more edits to the voice-over.
Also, you can edit the video clip with features in the toolbar, Inspector, and transitions panel around the preview window.
Step 5. Export.
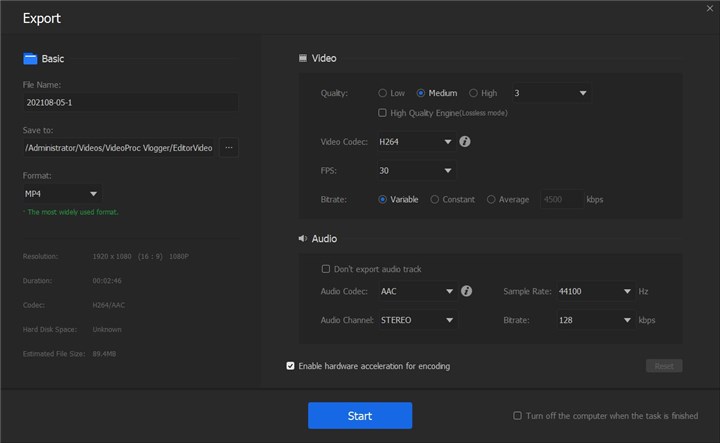
Click the "Export" button above the timeline. Finish output filename, format, location, and quality, and click "Start" to export the video with a voice-over from VideoProc Vlogger.
FAQ
How to voice over a video on iPhone?
Open iMovie on iPhone. Create a new project in the Movie mode. Add a video clip to which you want to add narration. Click the plus icon and choose Voiceover. Tap the Record icon, and the video recording will start in 3 seconds. Then the video starts to play and you can speak along with it. Click Stop to end. Now you can preview it and decide to add it to your video or retake it.
How to add voice-over to a Canva video?
Create a video project in Canva. Open the Uploads tab and choose Record Yourself. Allow it to access your microphone. Then start recording. When the voice-over is done, click Save and Exit. Now you can place the recording to any clip on the Canva timeline.
How to add voice-over to a YouTube video?
Import the YouTube video to VideoProc Vlogger. (If you have no copy of the YouTube video, you can download it using VideoProc Converter AI). Add the video to the timeline, then click Record in the toolbar to record a voice-over for it. Then add the recording to the audio track and align it to your video.
How do you voice over a TikTok video?
Make sure you are running the latest version of TikTok. Open it on your phone. Click the plus icon at the bottom of the screen. Select a video from your phone or capture a video now. Then you'll go to the editing interface. Expand the toolbar and select Audio Editing. Press the record button and start to narrate along.

