Are you looking to improve your video editing technique by using green screens? Do you want to learn how to make a green screen video for your pet project? In this green screen video guide, we'll teach you how to use green screens and edit your videos.
Today, it's easy to create videos and clips. Did you know that on YouTube alone, 720,000 hours of video get uploaded daily? Whether you want to make a movie or review a channel or film, a green screen can improve your video. Keep reading to learn how to use a green screen.

What Is a Green Screen
A green screen is often anything that's colored green placed on the background of the subject. This screen is green because the color is often the least used one in most situations. Before, these screens were originally blue, but green slowly became the ideal color for their purposes.
These were the chosen colors because they don't fit the natural skin tone of most people. Green stuck around because it's harder for our skin to produce green tones unless via artificial means. This makes it easier for the subject to stand out once editing begins.
These screens work because of the help of the Chroma Key tool. When using this tool, you separate your image or video into different layers. You'll be separating them based on the colors, hues, and tones found in each frame or image.
This separation is what allows you to remove or add elements to your shot. It's a great way to simplify or enhance any scene, especially when used as a backdrop.
Where Are Green Screens Often Used
As you can imagine, being able to manipulate backgrounds has a lot of uses nowadays to create an immersive and engaging piece of content. For the most part, mainstream media outlets like movie studios use these to add a lot of elements to their shots. Broadcasting studios also use green screens, often when delivering weather reports to the people.
Even YouTubers and Twitch streamers use green screens to look more professional. This also applies to students and influencers. They use them on different social platforms or online classes to become more engaging.
How to Create Your Own Green Screen Background Footage
Creating a green screen background for your own projects doesn't have to be hard. All you need are the proper tools and equipment, and to adjust your setup accordingly. When thinking about your setup, though, there are two ways for you to go about it.
Method 1: Create a DIY Green Screen Effect Video
The traditional method of doing green screen backgrounds is by creating your own physical setup. You will need a large green cloth, lights, and appropriate video editing software.
Step 1: The most important step is to ensure lighting remains even across the fabric. Even the slightest shadows might register differently in the software. This could lead to visual glitches while editing.
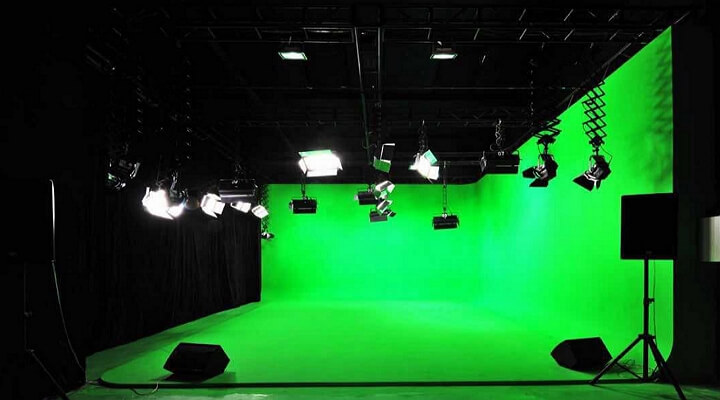
Tips: You can fix this by adding two lights in front, a backlight, and a key light to eliminate shadows on the green screen. And the backlight will help separate the subject from the background, which prevents the video footage from looking flat and gives you more freedom since you need not worry about light changes.
Step 2: Make sure that your green screen is wide enough and keep it wrinkle-free as small wrinkles and folds become highly visible in the final product.
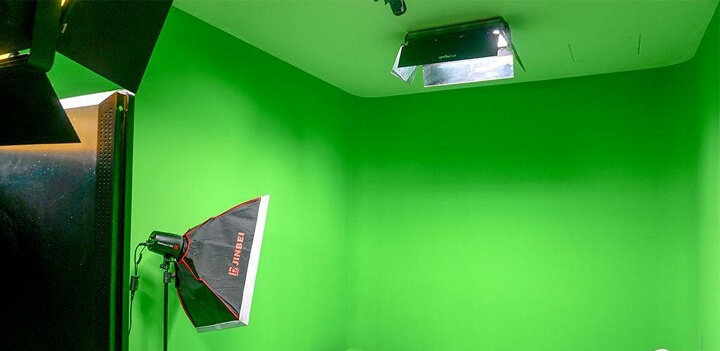
Tips: If you don't have a large enough screen to cover the entire shot, you can add small sheets to fill in the gaps. You must make sure that the tones and shades are the same, though. Otherwise, it will become more difficult for you to edit your footage later on.
Step 3: Use a tripod to stabilize your camera while filming. A stationary camera also makes sure that the shot doesn't pan all over the place. Shakes can interfere with the placement of elements on the green screen, distorting the background.

Method 2: Download a Green Screen Background
If you're short on budget, you may want to use software that adds a green screen background for you. The tool tracks the person in front of the camera. It then uses an algorithm to figure out where to place the digital background.
You can download these green screens through different websites like Shutterstock or Videezy. You can find simple green screen backgrounds on these websites.
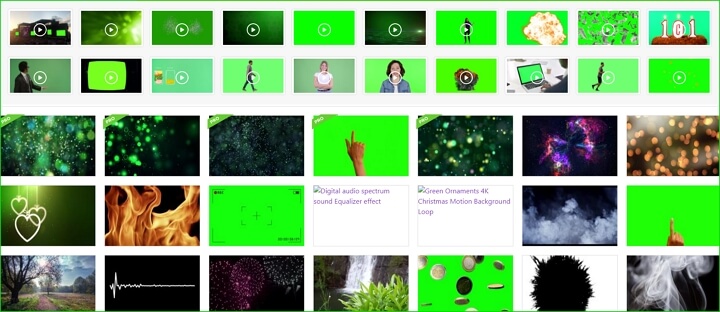
You can even find different elements that you can use in your scenes. These websites often have a lot of pre-shot footage of different elements in their archives. This means that you need not shoot these specific scenes anymore on your own. You can even find different shots where the green screen background is on different areas like the screen of a mobile device.
This method saves you a lot of production and post-production time. You'll only need to edit the scenes you want on the appropriate backgrounds. What limits this method, though, is that you're often only given a limited time to use the material you get from any website. This means it's best to use this method for short clips. This way, the time limitations won't be an issue. Consider these when going for TikTok videos or such.
How to Edit a Green Screen Video
The brunt of the effort in filming a green screen video comes from the editing process. Here's what you need to start editing your video.
Start by looking for good software that can handle heavy and extensive tasks.
Check out this guide to discover some of the best green screen editing software.
Once you have your footage and software, follow the next steps to complete your green screen film. Some software may have different tags but usually follow the same process. For this example, we'll be using VideoProc Vlogger.
To get started, click the buttons below to free download VideoProc Vlogger:
Step 1: Import Your Video Files.
Upon opening your software, import all the footage you'll use into the media library. Once imported, drag the green screen clip and other video and audio clips onto timeline.
Step 2: Choose a Track on the Timeline to Place Green Screen Video.
Normally, you will need to put the main video onto the Video Track in VideoProc Vlogger, and the green screen video onto the overlay track.
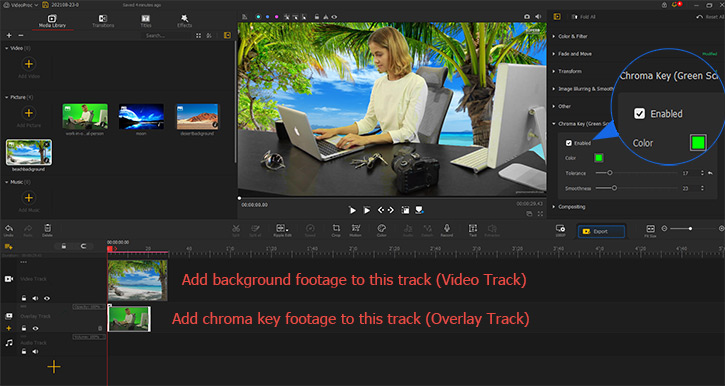
If you are creating a picture in picture video, featuring a talking head as the overlay, and the background of the talking head is going to be removed, then you need to place the green screen video onto the overlay track.
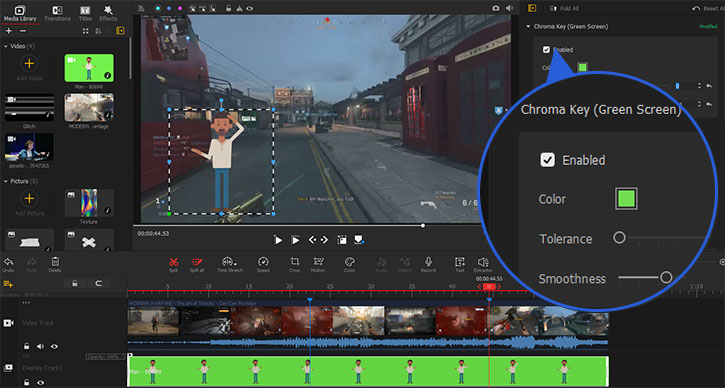
Step 3: Enable Green Screen Option.
Click on the green screen clip to make sure it is selected, then go to the Inspector Panel on the top right side.
Scrolling to the Chroma Key section, and hit Enable Chroma Key.
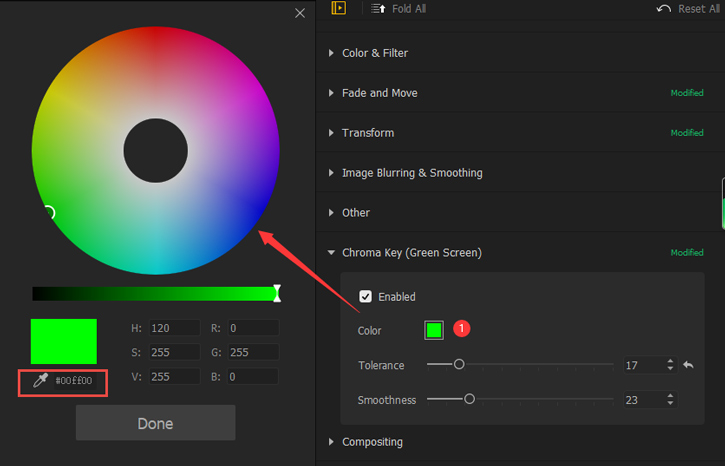
Step 4: Adjust Chroma Key Settings.
Use the eyedropper to pick the color that you want to remove. It is usually the default green color. Though if you have pure background with other color, it is also possible to remove that color and make a transparent video
Adjust the tolerance and smoothness parameters to fine tune the selection. Since every change is reflected in real-time, you can easily drag the sliders until you are satisfied with the result.
What You Need to Use the Chroma Key
Before you start filming your green screen video, you need to set up a few things first. Your green screen needs to be up. If you're using green cloth, it's best to keep it draped down, so it's smooth and straight.
You also need to make sure that your actor doesn't have on anything green. When you film, make sure the subject or actor is at least six feet away from the green screen. It will minimize spills and unwanted shadows appearing on the green screen.
Don't forget to set up your lighting, as well. Use separate lighting for your foreground and backdrop.
When you set up your lighting, make sure the subject uses lighting that matches the background you plan to add. For example, if the actor will be standing on a beach at sunset, the lighting should match that scene.
The last thing you need is a high-quality video editor, like VideoProc. Good video editors will make your videos look professional-looking and fine. Look for video editors with a Chroma Key tool for video production.
The Bottom Line
We hope you enjoyed reading our guide on how to make a green screen video. Now, you know how movie studios and online video creators work on their more fantastical pieces. With this guide, you can now express your creativity in the same way, too.
Do you want to check out our other green screen editing tips? Are you interested in learning more about the other uses of the VideoProc video editor? Check out the main page or visit our contact page if you have any questions about it.

