Forword: Looking into how to compress a video for Instagram Feed, Story, or IGTV? Wonder what are the best Instagram video compression settings? Or you're searching into what is the best video compressor for Instagram? Read this post to find all answers you need.
Instagram has pretty strict video requirements, so you might encounter errors like the video becoming poor quality or not uploading to Instagram when posting your video straight from your device.Instagram has pretty strict video requirements. It only accepts videos with aspect ratios between 1.91:1 and 9:16, resolutions over 720P, and frame rates over 30FPS. Asides, if your video is within 10 minutes, then its size cannot be larger than 650MB. This is why you might encounter errors like the video becoming poor quality or not uploading to Instagram when posting your video straight from your device.
Fortunately, we can easily address these issues by compressing MP4 for Instagram before uploading. In this post, we will introduce 3 easy ways to compress videos for Instagram. Plus, we'll be showing you some easy tricks to post your videos on Instagram with amazing quality.
Instagram Video Specs You Need to Know Before Compressing
Before you start compressing your video for Instagram, it's essential to understand the specifications Instagram recommends and enforces for different types of posts. Knowing these limits will help you choose the right compression settings and ensure your video looks great and uploads successfully to your Instagram Feed, Stories, Reels, or IGTV.
 Tips: Fortunately, powerful tools like VideoProc Converter AI are designed to help you easily meet these varied requirements and get your video ready for any Instagram post type.
1. Aspect Ratio: Get the Right Fit
Aspect Ratio: Instagram supports several aspect ratios, including square (1:1), vertical (4:5), and horizontal (1.91:1). For full-screen content like Stories and Reels, the ideal vertical aspect ratio is 9:16. Matching your video's dimensions to these ratios prevents awkward cropping or black bars.
2. Resolution and Quality: Finding the Balance
Resolution & Quality: While you might record in 4K, Instagram often recommends resolutions like 1080p for Feed/IGTV and 720p minimum for square videos. Compressing involves finding the right balance – reducing file size while keeping enough resolution and quality for a good viewing experience.
3. Compatible File Formats
To ensure your video uploads without error, stick to formats Instagram readily supports. The most common and recommended formats are MP4(H.264) and MOV (H.264). A good video compressor for Instagram like VideoProc Converter AI can easily convert and output your compressed video into these compatible formats.
4. Video Duration Limits
Beyond file size, each Instagram placement has a maximum duration. Compression helps with file size, but if your video is too long, you'll need to trim or split it using editing tools. Your compressed video must also fit within these time limits:
- Feed Posts: Up to 60 seconds.
- Stories: 15 seconds per clip (you can upload multiple clips that play sequentially).
- The maximum duration for videos recorded or edited within Reels is 3 minutes.
- IGTV: Up to 15 minutes when uploading from mobile; up to 60 minutes when uploading from the web (for verified accounts).
5. Instagram's Built-in Compression
It's important to know that Instagram applies its own compression algorithms after you upload your video. This means your video will be compressed twice – once by you, and once by Instagram. To minimize the impact of this second compression and maintain the best possible visual quality after upload, always start with the highest quality source video you have before you begin your own compression process.
Method 1. How to Compress Video for Instagram Effortlessly
VideoProc Converter AI is the easiest video compressor you can rely on to compress video for Instagram. With a simple moving of a slider, you can reduce the Instagram video file size by up to 90% without visible quality loss.
- Directly enter the target size (eg. 20MB or 30MB) to compress.
- Compress a bulk of videos for Instagram and other platforms all at once.
- 47x faster compression speed, powered by GPU acceleration tech.
- Flexible: change codec (to H.264, AV1, etc.), resolution, bitrate, aspect ratio...
- Convert video and audio files in 370+ formats to Instagram-supported ones.
- All round video editing tools: cut, split, crop, merge, text.
- AI-driven! Elevate the video/image/audio quality to the best quality.
Let's download and install VideoProc Converter AI and start compressing video for Instagram!

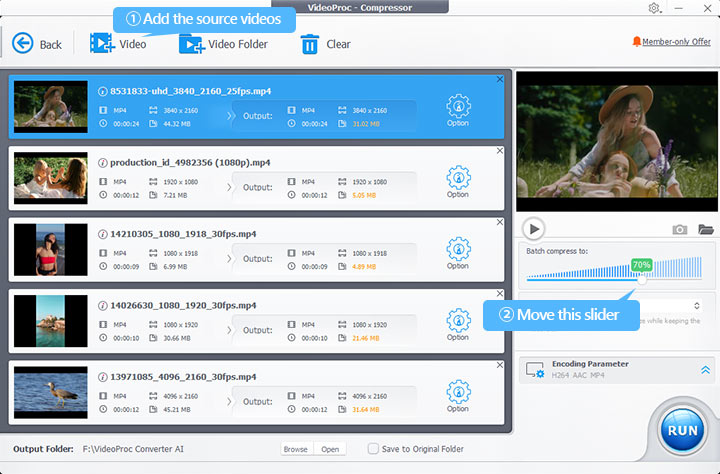
Step 1. Add the Video for Compressing
Run Videoproc Converter AI. Hit Compressor. Drag the original video file to this best video compressor for Instagram.
Step 2. Compress a Video for Instagram
Simply drag the slider to adjust the compression ratio. Let's say you want to compress the video file size by 30%, then just drag the slider to 70%.
Tips:
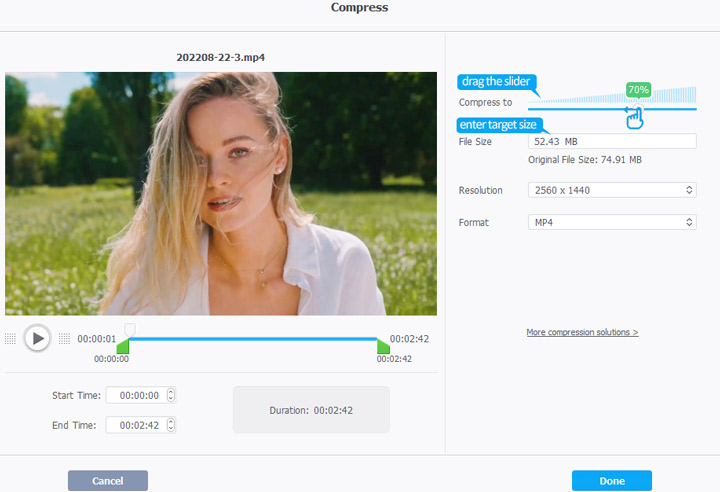
To adjust the target size and other parameters for the indivial video, hit the Option icon, and then you can:
- Set the target size by directly enter the idea size or moving a slider.
- Choose a lower resolution.
- Trim the unwanted segment.
Step 3. Export the Compressed Video
Click Done to confirm your adjustments. Hit Run to save the compressed Instagram video.

Bonus: For More Control & Editing (Customize Encoding Settings)
Need more advanced editing capabilities (like cropping the aspect ratio or splitting a long video) or want precise manual control over encoding settings for the best quality-to-size balance? VideoProc Converter AI also helps!
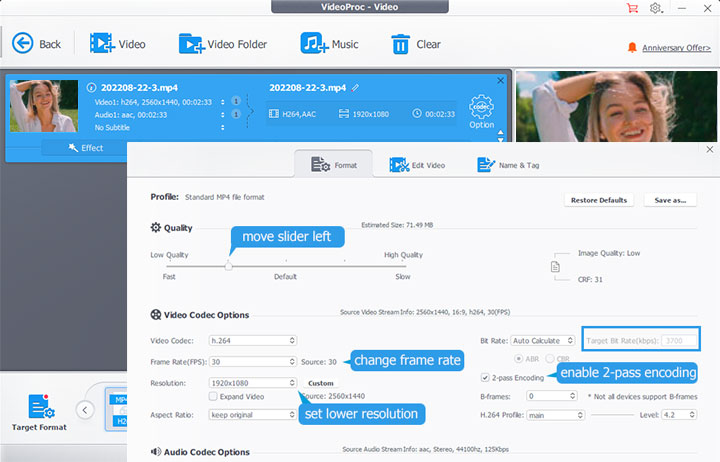
Just hit Video Converter in the main interface, import your video, go to the Target Format section, select MP4 H.264, and then hit codec option to open the Format panel. After that,
- Set a lower resolution: 1080x1080 (for a square video) and 1920x1080 (for a landscape video).
- Move the quality slider towards the left until the target bit rate is smaller than 3500kbps.
- Check the option for 2-pass encoding.
- Select 30FPS as the target frame rate.
- Click Edit video and then make quick edits in length, aspect ratio, and more.
Method 2. How to Compress Video for Instagram Online
What if compressing a video for Instagram is something that you do once in a blue moon? The most convenient manner is to reduce the video size for Instagram on your browser. Luckily, Freeconvert, OnlineConverter, MP4Compress, and many online video compressor for Instagram are made with this sole purpose.
Note: Those video compressors for Instagram don't require you to download or register. All you need to do is upload the Instagram video, apply a few parameter adjustments, and press the generate button. However, they have many limitations.
- Pop-up ads and redirects to unknown sites
- Offer very few options for adjusting parameters
- Most of them can't compress videos over 200MB
Surely, if you stick with compressing the Instagram video via your browser, we suggest you go with Freeconvert. It is a generous online Instagram video compression software with the capability to compress the video as large as 1GB. In addition, it doesn't put constrain on the input and output format. With it, you can compress Instagram video from or to MOV, FLV, and other 60 formats.
Step 1. Press Choose Files button to select the original video file for uploading to this online video compressor for Instagram.
Step 2. Choose MP4 as the result video file format.
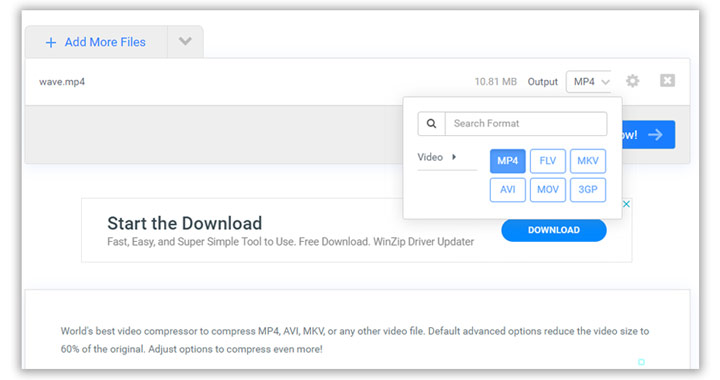
Step 3. Hit the tool button to enter the Advanced Options page.
Step 4. Select the video codec as H264.
Step 5. Choose the Compression Method. For instance, you need to choose Target a file size, and then move the cursor on the below Select Target Size bar left or right to decrease or increase the size.
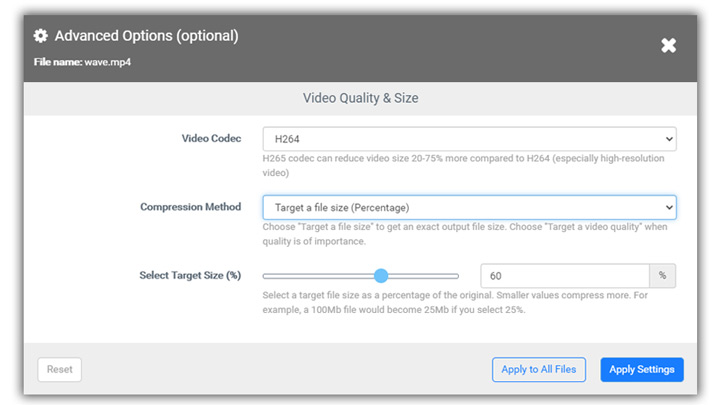
Step 6. Press Apply Setting. Hit Compress Now to start to compress video for Instagram online.
Method 3. How to Compress Video for Instagram on Premiere Pro
The high price tag (20.99USD per month), industry level layout, bewildering export options, and the high system requirement make Premiere Pro foredoomed to fall short of a beginner's expectation to handle the daily Instagram video compression task.
But if you are a premium user, or you just created and edited your Instagram video on Premiere and now want to export it, then you might want to know how to compress Instagram Video on Premiere Pro and what are the best Instagram compression settings in Premiere Pro.
Step 1. Install the latest version of Adobe Premiere Pro on your computer.
Note: Your computer must meet the minimum system requirements of Premiere Pro. Otherwise, you may encounter horrible stutters and a plethora of other errors.
Step 2. Press File, select New and choose Sequence to open up a New Sequence panel.
Step 3. Hit Digital SLR and select DSLR 1080p30 under 1080P.

Step 4. Choose Settings on the top menu bar of the New Sequence tab. Adjust the frame size, so the aspect ratio will fit the Instagram requirements.
Let's assume you want to compress video for an Instagram story, then you should enter 1080 for the horizontal and 1920 for the vertical resolution.
Step 5. Hit Save Preset, enter the name and description, press OK. Premiere Pro will load the newly created sequence. Select the customized preset and choose OK.
Step 6. Right-click on the media pool tab, select Import to feed into the source Instagram video. Drag the clip to the timeline. Select Keep existing settings on the pop-up error message window.
Here you can use the position, scale, and rotation feature to determine the portion you want your audiences to see.
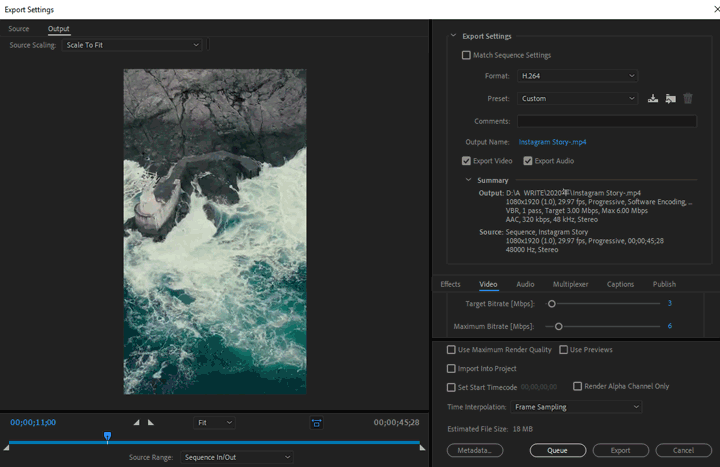
Step 7. Press File again, select Export, and choose Media. Scroll down to find Basic video settings. Move the cursors on Target Bitrate [Mbps] and Maximum Bitrate [Mbps] left to decrease the bitrate.
Setting 3bps as the target bitrate and 6bps as the maximum bitrate is the most propriety for most common Instagram videos.
FAQs
1. How to post video on Instagram with good quality?
Trick 1. Post Instagram Video on a Browser
- Login into your Instagram on Chrome
- Press F12 to open the developer tool
- Go to the upper of the window and select iPhone XR
- Browse the web version of Instagram and hit the plus icon to upload from the computer
Trick 2. Post Instagram on Facebook Creator Studio
- Link your Instagram and Facebook accounts on Chrome
- Go to Facebook Creator Studio, hit Create Post, and select Instagram feed
- Enter the title and description for the Instagram video
- Hit +Add Content > From file upload, choose the video for upload, and then hit Publish
2. What is the best Instagram video compression settings?
Well, though the ideal settings depend on your source footage a lot, conducting our experience and the Instagram video spec rule, we advise you to go with the below compression settings.
- Format: MP4 (H.264+AAC)
- Resolution: 720P or 1080P
- Bitrate: 3Mbps-6Mbps
- Frame rate: 30Fps