Subtitles are important for people watching foreign movies and TV shows, playing videos in a noisy place, or being hard of hearing. If you want to enjoy an MKV movie with subtitles every time you open it and keep them in sync, you can embed subtitles to MKV permanently. Today we gathered the top 5 methods of how to add subtitles to MKV on Windows and Mac. Check them now.
1. Add Subtitles to MKV with VideoProc Converter AI
Best for: Adding soft and hardcode subtitles to MKV on Windows and Mac permanently
VideoProc Converter AI is a slim multimedia tools suite to convert, compress, edit, download, and record screen. When it comes to adding subtitles, it supports .srt, .ass, and .ssa files and embeds them to MKV on Mac and Windows with ease.
With its robust downloader, you can easily fetch SRT subtitles for movies and TV series from 1000+ sites, and merge them to local MKV movies without digging out subtitle download sites anymore. Also, you can add subtitles to video in MP4, MOV, AVI, WebM, and 420+ formats. After that, you can make subtitles more readable by adjusting the position, font, size, and color, and check them by real-time preview.
Now download VideoProc Converter AI to download, edit, and add subtitles to MKV in one stop!
Step 1. Import an MKV movie to VideoProc Converter AI.
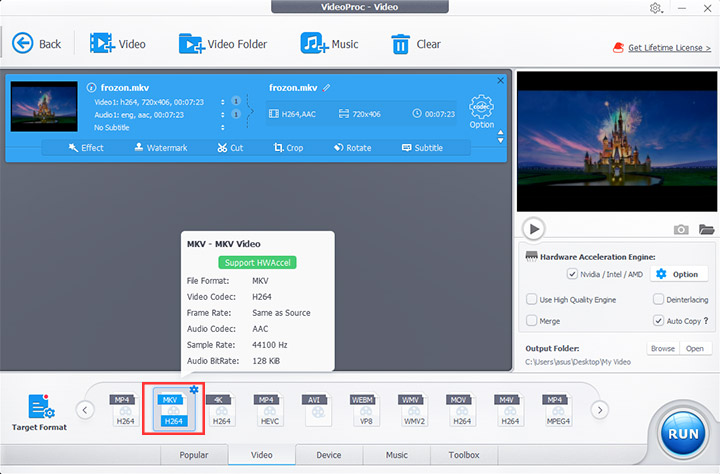
Open VideoProc Converter AI and click "Video" on the homepage. Drag and drop one or multiple MKV videos to its interface. Then select "MKV" in the "Video" option at the bottom as the output format.
Step 2. Add subtitles (.srt, .ass, or .ssa) to MKV.
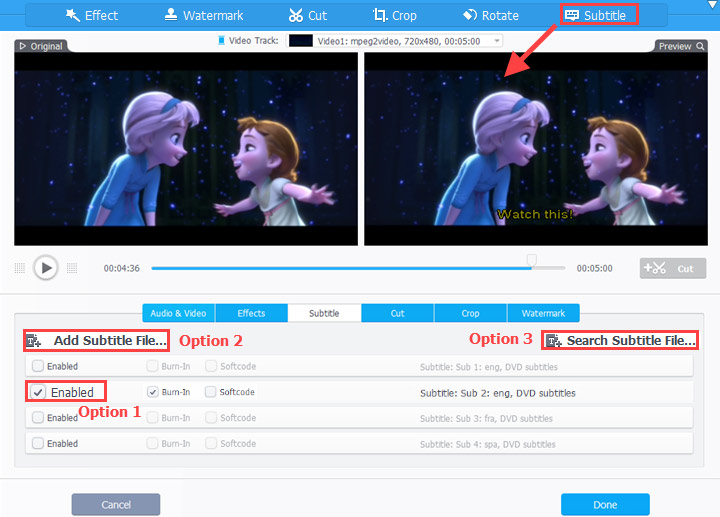
Click "Subtitle" in the editing toolbar. Now here are 3 options to merge subtitles with your MKV movie permanently:
- Option 1: If the MKV file contains subtitle tracks, say, in different languages, enable the one you want by checking the box before it.
- Option 2: If the subtitle file is stored on your computer, click "Add Subtitle File" to add it to the MKV video.
- Option 3: If you haven't prepared an SRT/ASS/SSA subtitle file yet, click "Search Subtitle File", and you can search for it by name and language. Then select one file and download it.
Step 3. Select subtitle embedding mode.
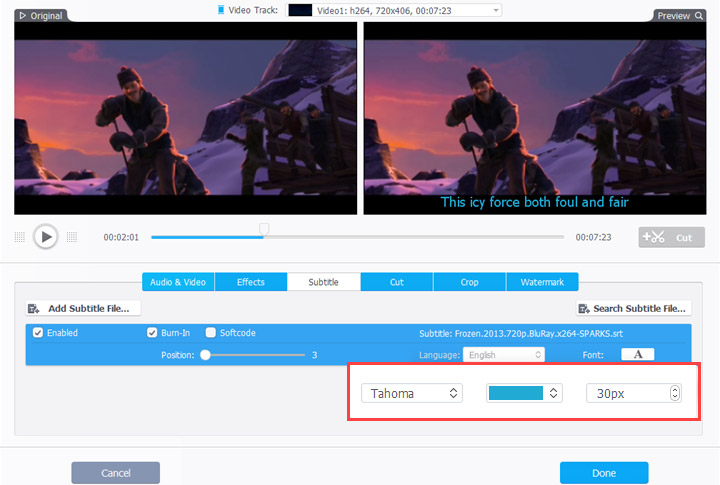
If you want to add subtitles to MKV permanently, select "Burn-In". It will add subtitles to MKV video stream that shows up every time you open the video and cannot be edited or deleted any more. While "Softcode" will merge subtitles to the MKV file as a separated track that can be either turn on or off.
Step 4. Adjust subtitle style (optional).
For SRT/ASS/SSA file from the local storage or the built-in subtitle downloader, you can customize its position, font, size, and color in Burn-In mode. Then, click "Done" to apply the changes.
Step 5. Export MKV with permanent subtitles.
You can go on editing and adjusting video settings if necessary. When everything is done, select an output folder. Hit the "RUN" button to start merging subtitles to MKV on your Mac or PC.
2. Add Subtitles to MKV with MKVToolNix
Best for: Embedding subtitles to MKV videos on Windows and Linux
MKVToolNix has a collection of tools to create, mux, demux, inspect, and edit Matroska files on Linux/Unix and Windows. It an open-source tool that supports subtitles in IDX, SUB, and SRT formats. If you are a power user wanting to add subtitles to MKV without re-encoding, this is a free option for you. But note that, it does let you edit subtitles or preview the MKV videos with subtitles. Here's how to use MKVToolNix to embed SRT to MKV on Windows.
Step 1. Before you start using MKVToolNix, make sure you've got an SRT file for your MKV movie from subtitle download sites like YIYF Subtitles and OpenSubtitles.
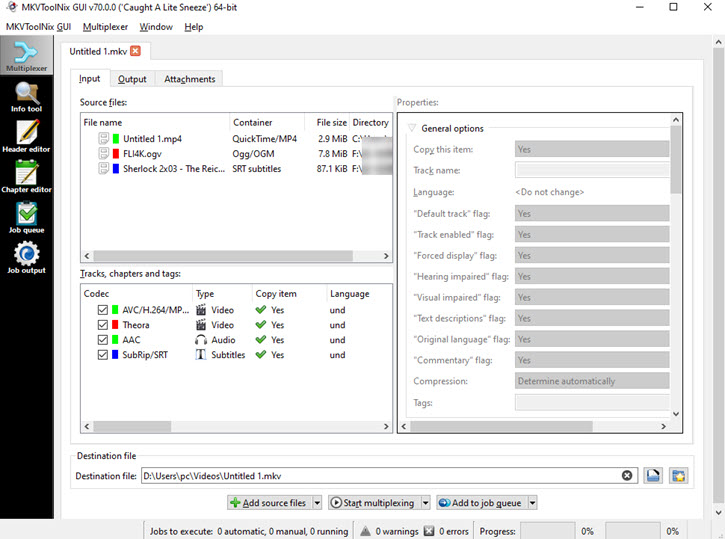
Step 2. Launch MKVToolNix and open its Multiplexer tab.
Step 3. Import an MKV video and an SRT subtitle file from your PC to this program. Click Start multiplexing and wait for it to export. When it finishes, you can open the file with a capable player that reads the subtitle track.
3. Add Subtitles to MKV with FFmpeg
Best for: Merging subtitles with MKV videos for free
FFmpeg is an open-source and powerful program that convert, compress, and stream videos in many formats. It completes tasks via command lines, so it's not friendly to beginners who want to add subtitles to MKV videos in no time. If you know quite well about some code technology, you can follow the steps below to embed SRT to MKV permanently on Mac and Windows.
Step 1. Download FFmpeg from its official website. Unzip the download pack.
Step 2. Create a new folder on your computer and name it FFmpeg. Move the download pack to the new folder.
Step 3. Open Run on Windows or Terminal on Mac to launch FFmpeg.
Step 4. To merge SRT subtitles to MKV, you need to input the following command line:
ffmpeg -i inputfilename.mkv -i subtitlefilename.srt -map 0:v -map 0:a -map 1:s -c:v copy -c:a copy -c:s copy outputfilename.mkv
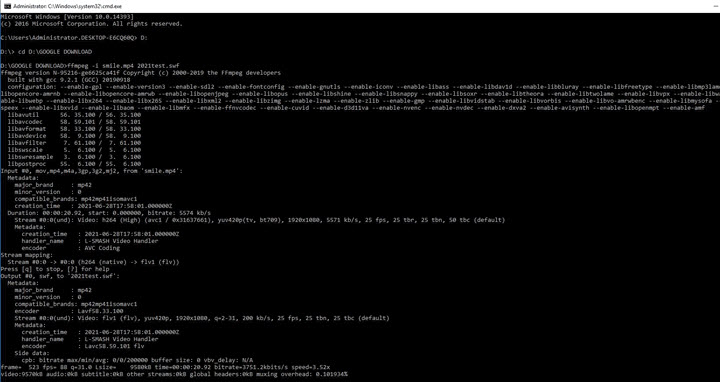
Step 5. Wait for it to export. Finally, you'll get an MKV video with subtitles embedded.
4. Add Subtitles to MKV with VLC
Best for: Adding soft subtitles to MKV for free
VLC is a free and powerful video player running on Windows and Mac. Surely it can play movies and separate subtitle files simultaneously. Beyond that, it can encapsulate subtitles and the MKV video into one file. So that you don't need to open MKV and subtitle tracks one by one. Here's how.
Step 1. Open VLC media player. Click Media > Convert/Save to add a .mkv file from your computer.
Step 2. Check the box before Use a subtitle file to import a .srt file from your PC. Click the Convert/Save button to proceed.
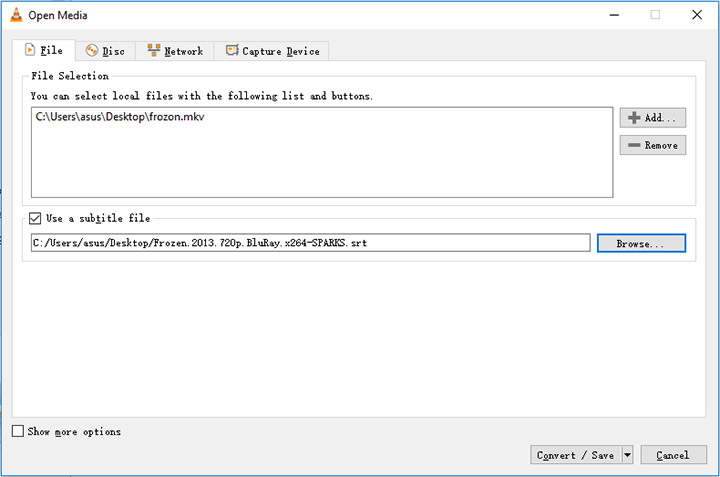
Step 3. Click the wrench icon in the Profile option. Open the Subtitles tab.
Step 4. Enable subtitles and choose Overlay subtitles on the video. Click Save and export.
5. Add Subtitles to MKV Online
Best for: Adding subtitles to short/small MKV videos
Some online video editors also allow you to add subtitles to MKV. It is a good option if you don't want to install any program on your computer. But the drawback is their limited video processing capabilities. They cannot handle long MKV files over 1 GB and will degrade the final video resolution and quality. If your file is small, you can try Kapwing to add text to your video with Kapwing.
Step 1. Go to the official website of Kapwing and open its online video editor.
Step 2. Import a .mkv file from your computer, Google Drive, or Dropbox. Then drag and drop the video to its timeline.
Step 3. Click the text icon to type the subtitles when every character speaks in the movie.

Step 4. When you finish adding subtitles line by line, click Export and ask it to render a whole new video with subtitles. At last, save the video to your computer or share it via the link generated by Kapwing.


