By A.J. McCann -
Contact Author:
[Solved] Adobe Premiere Pro Shortened Video Length After Import
 If you are searching for an easy solution, click here: The solution most recommended by us [85%]
3 Effective Solutions to Video Duration Is Shorter After Importing into Premiere Pro
Video nerds are always making their efforts to shoot and create professional-looking movies. So they learn about photography and post-production skills to make their cameraman dream come true. Adobe Premiere Pro, as the granddaddy of video editing, is uber-popular among these shutterbugs. Today in this post we will still put our focus on troubleshooting common Adobe Premiere Pro errors, get into the detail, the error that Premiere Pro not importing full video before editing.
"Not importing full video" is easy to understand, which means the video imported into Adobe software becomes shorter than it actually is. Well, before cutting to the chase, let's take a look at some user questions at first:
- When I import a long video in Premiere Pro CS6, in time line, the time is shorter than its real time.
- This hasn't happened before, but now when I am importing several short (around a minute or two) videos into Premiere, some of them are trimmed to 9 seconds, and so forth. I've checked the clip numerous times and it is still the right duration.

Drawn from the customer descriptions listed above and more online, we can define that this issue in most cases has nothing to do with the software performance, but is related closely to the video compatibility and software settings. Well, no more words, let's get down to the fixing methods right now.
Solution 1 - Try Basic Troubleshooting Ideas to Fix Premiere Pro Not Importing Full Video+
In case there are some newbies who are not familiar with Adobe troubleshooting stuff, here we give some simple tips to isolate and resolve the importing issue in the easiest way. Note the tips are listed at random below, therefore, you can try them at will.
- 1): Restart the software. If it's useless, reboot the computer then.
- 2): Rename the affected video or the folder the affected video is located.
- 3): Update the drivers of computer to obtain the best performance.
- 4): Delete and re-install the latest version of Premiere Pro. Creative Cloud Cleaner Tool is recommended to remove the software completely.
- 5): Try new sequence or project to avoid the source video gets damaged when importing.
- 6): Test the video file with importing error on any other computer or with a different user account. If Premiere shortens its time in the same way, move on to the advanced solutions below.
Solution 2 - Clear Software Cache or Check Frame Rate Setting to Avoid Video Time Not Matching Problem+
If the cache is not large enough, Premiere may encounter some importing errors like video and audio are out of sync, the video fails to import and videos not importing at the full length. Here it's suggested to clear Premiere's cache up to eliminate the influence of it.
From Windows users: Go to Edit -> Media -> Media Cache and select clean.
From Mac users: Go to Preferences -> Media -> Media Cache and select clean.
Alternatively, you can head to the media cache location and delete the files manually. Below are the default paths for both Windows and macOS computer (which can be adjusted under Preferences -> Media):
For Windows: /Users/username/AppData/Roaming/Adobe/Common
For Mac: /Users//Library/Application Support/Adobe/Common

Most often, frame rate is just the root cause. If the frame rate value under project/Timeline properties is smaller than that of the source video, when you load video into software, it will be compressed at lower frame rate so that the video duration may become shorter than before.
Thus, do check the frame rate of original footage via MediaInfo and the project/timeline properties, make sure they three stay the same, say 23.976, or 29.970, 30 fps and 60fps.
In many cases the major cause for "Adobe not importing full video" lies in the video compatibility. The Easiest & Fastest Solution 3: Convert the source video to a fully Adobe Premiere pro compatible format.
Since the cause of Premiere Pro not importing full video may vary from systems, hardware, software and the problematic videos, you must try the solutions listed above one by one to take your chance to resolve this error. Sounds time-consuming, ah? If you couldn't bear the one-by-one fixing flow, luckily, there's another way to figure this video length not matting matter out fast, and that's exactly converting video before importing.
VideoProc Converter AI - The One-click Solution to Fix Adobe Not Importing Full Video Clip Error.
- By transcoding the video to other format/codec, you can import it to Premiere Pro at the right length.
- By offering a series of editing features, VideoProc Converter AI lets you import the full video and do basic edits.
- By supporting hardware acceleration, it can boost the processing speed without compromising quality.
 Download VideoProc Converter AI on Windows
  to import full video to Premiere
 Download VideoProc Converter AI on Mac
  to import full video to Premiere
How to Convert Video That Failed to Import into Premiere Pro at Full Length
Please get the installer of VideoProc Converter AI downloaded on your machine and then accomplish the setup by following the wizard. After that, launch it to convert video in this way:
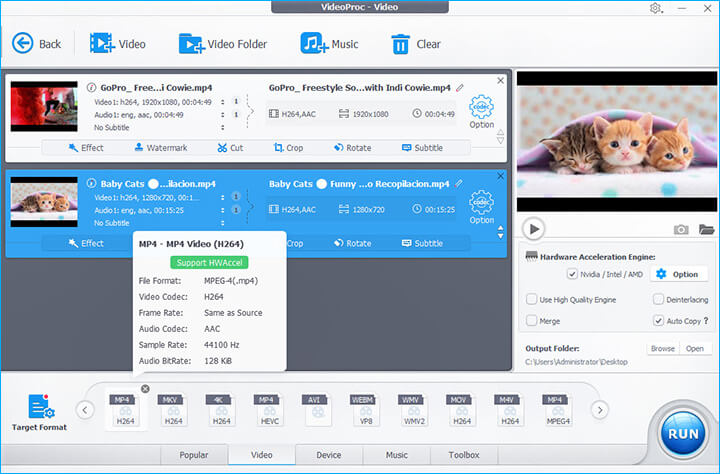
Step 1. Add the Source Video: VideoProc Converter AI is a one-stop video processing software, so there are four function buttons located on its main UI. You should click the "Video" button to pop up a video conversion panel. Here, you can drag the source video into software with your mouse or click "+ Video" to select and open video with VideoProc Converter AI.
Step 2. Choose the Target Format: When the video clip is loaded fully, move on the bottom of the UI and choose a target format from the profile list. You can convert your video to other format or codec as you and Adobe like, for example transferring AVI to MP4/MOV, transcoding HEVC to H.264. >> Adobe Premiere Pro Supported File Formats

Note: All the output profiles have optimized presets regarding frame rate, resolution, bit rate, aspect ratio and the similar. Bear in mind that if you don't want to sacrifice the video quality during conversion, do keep the parameter values the same as source. You can click exclamation mark (on the left side of input video name) to get all the source media's information.
Before you get the conversion started, you are also enabled to do some basic edits with this lightweight tool, cutting, cropping, rotating, flipping, changing playback speed, adding watermark and enhancing the quality of shaky/noisy video, just to name a few. >> See more editing features
Once done, import the resulting file to Adobe Premiere Pro or Premiere Elements and see if it can be imported now.
Step 3. RUN the Conversion: You can give one more look at the conversion/editing settings and then tap the round "RUN" button. Depending on the file size and computer's hardware configuration, this operation may take some time from several seconds to a few minutes. You can see the whole progress at a smaller conversion dialog box.
The Final Words:
When the conversion is finished, you can import the video again into Premiere Pro to see if the time is correct. If it has the right length, congratulations! But if it doesn't match the right time in the same way, well, you will need to contact the support team of Adobe. The last advice for your reference, the video taken by professional cams is more suitable for Adobe than that by mobiles.


