Here you can find 14 solutions reported by users from various forums and Q&A communities, that are proven to be working to fix Sony Vegas not rendering full video errors.
Each solution comes with an analysis for the specific scenarios and detailed steps are included to help you troubleshoot the Sony Vegas rendering issues.
To help the readers to troubleshoot the error quickly, this post prioritizes the solutions, with the method that most readers reported as workable staying high on the list.
These methods tackle the following issues and beyond:
- Sony Vegas not rendering the whole video, instead, it only renders part of video;
- Sony Vegas rendering stuck at a certain percentage, and it cannon finish rendering the whole video;
- Sony Vegas cannot render long video, such as hours of clips. It crashes halfway;
- Sony Vegas video rendering is problematic, the output video gets black screen or other errors.
Read on to try each solution and solve your problem now.
Solution 1. Turn off Render Loop Region Only Option
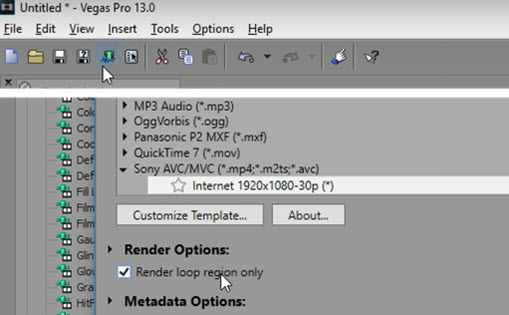
Turning off render loop region is the most effective solution to fix Sony Vegas not rendering full video error.
Quick Guide: Go to the Sony Vegas Project menu, and click the Render As button. In the pop-up window, uncheck the box "Render Loop Region Only". Then start to rend the video as you normally do, you shall find Sony Vegas now render the full video for you.

If you are using the Movie Studio Platinum version, go to Make Movie > Save to Hard Drive > Advanced Options, and disable "Render Loop Region Only".
Analysis: If you are interested in why this can solve the error, here is a detailed explanation.
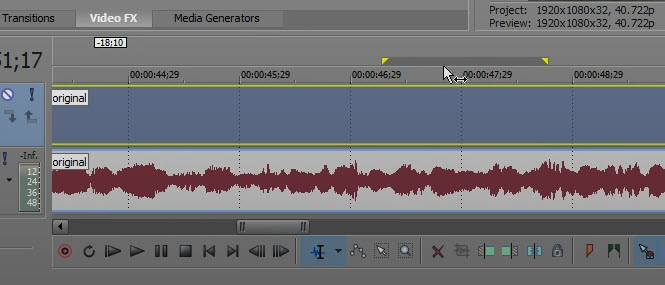
The option Render Loop Region Only means literally it will render and export the selected region (loop region) on the timeline. The loop region is the area indicated by the split yellow triangle and the blue lines. It can be created on purpose by you, or inadvertently when you drag the mouse above the timeline.

Above is the screenshot of how the loop region looks like in Sony Vegas.
It can be a handy option or an annoying feature in different scenarios. For the handy aspect, you can render a portion of the video as a demo, or check how it looks like, without waiting for a long render time.
For the annoying part, many users complained that they keep making loop region selections by accident, and have to manually minimize the selection or drag the in and out point to the entire project.
Pro Tips:
Remove the loop region selection (yellow triangle, blue lines)
To avoid accidental creation of the loop region selection, here is the method to prevent the auto creation of loop region when you drag above the timeline (or accidentally split the paired yellow triangle):
Go to the Menu bar in Sony Vegas, click Options > Preferences, and tick: Collapse loop region when no time selection is present.
With this option enabled, now when you accidentally create a loop region selection, you can click somewhere else on the timeline, and that loop region will be collapsed.

Solution 2. Extend the Loop Region to the Beginning and End Part of the Full Video
From the analysis in the previous solution, you already know that you can ask Sony Vegas to render and export the full video, instead of only render the smaller portion of the selected region.
Alternatively, you can tick the option to Render Loop Region Only, and drag the selection arrow to cover the entire project. That is, making the full video as the loop region. Then when you export the video, Sony Vegas not rendering full video error will be addressed.
Quick Guide:
Click on the yellow triangle and drag it to the very beginning of the video, then click the next yellow triangle and drag it to the end of the video.
Note: Make sure the audio ends with the video. If the audio is longer than video, and you drag the yellow triangle to the end of the project (the end of the audio clip), then in the exported video, you shall see the last part of the video remain in black screen, with audio playing in the background.
Solution 3. Save the Project as Another One
This might sound less motivational, but many users find it useful to solve "Sony Vegas not rendering the full video" problem. One possible explanation is that you may have clicked on the wrong places or messed up with certain settings, saving the project as another one can start afresh while reserving the already edited videos.

Quick Guide:
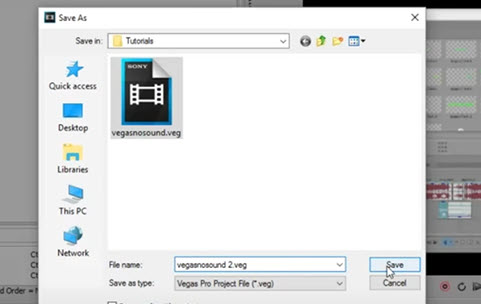
Step 1. You need to go the menu in the current project in Sony Vegas, and choose the option Save As. Now enter another name for the project, and save it as another project.
Step 2. Close the current project, and open up the newly saved project.
Step 3. Try rendering in the new project, and see it you can export the video in full length.
Solution 4. Render the Crashing Points to the New Track
The "Render to new track" option is used by some users to smash a rendering issue. Since it will create a newly rendered file to a new track, on top of the original video, you can use this feature to deal with the crashing sections.
For instance, let's suppose Sony Vegas won't render the full video, and often crashes at 00:40:00. Here is the steps to fix the error:
Step 1. Select the region that tends to be problematic, for instance, starting from somewhere near 00:40:00 and to the end of an effect or important areas.
Step 2. Go to Tools > Render to New Track.
Note: Make sure the new track is set to use the same profile that matches the original video (resolution, fps, codec, etc.).
Step 3. Now that the selected region has been rendered into a new track, above the original video, you can delete the original part that keeps locking up the rendering process, while maintaining other parts on the original track.
Step 4. Render the whole project out, using the Render As option as you usually do.
Now you will find the "Sony Vegas not rendering full video" problem be gone for good. If somehow Sony Vegas still only render part of the video, you can go on with next troubleshooting method.
Solution 5. Check If You Have Enough Storage Space and RAM Memory
For some users, the "Sony Vegas not rendering full video error" is demonstrated as crashing at certain percentages. For instance, everything may go well in the beginning, and then it crashes at 75%.
It may throw you an error message "An error occurred writing the file. Make sure you have the write access to the file/folder and that there is enough free space."
Lack of storage space or RAM memory can be accounted for the error. It is especially true when the intended output file is hours long. The virtual memory will need to accommodate Gigabytes of buffers, and there will also be a temporary file (.tmp) that is the same size as the target output file.
Pro Tip:
Upgrading the hardware and installing RAM memory might not be the best choice for many users. If you are trying to render a large project, you can render it segment by segment, which will relive the hardware and virtual memory.
Then you can use dedicated video mergers to merge separated videos into one video, losslessly, without re-encoding.
Solution 6. Disable "Smart Resample" in Sony Vegas
Some users also report the rendering hiccup arises when "Smart Resample" is enabled. Unchecking this feature can prevent rending issues for certain scenarios.

Quick Guides:
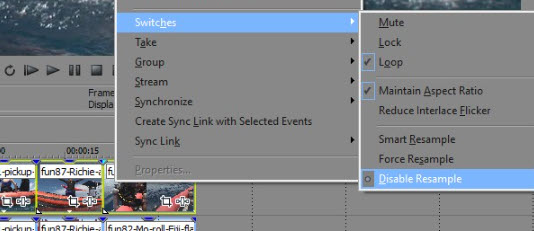
Step 1. Select all the clips in the timeline (shortcut Ctrl/cmd +A).
Step 2. Right-click on the clip, go to Switches, and hit Disable Resample.
Now the Smart Resample option is disabled, and you can go on to export the video, and see if Sony Vegas not rendering full video problem still exists.
Solution 7. Turn off GPU Acceleration in Sony Vegas
GPU Acceleration can be another cause for this "Sony Vegas not rendering full video" annoyance. You can try to turn off GPU Acceleration, and restart the program to render again. Several users have find it works for them. After turning off GPU accerlation in settings, "Sony Vegas only renders part of video" is no longer a problem.
Quick Guides:
Step 1. Go to Options > Preferences.
Step 2. Turn off GPU Acceleration.
Step 3. Apply the settings, save the program and close Sony Vegas.
Step 4. Re-launch the project, and go on rendering the video.
Solution 8. Increase Dynamic RAM in Sony Vegas
Note: this is a solution to fix the "pre-render feature not rendering the whole selected area" issue. If you are looking for render in terms of exporting the video, refer to solutions above.
If you are using Shift+B to pre-render the project in Sony Vegas, and notice that the software only pre-renders a portion of the selected area, here is the fix.
Since Shift+B renders into memory, in order to make Sony Vegas pre-render longer, you need to increase the Dynamic RAM in Preferences.
Quick Guide:
Step 1. Go to Option > Preferences, and click the video tab.
Step 2. Enter a number to control the amount of Dynamic RAM allocated to the video preview.
Once you don't need the RAM cache, you can type in the value 0 for the Dynamic RAM preview, or you can resize the preview window to clear the cache.
Solution 9. Turn off Antivirus Software or Other Security Software
Certain security software may not be compatible with Sony Vegas. You can try to exit the antivirus or security software temporarily before rendering the project.
Plus, running multiple antivirus programs simultaneously can slow down the system and occupy computing resources.
After quitting the security software temporarily, you can click Render As icon from Sony Vegas, export the normal way you do, and check if the problem of Sony Vegas not rendering full video still persists.
Solution 10. Make Sure You Have Administrator Privileges
Another troubleshooting method you can try is to run the software as administrator, and make sure you have admin rights to related folders and programs.
Quick Guide: Right-click on Sony Vegas, and hit Run as Administrator.
If Sony Vegas alerts you that it lacks the permission to write to the file/folder, you can also try to enable administrator privilege on fileIoSurrigate.exe which is in the installation folder of Sony Vegas.
For instance, if you install the program in C: drive, it is in this path:
C:/program files/VEGAS/18.0/X86/fileIoSurrigate.exe
You can also go to the output folder, and ensure it has permissions for full control, and can modify, read and execute.
Solution 11. Save and Restart the Project
It is old cliché to restart a program once something goes wrong, still, many users claims this simple action have saved their hours of work.
To do so, simply press Ctrl/cmd + S to save the current project, close it, and launch the project again.
The project file of Sony Vegas ends in .veg as the file extension.
Now you can try to render full video in Sony Vegas.
Solution 12. Copy and Paste the Timeline to a New Project
Alternatively, you can also try copying and pasting the entire timeline to a new project.
Step 1. Drag the mouse to select all the tracks and regions on the timeline, and copy them.
Step 2. Create a new Sony Vegas program, and paste the timeline.
Step 3. Try render the full video and see it is works.
If your video is quite long, and you don't wait to wait for hours to get the result, you can also try rendering the problematic point that fails in the previous project. For instance, if your video rendering stuck at 86%, now you can try start somewhere near that point.
Solution 13. Set Rendering Settings to Match the Source Video
This may happen when you record the source video differently than you do normally.
For instance, you may be using Sony AVC/MVC: AVCHD 1920×1080 Codec all the time, and now you change the camera to record in 1440x1080. But when rendering the video, you still go for that old profile.
Quick Guide:
Always make sure the output format matches the project settings and the source video.
Solution 14. Don't Use the Pirated Copy of Sony Vegas
Besides showing respect for the developers, it makes sense to use the official version of Sony Vegas to avoid bugs and malware. Pirated Sony Vegas may fail in rendering the full video, making all your efforts a waste of time.
If you prefer a free Sony Vegas alternative, you can check this list of top 18 free video editing software.


