As the go-to video editing software for Mac users sculpting their visual narratives, iMovie opens the gateway to seamless video editing. But users may find themselves sometimes entangled in the error message 'not enough disk space iMovie', particularly on Macs with limited startup disk space. If this hiccup is interrupting your editing flow, you've come to the right place. Below we have put together a complete tutorial explaining the reasons behind and solutions to the 'not enough disk space for iMovie' error. Read on!

Why Does iMovie Say Not Enough Disk Space
The "iMovie not enough disk space" error typically occurs for a couple of reasons. Firstly, if your Mac's startup disk is nearly full, iMovie may struggle to function properly. This happens because iMovie generates a substantial number of temporary and cache files, gobbling up significant space over time. Ideally, iMovie likes to have a minimum of 25GB of available storage to ensure a smooth operation. If your Mac initially only came with 128GB or 256GB, using iMovie can swiftly fill it up, triggering the "not enough disk space" error.
Other contributors include an outdated iMovie version, corrupted iMovie installation, and large iMovie project files, especially those containing high-resolution videos or numerous edits.
Based on the possible causes brought here, we have presented below the top 6 solutions that you can leverage when there is not enough disk space for iMovie.
How to Fix iMovie Not Enough Disk Space Error
Method 1. Clean Your Disk Space
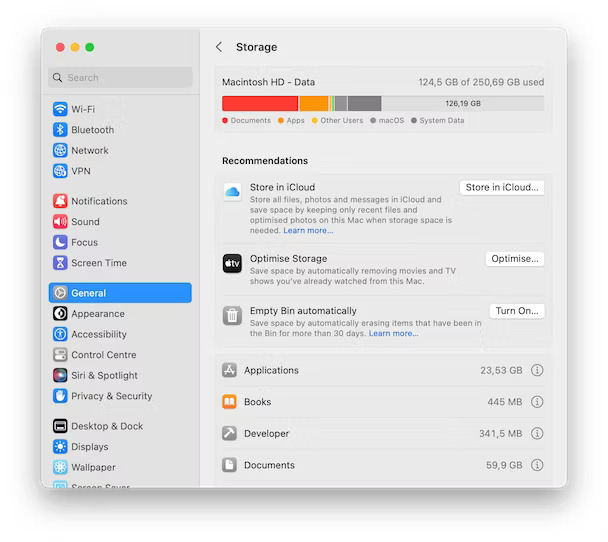
First thing first, ensure you have sufficient disk space, which sets the stage for a smooth iMovie editing experience. To check your Mac's disk usage: click the Apple icon in the upper left of your home screen, and go to the Storage tab, where you can find a detailed breakdown of your Mac's storage usage. If you find limited free space left, identify the major culprits consuming your storage, and clean them out.
Method 2. Update/Reinstall iMovie
Running an outdated iMovie may lack the efficiency and optimizations for proper storage management, leading to errors 'not enough disk space for iMovie'. Besides, newer iMovie versions often come with feature updates and bug fixes that contribute to more effective storage utilization. Thus update or reinstall iMovie, and ensure you are running the latest version of the software.
- To update iMovie, go to the App Store and check for any updates available.
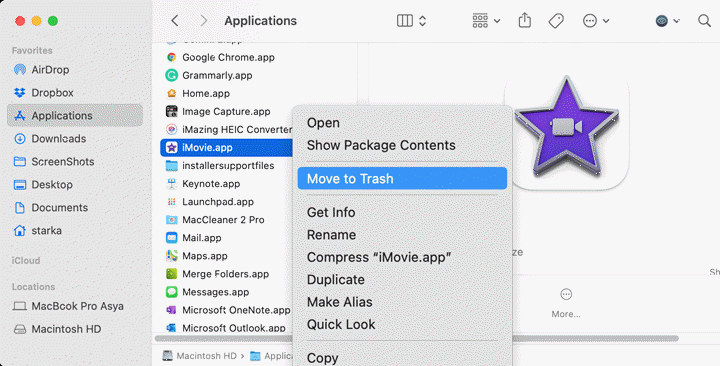
- To reinstall the software, open Finder, and navigate to Applications > iMovie. Right-click the app icon, and select "Move to Trash". Then open Finder again, and from the top, click Go > Go to Folder. In the pop-up, enter ~/Library. Select the iMovie-related files, which are typically found in folders like Caches, Containers, Application Support, and Preferences, move them to Trash, and empty the Trash afterward permanently to remove iMovie and its associated files. Then you can reinstall it on your Mac and check if the error 'not enough disk space for iMovie' persists.
Method 3. Delete Outdated iMovie Projects
If you've accumulated numerous projects in iMovie over time, it's better to declutter and clear out the outdated or unused ones. Not only does this help in terms of organization and finding what you need more easily, but it also frees up valuable storage space on your Mac and fixes the error 'not enough disk space on iMovie'. To deleted
To delete unwanted iMovie projects:
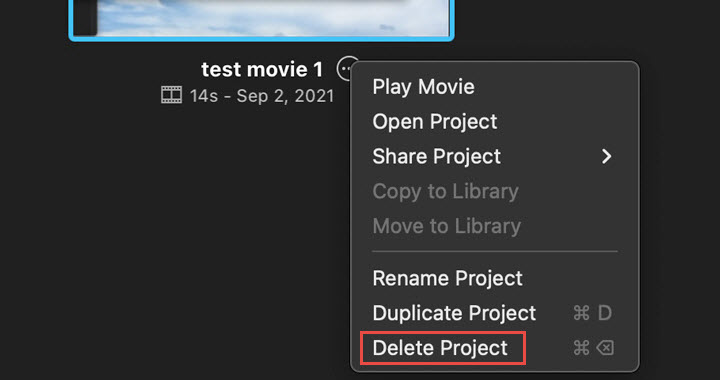
Step 1. Open iMovie, and click on Projects at the top of the window.
Step 2. Choose the project you wish to remove and hover over its name with the mouse pointer.
Step 3. Click on the three-dots icon.
Step 4. From the menu, select Delete Project. Repeat the process for any additional project you wish to remove.
Now restart iMovie and see if the error of iMovie saying not enough disk space is fixed.
Method 4. Delete iMovie Library Files
Clearing iMovie library files is another way to address the 'iMovie not enough disk space' error. The iMovie Library holds all your video clips and photos, and if it becomes too large, it can quickly eat up your Mac's storage. Deleting unwanted or unnecessary files within the iMovie Library not only frees up space but also streamlines your iMovie projects. To do that:
Step 1. In iMovie, open a project.
Step 2. Click on the iMovie library in the sidebar to access all the clips saved by the software.
Step 3. Select the clips you wish to remove, right-click and choose 'Delete Media from Event'.
Now restart iMovie and see if the error vanishes.
Method 5. Delete iMovie Render Files
Apart from deleting iMovie projects and library files, you can also remove the rendered files in iMovie. This method is advantageous since it spares your iMovie projects from any direct impact. However, it's essential to note that this action may temporarily influence iMovie's performance until the application regenerates the specific render files essential for your active projects.
To delete iMovie rendered files:
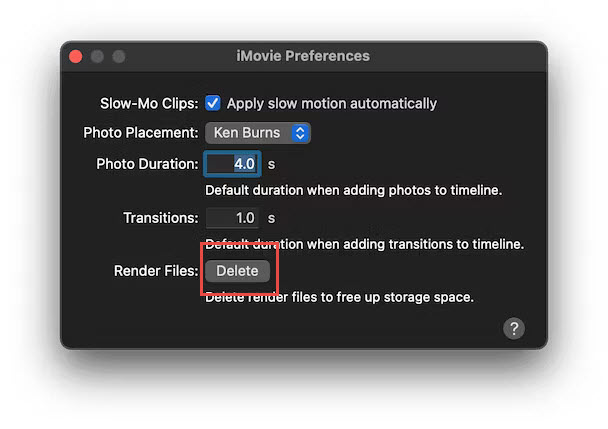
Step 1. Click the iMovie menu in the top left and select Preferences.
Step 2. Click the Delete button beside the Render Files > Delete to remove the iMovie Render Files.
Method 6. Move iMovie Library to An External Drive
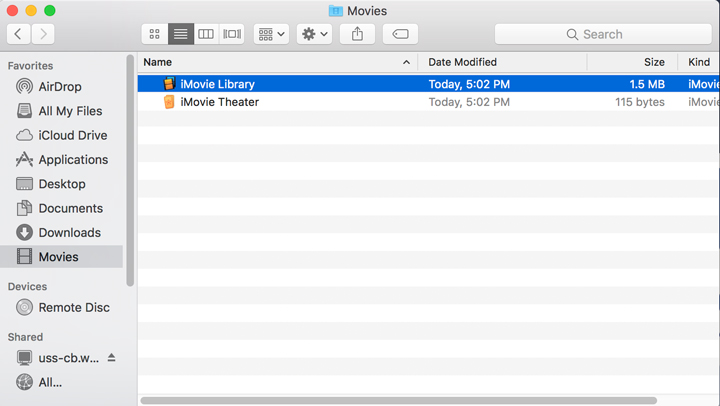
Users also run into the situation where iMovie claims there's not enough disk space, yet it seems like there's nothing left to delete. In fact, iMovie stores all your projects, clips, and associated media into a unified large file that is typically housed in the Movies folder within your Home folder. If your Mac is grappling with limited free disk storage space, a practical solution is to move your iMovie library to an external hard drive and free up the space on your Mac.
To do that:
Step 1. Ensure the iMovie is closed on your Mac. Connect your external drive and reformat it as APFS or MacOS Extended (Journaled).
Step 2. In the Finder window, select the external drive > File, and choose Get Info. Click the triangle next to Sharing & Permissions, and ensure "Ignore ownership on this volume" is checked.
Step 3. Go to the Movies folder in your user Home directory.
Step 4. Drag the iMovie Library file to the external disk. Once the transfer is complete, double-click to open it in iMovie. If prompted for access to your external hard drive, click OK.
Step 5. Drag the original iMovie Library file from your Home folder to the Trash, and empty the Trash
By doing this, you can free up space on your Mac and solve the 'not enough disk space for iMovie' error.
Bonus: Use the Best Free iMovie Alternative
For those seeking an iMovie alternative that consumes less storage space than iMovie itself, try VideoProc Vlogger, the free lightweight video editing software. It offers a rich array of editing features, including text overlays, color adjustments, diverse filters, and effects, audio enhancements, motion, speed control, and more. Particularly noteworthy is its efficiency in delivering these advanced editing tools without burdening your storage significantly, setting it apart from other free alternatives.
VideoProc Vlogger - Best Free Lightweight iMovie Alternative
- Best free lightweight iMovie alternative for both beginners and experts.
- Edit videos of all kinds without imposing a hefty storage load
- 14+ Bezier speed curves to change speed at a variable rate.
- Stylish effects, filters, transitions, motion, audio, and texts for a quick touch-up.
- 100% free, safe, clean, and simple to learn for all users.
Excellent ![]()
![]()


