Summary: Logitech c920/c270 webcam not working? Follow through the post and learn the best 6 solutions to fix the 'Logitech camera not working' error on Windows/Mac. If Logitech Capture is failing to detect your webcam, try the best Logitech alternative to record videos.
Dealing with unexpected tech glitches can be frustrating, especially when your Logitech camera decides to go offline just before a video call. While Logitech webcams, from the popular C920 to the more basic C270, are known for their reliability, they’re not immune to errors. One common issue users face is the Logitech camera not working or being detected. If you're encountering this problem, don’t worry—below are six effective solutions to fix the "Logitech camera not working" error. Read on!
Why is the Logitech Webcam Not Working
If your Logitech webcam isn't working, here are some common causes and solutions:
- Driver Issues: Outdated or corrupted drivers can cause problems. Update or reinstall the webcam driver from the Logitech website or via Device Manager.
- Software Conflicts: Other apps (like Zoom or Skype) may be using the webcam, blocking access for other programs. Close these apps or check Task Manager.
- Camera Privacy Settings: Ensure the webcam has permission in your system's privacy settings (Windows: Settings → Privacy → Camera; Mac: System Preferences → Security & Privacy → Camera).
- Hardware Issues: Check USB connections or try a different port. The webcam may be faulty if other solutions don’t work.
- OS or App Updates: Ensure your operating system and apps are up to date.
Based on these issues, we have concluded the 6 best solutions to fix your Logitech webcam when it's not working.
How to Fix Logitech Camera Not Working
Given the versatility of Logitech webcams, factors that contribute to the 'Logitech camera not working or detected' error can come down to many, such as damaged physical components like ports, cables, or the webcam itself, permission issues, misconfigured webcam settings, outdated or corrupt webcam drivers, etc.
Based on these possible causes, we have collected below 6 best ways to address Logitech webcam malfunctions errors:
Method 1. Check the connection port
Checking the connection port is always the first step in troubleshooting the Logitech camera not working error. A loose or faulty connection can lead to disruptions in communication, causing the camera to malfunction. By examining the connection port and checking if the wires are tangled or damaged, you can rule out a common and easily fixable cause before digging into more complex software or configuration problems.
Method 2. Check if the system detects the webcam
In instances where the system fails to detect the webcam, you can troubleshoot the Logitech camera not working or detected by checking if your system can recognize the camera:
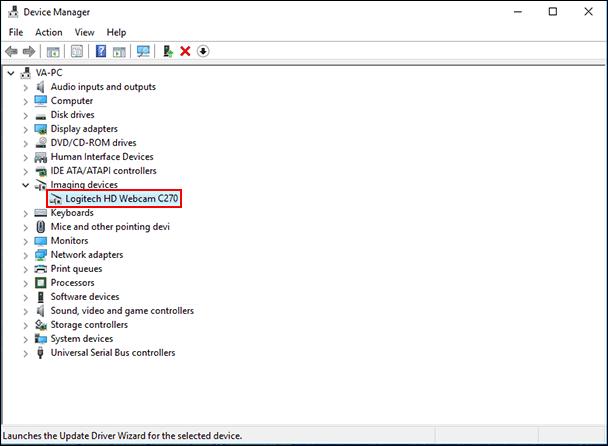
Step 1. Press the Window logo key + X and select Device Manager.
Step 2. Locate the Imaging devices.
Step 3. Double-click it and check if the Logitech webcam shows up. If the Logitech webcam remains undetected, unplug the webcam, shut down your system, plug back the camera, and restart the PC. After that, your Logitech camera shall function properly.
Method 3. Check Privacy Settings
Windows privacy settings can be another contributor to Logitech webcam problems due to the restrictions they impose on the camera's access to certain functionalities. Privacy settings are designed to safeguard user data and protect against unauthorized access to devices, including webcams. When these settings are too stringent, they may block the Logitech webcam's ability to function properly and lead to the Logitech C920/C270 camera not working error.
To check and change the privacy settings on Windows 10/11:
Step 1. Press the Windows logo key + I to enter the Settings page, and select Privacy.
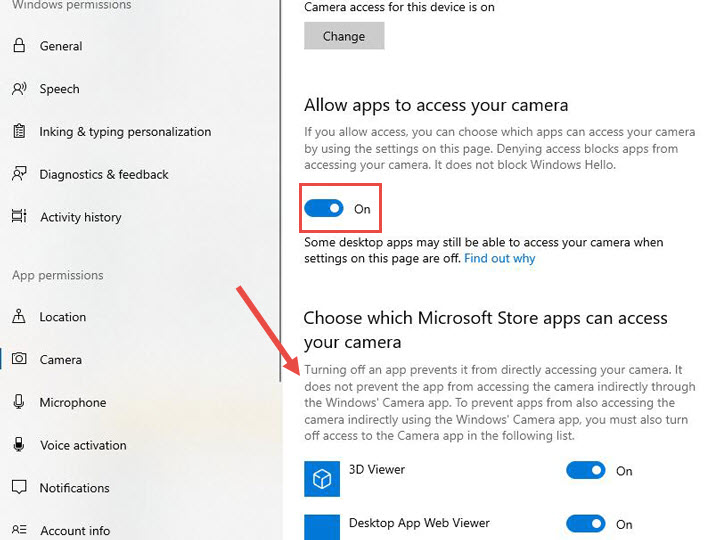
Step 2. Click the Camera option from the left sidebar > Enable Allow apps to access your camera.
Step 3. Scroll down, go through the list of apps and, toggle the switch to enable access for the specific apps for which you wish the Logitech webcam to function.
Now try the Logitech webcam again to see if the camera works properly.
Method 4. Reinstall the Logitech software
Reinstalling Logitech software proves to be another solution to fix the webcam issues, as this can address potential problems such as corruption, outdated software, driver issues, configuration errors, and missing files. To do so:
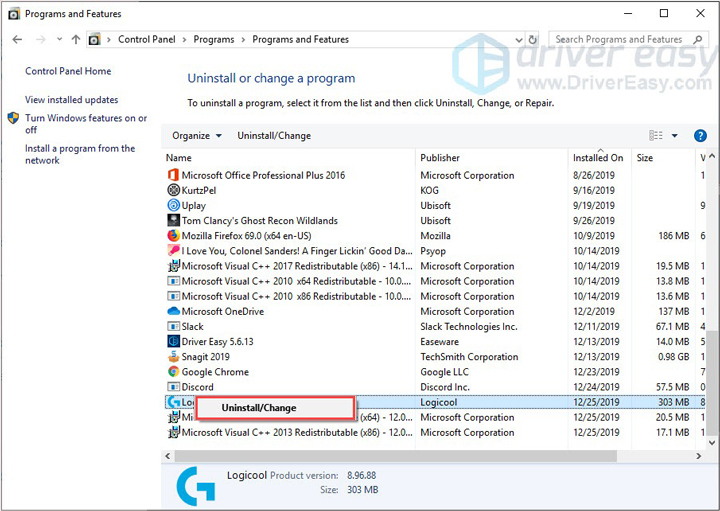
Step 1. Press the Windows logo key + R, type appwiz.cpl, and press Enter.
Step 2. Right-click on Logitech software, choose Uninstall and select THE DRIVER.
Step 3. Once the uninstallation is complete, restart the camera to check if it works with your software. If the error persists, uninstall the entire Logitech software and re-download it from the Logitech website.
Method 5. Disable conflict apps
Logitech webcams may encounter issues on Windows 10 due to conflicts with other programs like Skype, Discord, VPN, etc. In such instances, disabling these conflict apps can fix the error and restore seamless performance to your Logitech camera.
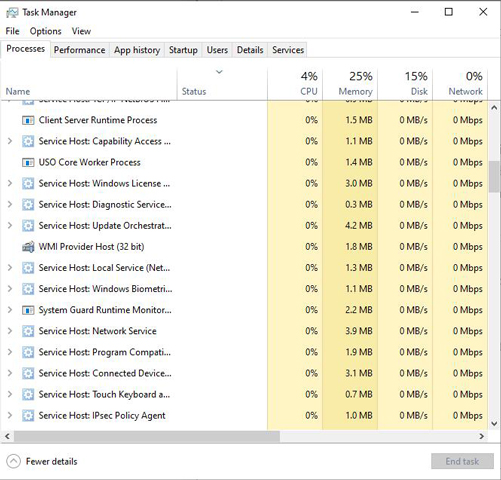
Step 1. Press the Ctrl, Shift, and Esc keys simultaneously to open Task Manager.
Step 2. In Task Manager, find the conflicting programs like Skype, Discord, VPN, etc., right-click and select End Task.
Step 3. Restart your camera and see if the Logitech camera can work properly.
Method 6. Re-install Logitech webcam driver
Over time, the driver installation may become corrupted, leading to operational issues. Reinstalling the driver could ensure a fresh and clean setup, eliminating potential corruption and fixing the Logitech camera not working error. To do that:
Step 1. Press the Window logo key + X and select Device Manager.
Step 2. In Device Manager, navigate to Imaging devices, expand it, and right-click on the Logitech webcam.
Step 3. In Device Manager, navigate to Imaging devices, expand it, and right-click on the Logitech webcam.
Use Logitech Capture Alternative to Record Videos
If Logitech Capture is failing to detect your webcam and you are loath to cope with the technical issues, you can try the best Logitech alternative to record your videos.
As the best Logitech Capture alternative and the top webcam recording software, VideoProc Converter AI not only allows you to record from your webcam or virtual webcam but also enables simultaneous recording of the desktop screen and webcam. Notably, the inclusion of the Chroma Key feature empowers users to effortlessly remove or modify the webcam background. Besides, packed with a basket of utility tools, you can crop, draw, and highlight any content, and even add outlines, texts, arrows, voiceover, images, and more.

VideoProc Converter AI – Best Logitech Capture Alternative for Windows/Mac
- 4 recording modes; options to simultaneously record webcam and computer screen.
- Real-time drawing of annotations, outlines, texts, and arrows.
- Support popular video formats and GPU encodings.
- Record, edit, compress, convert, and trim screen recording in one-stop.
![]() Excellent
Excellent ![]()
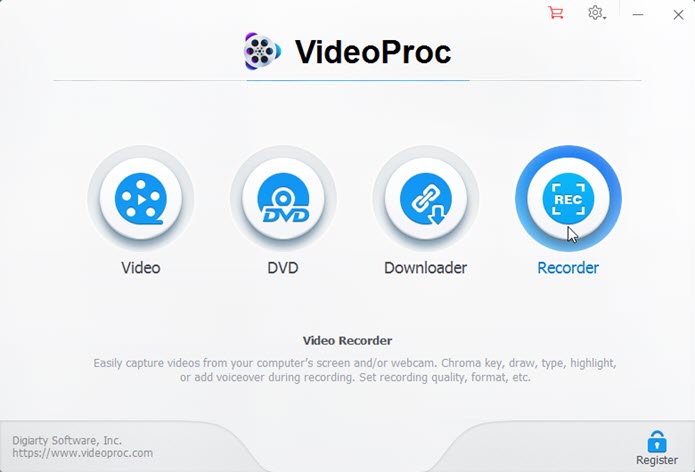
Step 1. Free download VideoProc Converter AI, install and launch it. Click the Recorder module.
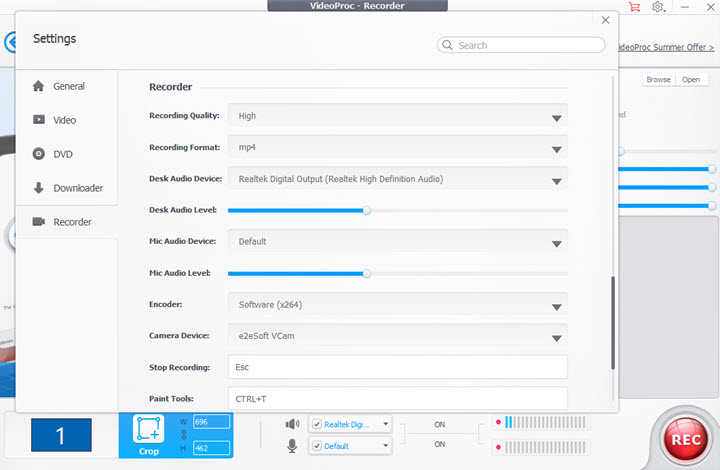
Step 2. Click the gear icon on the upper-right corner to open Recorder Settings. Expand the dropdown menus of Desk Audio Device and Camera Device to choose your facecam and microphone. Configure other settings if necessary.
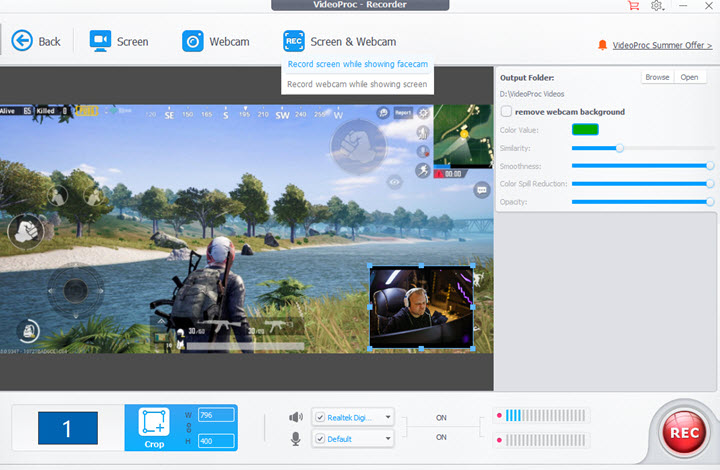
Step 3. Back to the Recorder panel, select 'Screen & Webcam' > 'Record screen while showing facecam' or 'Record webcam showing screen' based on your need. Use the Crop tool to select to record a part of your screen if needed.
Step 4. Click on the Rec button to record the screen with a webcam on Windows/Mac, and you can use the shortcut 'Ctrl+Alt+Shift+T' to activate or hide the painting tools during recording.
Once finished, press the Stop button to stop recording, and the recording file will be stored in the location you previously set.

