Ever taken a photo that seemed perfect, only to find it slightly blurred or lacking in sharpness? Image sharpening can be your solution.
Sharpening is an important part of any image editing workflow. It accentuates details and increases the contrast at image edges, making in-focus areas look sharper. In Photoshop, you have several tools at your disposal to achieve crisp and clear results.
So, how to sharpen an image in Photoshop? In this guide, we'll explore how to bring out the details using Photoshop's various techniques, from simple filters to more advanced methods like the High Pass filter. Whether you need to sharpen the entire image or just a specific part, you'll find the method that works best for your situation within Photoshop. For those seeking a faster and detail-preserved solution, try the AI-powered alternative method.
How to Sharpen Image in Photoshop
Photoshop offers various tools, filters, and masks to sharpen an image. Image sharpening makes the photo look sharper by increasing the contrast of the pixels or at the edges. So you might want to sharpen your images multiple times in small amounts so as not to overdo it. Also, denoise your image before sharpening so that you don't intensify the noise.
1. Unsharp Mask Filter
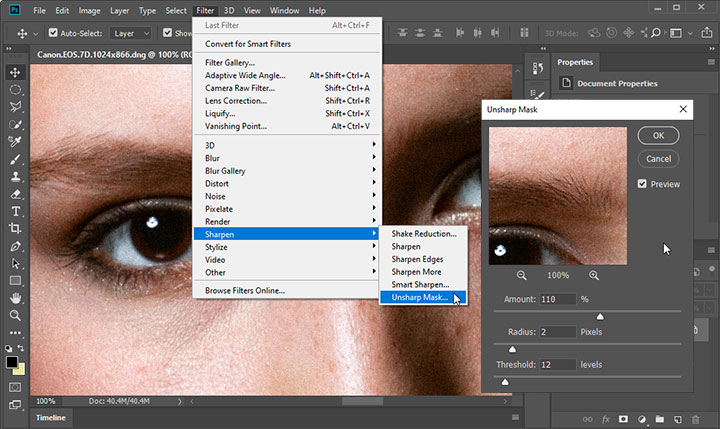
The Unsharp Mask filter is a relatively simple way to sharpen an image in Photoshop. With options to set the amount, radius, and threshold, it offers better control over the image sharpening. It's primarily used for output sharpening when preparing images for the web or print. Here's how to sharpen an image in Photoshop with the Unsharp Mask filter.
- Select the layer with your image in the Layers panel.
- Convert the layer into a smart object using Filter > Convert for Smart Filters.
- Go to Filter > Sharpen > Unsharp Mask.
- Adjust the sharpening effect by dragging the sliders of amount, radius, and threshold.
- Enable Preview to see the effect of your adjustments in real-time.
- Click OK to apply the changes once satisfied.
Note:
- The Amount slider controls the strength of the sharpening effect. For high-resolution printed images, an amount between 150% and 200% is usually recommended.
- The Radius slider determines the number of pixels surrounding the edge pixels. The greater the radius value, the wider the edge effects. And the wider the edge effects, the more obvious the sharpening. For high-resolution printed images, an amount between 150% and 200% is usually recommended.
- The Threshold slider helps avoid sharpening grain or smooth areas. The default Threshold value (0) sharpens all pixels in the image. To avoid introducing noise or posterization, try experimenting with values between 2 and 20.
2. Smart Sharpen Filter
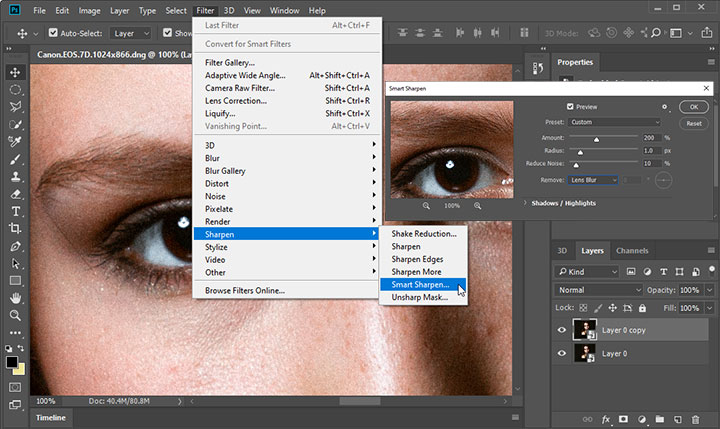
The Smart Sharpen filter offers even more control over the sharpening process. Besides the amount and radius of sharpening, you can set the sharpening algorithm or control the amount of sharpening that occurs in shadow and highlight areas. It's recommended for targeted sharpening. Follow the steps below to sharpen an image in Photoshop using Smart Sharpen.
- Duplicate the layer with your image.
- Right-click the duplicate layer and choose Convert to Smart Object.
- Go to Filter > Sharpen > Smart Sharpen.
- Set the controls in the Smart Sharpen dialogue box.
- Enable Preview to see real-time changes and fine-tune the sliders.
- Click OK to apply the Smart Sharpen filter when you are happy with the adjustments.
3. Sharpen Filters
In addition to the Unsharp Mask and the Smart Sharpen filters we've discussed, there are Sharpen, Sharpen Edges, and Sharpen More options. These filters are straightforward and do not provide controls and options. But you can still use them to sharpen images in Photoshop. Each filter applies a preset level of sharpening to your image, and they can be particularly helpful when you are in a hurry or working on images that only need a slight boost in sharpness.

4. High Pass Filter
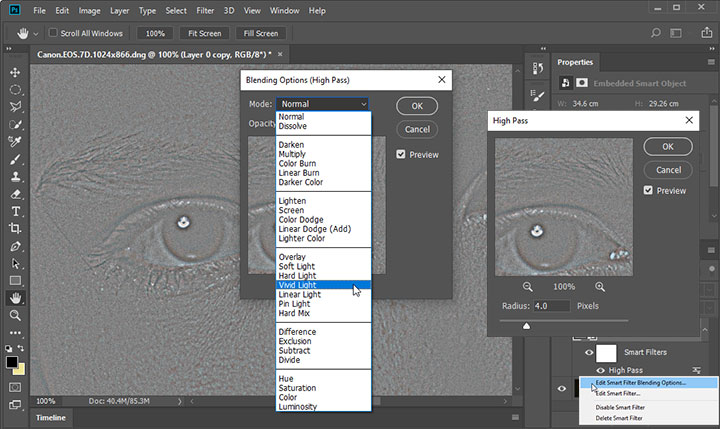
The High Pass filter is another popular way to sharpen an image in Photoshop. It works by highlighting the edges in an image while suppressing the rest. This method is pretty easy to use since there's only one effective setting to experiment with. However, it may not produce as good results as other methods. Here's how to sharpen an image in Photoshop using the High Pass filter.
- Duplicate the layer with your image to keep your edits non-destructive.
- Convert the duplicated layer to a Smart Object.
- Go to Filter > Other > High Pass.
- Adjust the Radius slider to see how much of the image is sharpened. A value between 1 and 7 should be good for most images.
- Click OK to apply the High Pass filter.
- Set the blending option for the High Pass filter, such as Vivid Light or Hard Light.
- Alter the filter's intensity with the Opacity Slider. The lower the opacity, the less harsh the sharpening, and vice versa.
5. Shake Reduction filter
The Shake Reduction filter is designed to correct blurring caused by camera movement. This tool is especially useful when dealing with images taken in low light or with a slow shutter speed, where even the slightest hand movement can result in a blurry photo. Unlike other sharpening methods that enhance edges, the Shake Reduction filter specifically targets motion blur, making it a powerful tool for rescuing shots that might otherwise be unusable.
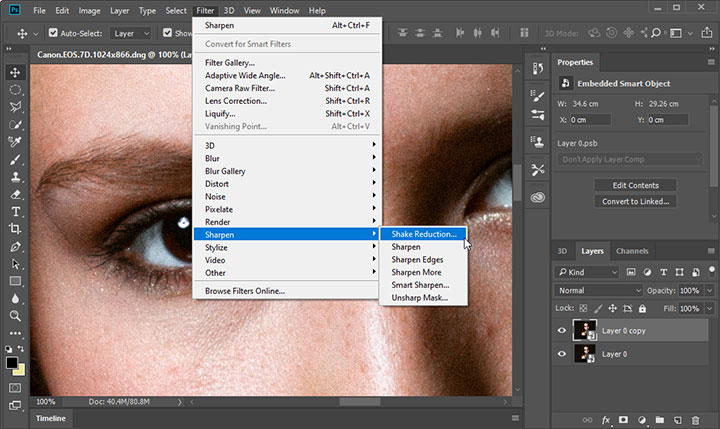
However, please note that Adobe has removed Camera Shake Reduction (Filter > Sharpen > Shake Reduction) since Photoshop 23.3.
6. Adobe Camera Raw
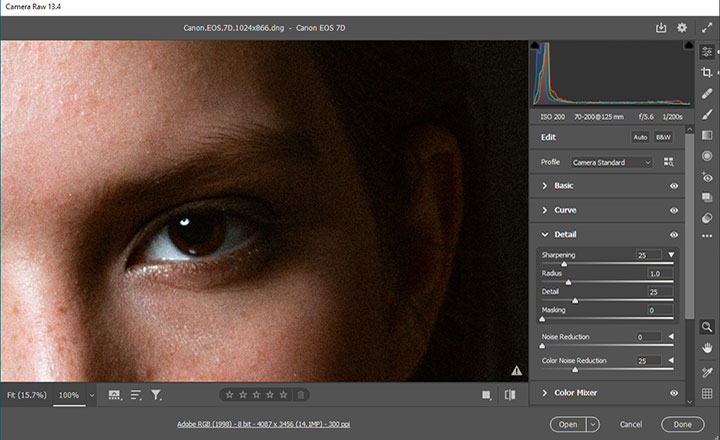
Adobe Camera Raw is an excellent resource to sharpen an image in Photoshop before they even reach the main interface. The sharpening controls adjust edge definition in the image. You can find them in the Detail panel of the Camera Raw dialog. Here's how to sharpen an image in Photoshop using Camera Raw.
- Open your image in Camera Raw. If you are working with a raw file, it will automatically open in Camera Raw when you import it into Photoshop. If you are working with a different file format, go to Filter > Camera Raw Filter to access Camera Raw.
- Zoom the preview image to at least 100%.
- Navigate to the Detail panel.
- Adjust sharpening controls, including amount, radius, detail, and masking.
- Fine-tune with Noise Reduction (optional).
- Click Done to apply the changes.
Note:
- Amount: Adjusts edge definition. A default setting of 25% is applied to all raw or raw DNG images. Increase the Amount value to increase sharpening.
- Radius: Adjusts the size of the details that sharpening is applied to. Photos with fine details generally need a lower setting.
- Detail: Adjusts how much high-frequency information is sharpened in the image and how much the sharpening process emphasizes edges. Lower settings primarily sharpen edges to remove blurring. Higher values are useful for making the textures in the image more pronounced.
- Masking: Controls an edge mask. With a setting of zero (0), everything in the image receives the same amount of sharpening. With a setting of 100, sharpening is mostly restricted to those areas near the strongest edges.
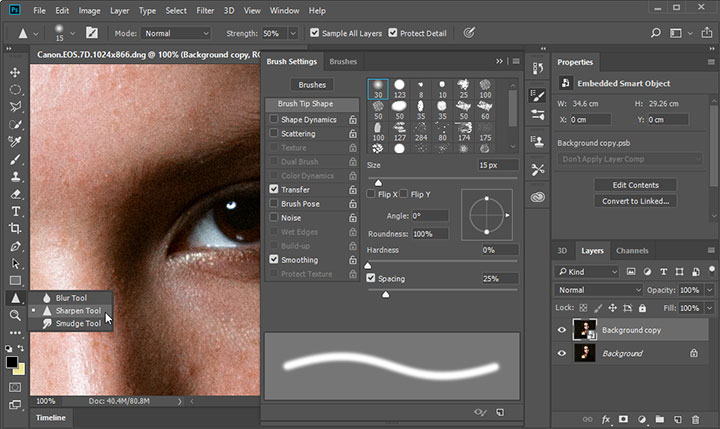
7. Sharpen Tool
The sharpen tool is most commonly used to make a specific object within a photo stand out more. It makes the parts of the image sharp by increasing the contrast between the pixels by making the light pixels lighter and the dark pixels darker. Here's how to sharpen part of an image in Photoshop with the sharpen tool.
- Select the Sharpen Tool from the toolbar.
- Choose a brush tip shape and select options for the blending mode and strength value.
- Enable Sample All Layers to sharpen using data from all visible layers.
- Check Protect Detail to enhance the sharpening effect and minimize pixelated artifacts.
- Click and drag the Sharpen Tool over the areas you want to sharpen.
AI Sharpening: An Easier Alternative to Sharpen Photos in Photoshop
Photoshop provides deep control for sharpening, but the process can sometimes be complex or time-consuming, involving trial and error to find the right balance. If you're looking for a quicker, more automated way to sharpen your images without diving deep into manual settings, consider exploring AI-driven software.
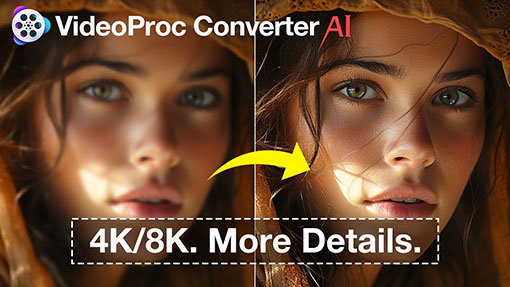
VideoProc Converter AI provides an AI Image feature for effortless sharpening. Its AI technology goes beyond simple sharpening; it intelligently analyzes and corrects issues like blur and noise while ensuring original details are preserved and naturally enhanced. This automated process is incredibly user-friendly, often requiring just one click, making professional-quality sharpening fast and accessible for everyone, unlike the time-consuming manual methods in Photoshop.

Conclusion
That's all about how to sharpen an image in Photoshop. Image sharpening can significantly enhance the quality and impact of your photos. Whether you are working with the precision of the Unsharp Mask, the versatility of Smart Sharpen, or the targeted control of the Sharpen Tool, there's a method that fits your needs.
For those looking for a more streamlined approach, tools like VideoProc Converter AI can simplify the process, providing high-quality results with minimal effort. The Image Enhancement (1x) feature integrates image sharpening, denoising, and quality enhancement with 4 specialized AI image upscaling/enhancing models. It supports multiple file formats, including JPEG, PNG, TIFF, etc., making it versatile for different types of images. A free trial is available. Hesitate no more and try VideoProc Converter AI starting today.