"How to extract audio from a DVD?"
You may have the same question when ordering some concert DVDs but having no time to watch & listen to them. And if you are searching for an easy and losslessly solution to extract audio (MP3, AAC, FLAC, WAV, etc.) from DVD, you're in the right place.
We are going to introduce 5 different methods to rip audio from DVDs to listen to them on the go. Whether you need to rip audio from music DVDs by chapter or you're looking for an easy DVD audio ripping method that brings the best sound quality, you'll find the ideal solution.
5 Best DVD Audio Extractors to Rip Audio from DVD at a Glance
| Pros | Cons | |
|---|---|---|
| VideoProc Converter AI (Best Overall) |
|
|
| VLC |
|
|
| HandBrake |
|
|
| Xmedia Recode |
|
|
| DVD Audio Extractor |
|
|
Method 1. Extract Audio from DVD with VideoProc Converter AI
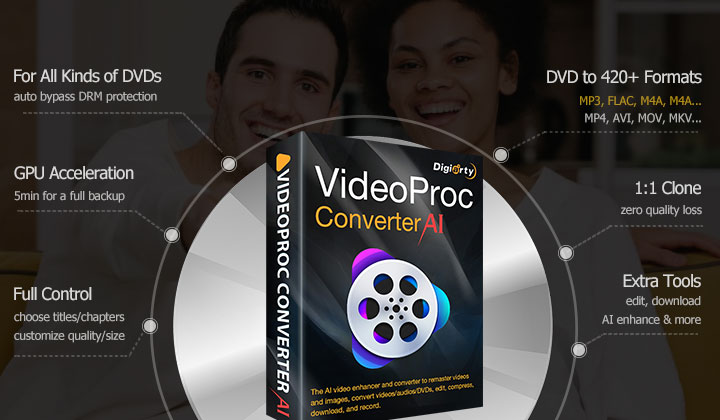
This decent piece of DVD to audio extractor lets you rip audio from DVDs of any kind on Mac and Windows, be it a home DVD, a music DVD, or a 99-title Disney DVD. There are dozens of ready-made profiles for the outcome audio file, allowing you fast output audio that is suitable for playing or sharing on a specific device or platform. The UI of VideoProc Converter AI is self-explained and 100% friendly for beginners, so you will never leave feeling in any doubt about what you are going to do.
What kinds of DVDs it supports: VideoProc Converter AI lets you rip audio from DVDs of a wide range of types, including music concert DVDs, movie DVDs, TV show DVDs, workout DVDs, home DVDs, slightly scratched DVDs, and even commercial DVDs protected by advanced encryption schemes like Disney-99 titles, Sony Arcos, and Region Codes.
VideoProc Converter AI - Why Is It the Best DVD Audio Extractor
- Rip soundtrack from DVDs, DVD files (ISO, Video_TS), and digital video files.
- Flexible to choose specific titles/chapters and save them as individual files.
- 5 mins to rip the entire DVDs to audio/video with preferred size and quality.
- More audio formats to choose from: MP3, AAC, FLAC, M4A, WAV, and more.
- Superior sound quality with 1:1 quality retention (Dolby Digital 5.1 supported).
- 370+ input formats supported. Turn audio from MP4, AVI, MOV, MKV, WebM...
- Customize settings for chapters, titles, tracks, bitrate, subtitles, and more.
- Also a video editor, video converter, audio converter, media downloader, and more.
- New AI tools to restore, enhance, smooth, denoise, and deshake your videos.
How to Extract Audio from DVD with VideoProc Converter AI
Step 1. Load Your DVD to DVD Audio Extractor
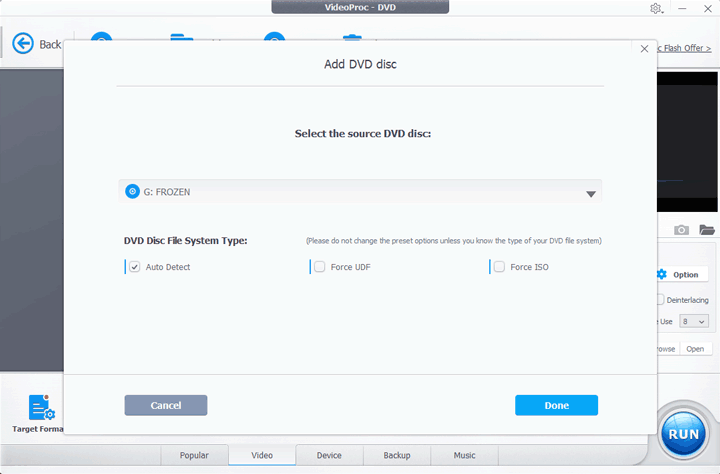
Download and install VideoProc Converter AI on your Windows or Mac. Launch it up, click on DVD, and press DVD Disc to add your disc to this speedy and easy DVD audio extractor.
Tips:
If necessary, expand the language track tab to choose the favored language track to rip. You can also hit Edit to enter the new tab for changing the audio playback speed and volume.
Step 2. Choose an Audio Format
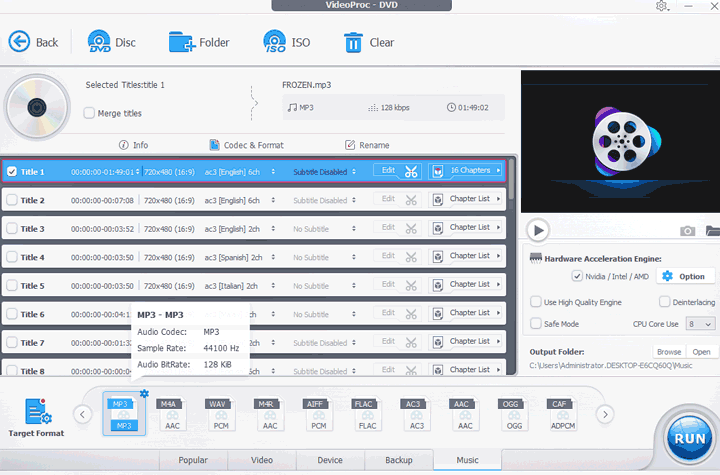
Move down to the Target Format section, hit Music to acquire a raft of audio formats including OGG, AAC, MP3, FLAC, WMA, PCM, etc. Select the needed audio codec.
Step 3. Fast Rip Audio from DVD
Hit Browse to select a location for the export. Hit Run to enable VideoProc Converter AI rip audio from a DVD.
Q1. How to rip audio from DVD by chapters?
It's easy to rip audio from DVD by specific chapters. After Step 2, expand the button of Chapter List of the selected titles, uncheck Select all chapters and tickle up the needed chapters only.
Q2. How to extract audio from DVD with multiple titles?
By default, this DVD to audio extractor detects, selects, and rips audio from the main title of the DVD. You are also allowed to rip audio from the selected titles. To do so, simply choose the needed titles after Step 2.
Q3. How to adjust the size, quality, or more of the music ripped from the DVD?
Once you have chosen the target music format, hit the gear icon next to the chosen audio format. This will lead you to a new tab named Format. Herein, you can move the cursor on the quality slider left or right to decrease the audio file size or enhance the audio quality. You can also change the audio codec, sample rate, audio channel, bitrate, etc.
Method 2. Extract Audio from DVD for Free with VLC Media Player
Chances are you've used VLC media player before. As a cross-platform and multiple purposed media player, VLC media player helps many people view movies or audios that won't open on another program or device. Did you know this feature-rich media player can be applied to rip audio from DVD as well? Thanks to the support of DVD input and audio output, you can easily rip audio from DVDs and save the outcomes as MP3, OGG, or several other formats.
Note: VLC is only useful to rip audio from non-encrypted DVDs. If you need to rip audio from the protected commercial DVDs, navigate to our first method.
How to Extract Audio from DVD with VLC
Step 1. Download and Install VLC
After you inserting the DVD onto your computer, go to the official download site of the VLC media player, find the latest version of the installer file to download and install this free DVD audio extractor on your PC, Mac, or Linux computer.
Step 2. Find the Open Media Panel
Launch up the VLC media player, hit Media, and choose Convert/Save from the unfolded options. This will lead you to a new pop-up panel named Open Media.
Step 3. Select Your DVD for Loading
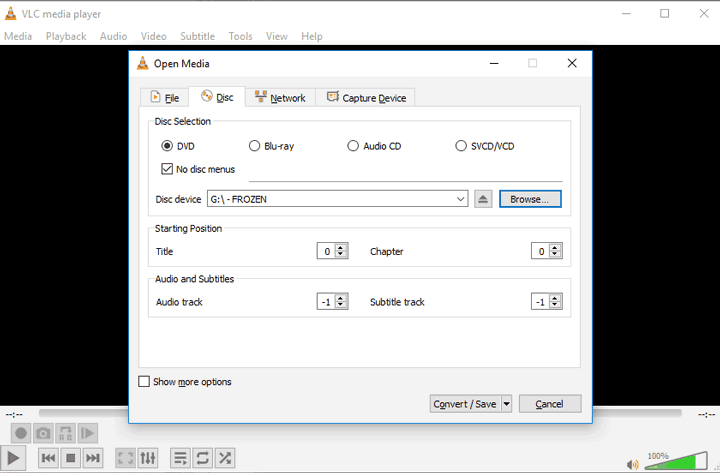
Press Discs and select DVD because you want to rip audio from a DVD disc. Of course, you can choose Blu-ray, Audio CD, or SVCD/VCD if you need to cope with the related sort of discs.
Step 4. Choose the Target DVD Disc
Tick No Disk Menu to skip copying the DVD menu. Leave the default Starting Position settings to rip the entire DVD audio, or adjust the title and chapter numbers to rip specific sections or features. If you prefer a different language track, enter its corresponding number under Audio Track. Since you can't navigate DVD titles and tracks directly, some trial and error may be needed to find the correct settings.
Step 5. Set MP3 as the Exported Codec
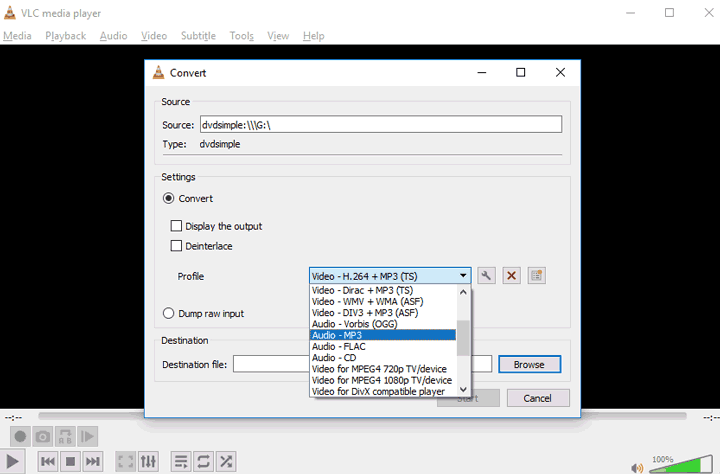
Click Convert / Save and choose Audio – Vorbis (OGG), Audio - MP3, Audio – FLAC, or Audio – CD as the output audio format. If the available audio format presets don't meet your requirements, you can create a custom preset by clicking the New Preset button. This option lets you tailor settings such as the encapsulation format and audio codec among others. However, be aware that this advanced customization might be somewhat complex for beginners.
Step 6. Start to Rip Audio from DVD with VLC
After everything is set properly, hit Browse to assign a folder for holding the audio extracted from DVD. Afterward, press Start. This free DVD audio ripper now starts to rip audio from DVD.
Method 3. Extract Audio from DVD for Free with HandBrake
Ripping audio from DVD via HandBrake is complex. Though being a well-known video converter and DVD ripper, it constrains you to output media files in MKV, MP4, and WebM video format. In other words, it won't rip audio-only files from DVDs. The good thing is there are a large number of video conversion software accepting to convert video to audio. Thus, we can rip DVD to MP4 or other video files first, and then use the best video converter as the combo to transcode video to audio.
How to Extract Audio from DVD with Handbrake
Step 1. Install Handbrake DVD Audio Extractor
Go to the HandBrake official download site to have this open-source DVD ripper downloaded and installed on your computer. Don't forget to insert your DVD into the computer.
Step 2. Import DVD to HandBrake
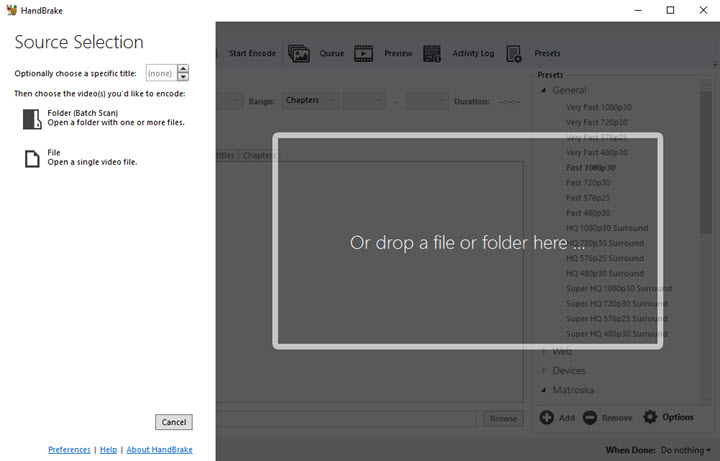
Handbrake can automatically detect the mounted DVD disc, so you should be able to see your DVD file once you open up this program. If it failed to detect the mounted disc, you can press Folder to add the DVD to Handbrake.
Step 3. Set the Range Information
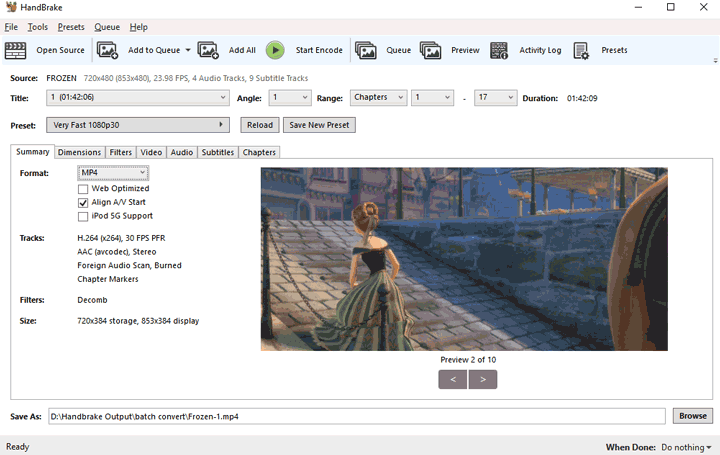
Next the metadata information of the source file, there are options to choose the Range for your DVD disc. You can skip this setting if you want to rip audio from the whole DVD disc. Suppose you just need to rip the audio from some specific chapters, you need to enter the information of which chapters/seconds/frames that you want to cope with.
Step 4. Choose an Output Format
Navigate to the Preset option and select Very Fast 1080p 30 for acquiring a fast conversion speed.
Note: As said, Handbrake only allows you to output videos, meaning we need to combine with another media converter to turn the MKV/WebM/MP4 video that's generated by Handbrake to audio formats like MP3 and FLAC.
Step 5. Start to Rip Audio from DVD with HandBrake
Hit Start Encode to let Handbrake start to rip MP4 from DVD. Later you can use VideoProc Converter AI or VLC media player to convert MP4 to MP3 or other audio formats.
Method 4. Extract Audio from DVD for Free with Xmedia Recode
If you're looking for a DVD to audio extractor that rips the highest audio quality on Windows, you might give Xmedia Recode a try. The same compact UI and a similar range of the input file formats make this Windows-only freeware looked on par with HandBrake. However, it supports to out audio files. That is to say, you don't need to use additional software to use Xmedia Recode to rip DVD into OGG/MP3/WMA, convert MP3 to FLAC/OGG, or remove audios from videos. Unfortunately, this free of charge program goes crashes very frequently especially when it handles over 2 hours of movie DVDs.
How to Extract DVD Audio with Xmedia Recode
Step 1. Install Xmedia Recode on PC
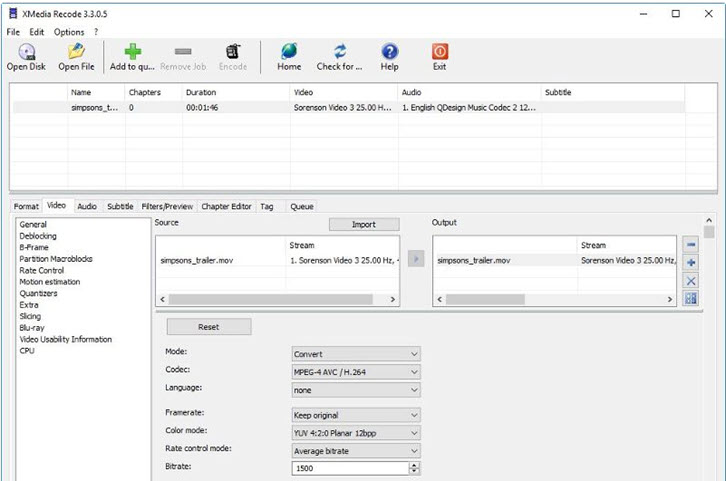
Open the official site of Xmedia Recode, move your mouse to Download to find 3 different download packs for Windows 64bit, Windows 32bit, and Windows XP SP3, Vista. Choose the one that matches your PC. After successfully downloading and installing Xmedia Recode, open it up.
Step 2. Add the DVD Disk
On the main interface of this DVD audio ripper, press Open Disc to choose the original DVD for loading. Depending on the length and the type of your DVD, this may consume you a few minutes.
Step 3. Set the Proper Output Format
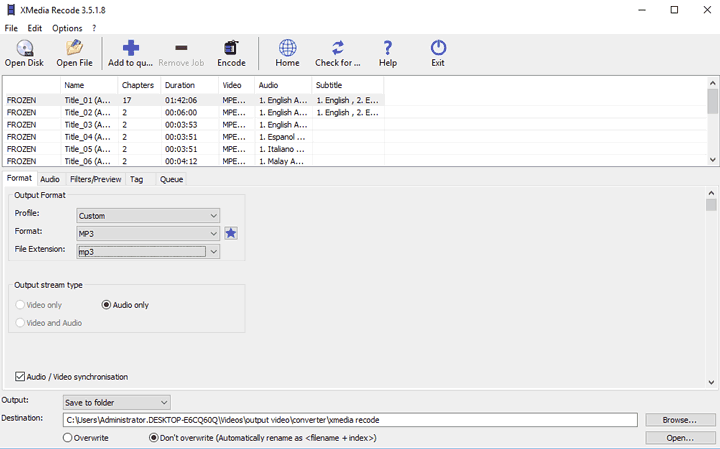
Now you'd be able to find the Format tab. Here you need to tick up the Audio only option firstly to ensure it exports audio file instead of video. After that, you can click on Profile to apply the preset properties, or expand the Format tab to choose the desired audio format, such as FLAC, AAC, MP3 as the output file type.
Step 4. Tweak Up the Audio Properties
Press Audio next to the Format option to enter a new panel. It's for adjusting audio properties including Sample Rate, Channels, Downmix matrices, Rate control mode, and more. You can leave all these values as default or make your own settings to achieve your specific purpose.
Step 5. Ready to Extract Audio from DVD
Hit Browse, locate the folder used for holding the output files, select it, and then press OK. Navigate to the top menu bar to find the blue Add to queue icon, and hit this. Now the option of Encode is available. You can hit it to start to rip MP3/FLAC/AAC/WAV audio from DVD.
Method 5. Extract Audio from DVD with DVD Audio Extractor
DVD Audio Extractor, just as its name implies, is a dedicated program designed for extracting audio from Blu-ray, DVD-Audio, and DVD-Video. While its interface may look somewhat dated, it remains relatively straightforward to master. You should have no problem understanding its features in 30 minutes. Being a cross-platform program, it can run on Windows, Mac, and Linux, which adds to its versatility. However, its capabilities are limited to ripping audio from home DVDs into OGG, MP3, WAV, FLAC, Audio CD, and DTS CD formats. It cannot handle copy-protected DVDs or extract audio into other popular formats like PCM and Vorbis.
How to Extract Audio from DVD with DVD Audio Extractor
Step 1. Install DVD Audio Extractor
Visit the official DVD Audio Extractor website. Click the Download icon to access the download page. Select the appropriate exe file for your operating system and click it to begin downloading. Once downloaded, double-click the exe file and follow the on-screen instructions to install the software on your computer.
Step 2. Import DVD to DVD Audio Extractor
Insert the DVD from which you wish to extract audio. Open DVD Audio Extractor, which will automatically detect and display the content of the disc.
Step 3. Select the Desired Content
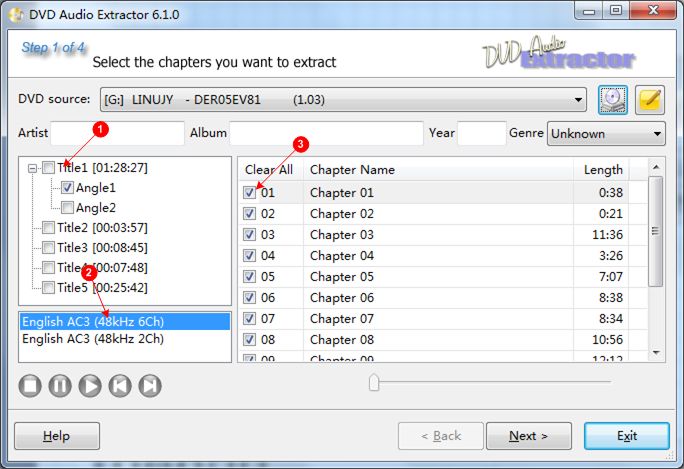
By default, DVD Audio Extractor selects the first title and lists all its chapters. Click on any title that interests you to change the active selection. If multiple angles are available for that title, choose the specific angle you prefer.
Step 4. Adjust the Output Settings
Click the Next button. Choose your preferred output format. You can also adjust other audio encoding settings, such as the sample rate and audio channels. Specify the output location. Click Next to proceed to the export page. Finally, click Start to begin the process of ripping audio from the DVD.
What Are the Best Audio Formats To Rip the DVD To
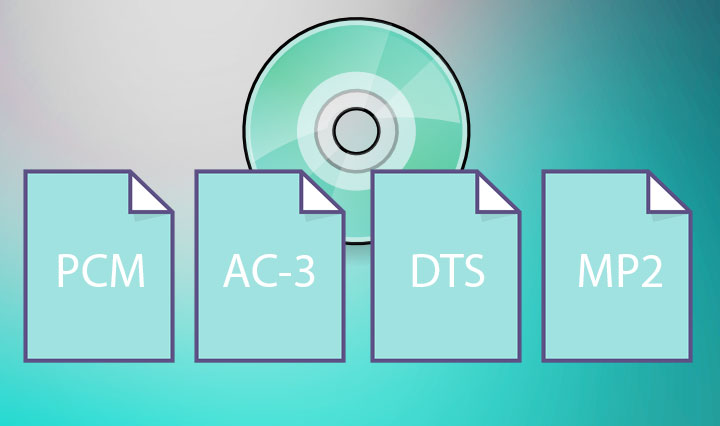
The audio data contained in a DVD can be MPEG-1 Audio Layer II (MP2), Dolby Digital (AC-3), PCM, or DTS format. Does it mean that they are the best audio formats to rip DVDs into? Not exactly. Let's firstly understand what these audio formats refer to.
- PCM, also known as Pulse Code Modulation, refers to the uncompressed digital audio data converted from analog signals through sampling, quantization, and coding. Therefore, PCM is closest to the original sound. But, it is very large. A one-hour 96KHz, 24-bit PCM file is around 2.07GB.
- AC-3 or AC3 is a 5.1 stereo audio scheme that contains up to five discrete channels (left front, right front, center front, left right surround) and a low-frequency effects channel. It's more efficient than other relics of the DVD age and is well supported by today's home theater systems. AC-3 is the most common compressed audio track formats in DVDs.
- DTS is a lossy compressed and multichannel digital surround format like AC-3. It supports higher sampling frequency than that of AC-3 and the compression ratio is one-quarter of AC-3, meaning DTS can contain more original audio data. One of its major drawbacks is it can't be recognized by most portable devices.
- MP2 is a 2-channel stereo audio compression scheme that's not for DVD NTSC. And as an old audio compression term which is slowly phasing out by advanced formats like AAC and MP3. Therefore, you might risk your audio library not having sound soon, when playing on your computer or smartphones.
Overall, above DVD standard audio formats are good in stereo and mono sound quality, but short of compression efficiency and compatibility than advanced codecs like AAC or MP3. Within these features considered, we advise you to:
- Rip DVD into MP3 for hearing movie sound with the original speaker or earphone of computer, notebook, or TVs.
- Rip DVD into MP3, AAC or AC-3 when listening to it via earphone around 60USD or speakers around 150USD.
- Rip DVD into DTS or PCM to enjoy the placebo sound quality under the 5.1 or 7.1 home theater sound system.
FAQs
1. Can you rip music from DVD with Windows Media Player on Windows 10/11?
Sorry to disappoint you. Microsoft removed the support for DVD playback and added the support for FLAC and MKV video files for Windows media player on Windows 10/11. So, you can't rip music from DVDs with Windows media player on Windows 10/11 anymore.
2. Can I convert or rip protected DVDs to MP3?
Yes. By using VideoProc Converter AI, you can rip the encrypted movies and copy-protected DVDs to MP3 without hassle.
3. Will ripping audio from DVD result in quality loss?
It depends on the output format you choose. Ripping to a lossless format like FLAC or WAV (especially from original PCM or DTS sources on the DVD) can retain 1:1 original quality. However, converting to lossy formats like MP3 or AAC, particularly at lower bitrates, will introduce some quality loss due to compression. For the best balance of quality and file size, aim for high-bitrate MP3s (e.g., 320kbps) or AAC, or opt for FLAC if storage isn't a concern.
4. Can I rip specific audio tracks or languages from a DVD?
Yes, most professional DVD audio extractors, including VideoProc Converter AI, allow you to select specific audio tracks (e.g., English, French, commentary) or even individual chapters from a DVD. This is particularly useful for concert DVDs where you might only want certain songs, or for movies where you want a specific language track without the video.
5. How can I add or edit metadata (artist, title, album) to the ripped audio files?
While some advanced DVD audio rippers like VideoProc Converter AI offer metadata editing during the ripping process, for comprehensive tagging (artist, album, genre, year, cover art), you'll often need a dedicated audio tag editor. Tools like Mp3tag, MusicBrainz Picard, or even built-in media players like iTunes/Windows Media Player allow you to easily edit and enrich the metadata of your ripped audio files after the extraction is complete.

 Easy interface. User friendly
 No available on Linux or phone


