Zoom is a video conferencing platform that holds and records meetings and webinars. In most cases, it saves recordings in MP4 for easy playback. But if your recording is ended accidentally, you'll get a file with a .zoom extension and can't open it directly. That's because the sudden end stops auto-conversion in Zoom.
Fortunately, here are some tricks to let Zoom go on converting recordings to MP4. We'll get you through the steps to convert .zoom to .mp4 with Zoom client and the converter in the Zoom package file. And if you find them do not work in your case, we'll show you some quick fixes in the last section. Let's begin.
1. Convert Zoom Recording to MP4 with Zoom Desktop Client
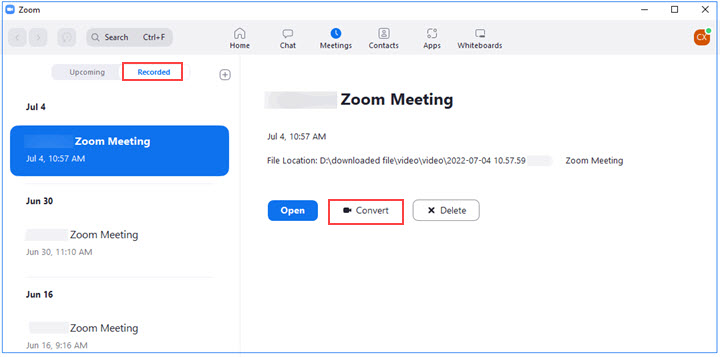
All the recordings in your account can be found in the Meetings history of Zoom client. Meanwhile, it has a converter for you to view these recordings in MP4 format. Here's how to find and convert them to MP4.
Step 1. Open Zoom desktop client on your computer. Sign in to it with your account.
Step 2. Navigate to Meetings > Recorded.
Step 3. Click the recording saved in Zoom client. Now click Convert under the filename.

Step 4. Wait for a while, and you'll get an MP4 file from Zoom.
2. Convert Zoom Recording to MP4 with Zoom Converter
Zoom usually names the recording file (that hasn't been converted to MP4) "double_click_to_convert_xx.zoom". But when you double-click on it, you'll find the Zoom installer does not open the .zoom file with its converter automatically. Below is how to convert .zoom to .mp4 manually with the built-in converter in Zoom – zTscode.exe for Windows and Transcode.app on Mac.
Before we start, make sure you've installed Zoom desktop client successfully and locate Zoom recordings on your computer:
- Windows: C:\Users\asus\Documents\Zoom
- Mac: \Users\[User Name]\Documents\Zoom
Convert Zoom Recording to MP4 on Windows with zTscoder
Step 1. Right-click on the .zoom file and select > Open with… > More apps. Scroll down the menu to click Look for another app on this PC.
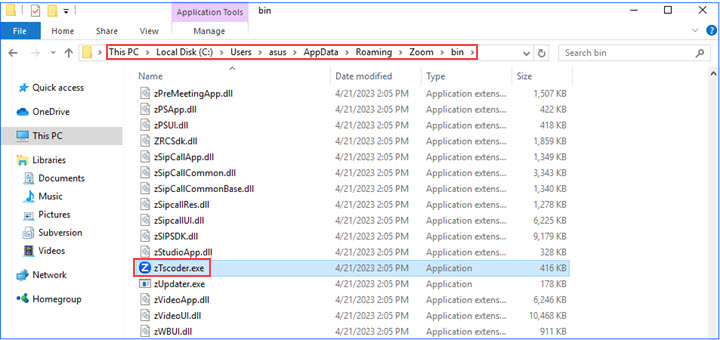
Step 2. Open folders in C:\Users\UserName\AppData\Roaming\Zoom\bin. Select zTscoder.exe and click Open.

Step 3. Now you can see the file being converted to MP4.
Tips: If zTscoder doesn't respond, run zTscoder.exe before starting the conversion. Go to Control Panel > System and Security > System. Open Advanced system settings. Add C:\Users\username\AppData\Roaming\Zoom\bin in Environment Variables.
Convert Zoom Recording to MP4 on Mac with Transcode
Step 1. Double-click on the .zoom file. When you see a prompt "There is no application set to open the document", click "Choose Application". If it doesn't show up, right-click on the .zoom file and select "Open with" and "Other".
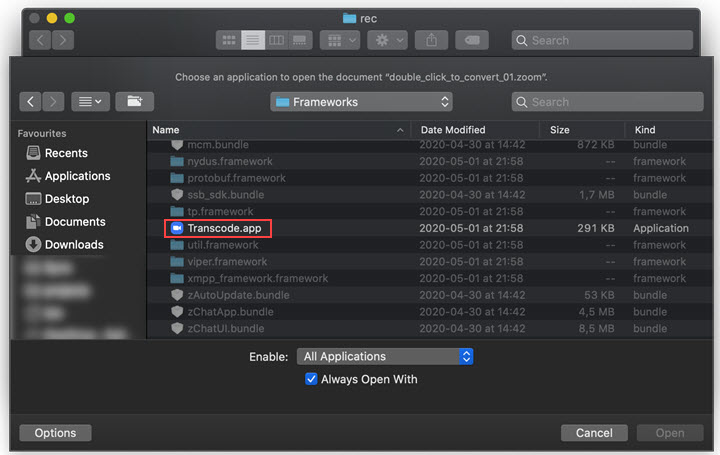
Step 2. Now press Command, Shift, and G simultaneously. Proceed in the path: \Applications\zoom.us.app\Contents\Frameworks\
Step 3. In the Frameworks folder, enable "All Applications" and check "Always Open With". Then select "Transcode.app" and open.

Step 4. Now you can see the conversion starts. When it is done, select a folder to save the MP4 file. By default, it's stored in the same folder where .zoom files were in.
Tips: If you come across a dialog before conversion, select "Open System Preferences". Click the lock icon in the bottom left corner and enter your password. Then click "Full Disk Access" and check "zoom.us.app". Now it can perform the conversion automatically.
How to Fix Failed Conversion of Zoom Recording to MP4
The conversion by Zoom converter does not always work due to various things, such as corrupted recordings, invalid file path, inadequate disk storage, etc. Anyway, here're 5 quick fixes you can try.
1. Record Zoom meetings with VideoProc Converter AI.
VideoProc Converter AI is a versatile video processing program for Windows and Mac. It features a video editor, converter, downloader, and screen recorder. It captures all sorts of Zoom recordings with audio and saves them in MP4, MKV, MOV, TS, and multiple formats for your need. In case troubled by any unplayable Zoom recordings, just let VideoProc Converter AI record Zoom meetings or webinars for you. In addition, it has powerful AI tools to enhance low-res recordings to HD and 4K, increase frame rate for a smoother look, and denoise.
Now download and install VideoProc Converter AI and record Zoom meetings in MP4 without fuss!
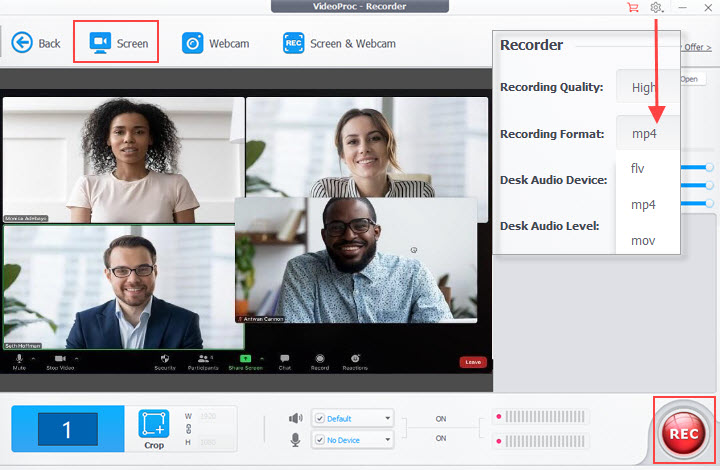
Step 1. Launch VideoProc Converter AI. Click "Recorder" on the main UI. Select the "Screen" recording mode.
Step 2. Join the meeting you want to record. Click Crop to specify the recording area and enable audio recording.
Step 3. Click the red button to start recording. And click the red button again to stop recording.

Tips: VideoProc Converter AI records the screen in MP4 by default. If you want more options, click the gear icon in the top right corner. In Settings, you can change the recording format, quality, and more recording options.
2. Swap the .zoom file with a new recording.
The recording remains .zoom because Zoom hasn't finished the conversion. Here's a trick to let it go on processing the .zoom file – switching it with a new recording.
Step 1. Launch Zoom client on your computer. Start a new meeting with only yourself inside and record it. Then pause it (not end it).
Step 2. In the Zoom recording folder, you'll see the newly-recorded file with the .zoom extension. Just swap it with the file you want to convert.
Step 3. Now end the recording, and you'll see it saved in .mp4.
3. Update Zoom to the latest version.
Zoom regularly updates to provide more features and fix bugs and compatibility issues. So staying updated might solve the conversion errors.
You just need to open the profile icon on Zoom desktop client and check for updates. If there's a new version, ask it to download and install.
4. Restore the recording path.
If you changed the path during the recording, the folder that Zoom is processing is invalid, thus, failing to convert it to MP4. So make sure the recording is in the default folder and stays in the original filename.
5. Free up more disk space on your computer.
When you notice that some recordings can be converted to MP4, while some not, check if the latter is too large while your disk space is low. In such a case, you need to free up some space on your computer for the Zoom recording.


