Summary: How to screen record with VLC? Follow through the post and learn the way. If you are seeking to get VLC record screen with audio, check out the best VLC screen recorder alternative - VideoProc Converter AI.
Widely recognized for its versatility and extensive array of features, VLC can also serve as a robust free screen recording tool. Whether you want to capture an important presentation, create a tutorial, or preserve a cherished moment, VLC has got you covered. Plus, VLC offers support for numerous formats and provides the flexibility to customize recording settings according to your preferences. In this post, we will guide you through the step-by-step process of the VLC record screen on both Mac and Windows platforms.
How to Record Screen with VLC on Windows
Free download VLC and follow the steps below to record screen with VLC on Windows:
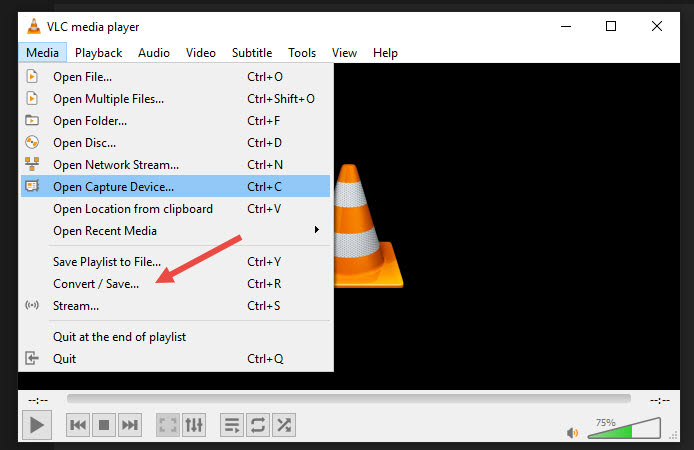
Step 1. Open the VLC Media Player, click on the Media tab, and select Convert/Save.
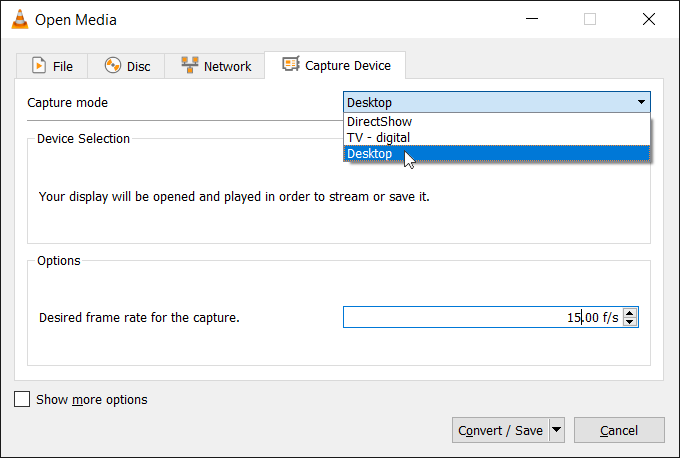
Step 2. Choose Capture Device in the window that pops up, and set the Computer mode to Desktop. In the Options panel, choose a desired frame rate for your VLC screen record
The standard frame rate for videos typically ranges between 25 and 30 frames per second. However, when capturing content on screens, the standard frame rate often drops to 10 frames per second. If you desire a smoother video, you can increase the frame rate. Keep in mind, though, that higher frame rates during recording may require additional processing power.
Step 3. Once the frame rate is set, hit Convert/Save, and you will be brought to the Convert panel to complete the setting for the VLC record screen. Click on the drop-down menu in the Profile section and choose MP4 as the output format, and specify the path where you wish to save your VLC screen recording.
Step 4. Hit Start to record screen with VLC on Windows. And make sure the VLC window is minimized during the recording process.
Note:
- VLC only allows you to record the full screen. If you need to capture only a specific part of your screen, you will require additional video cropper software or consider using other screen recording tools that offer this feature.
- VLC does not have built-in support for simultaneous screen and audio recording. If you require audio in your VLC screen recording, you will need to use separate audio recording software to capture the audio separately. Alternatively, consider using other dedicated screen recording software that allows capturing both screen and audio together.
The limitations apply to VLC screen recordings on both Windows and Mac environments.
How to Record Screen with VLC on Mac
The steps for screen recording using VLC on a Mac are similar to those on Windows, with a few minor differences:
Step 1. Launch the VLC media player on your Mac. In the menu bar, click on File and select Open Capture Device from the dropdown menu.
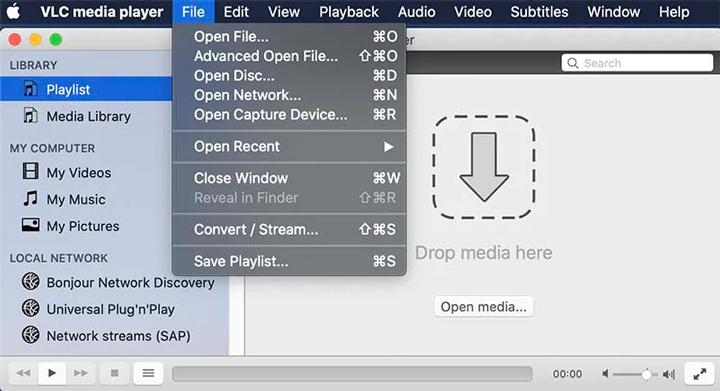
Step 2. In the Capture Device tab, click on Capture and choose Screen as the capture mode.
Step 3. Select Setting, and configure the desired frame rate. You can choose a standard frame rate like 25 or 30 frames per second.
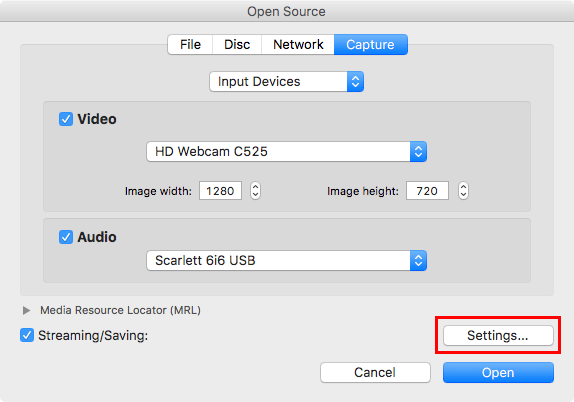
Step 4. Click on Open, and minimize the VLC recording window. Then hit Playback on the top toolbar > Record to start the screen recording with VLC on Mac. To stop the recording, click on the 'Stop' button in the VLC control panel.
Best VLC Screen Recorder Alternative
Despite being a competent media player, VLC cannot fully replace dedicated screen recording software. As mentioned earlier, capturing a specific portion of the screen can be challenging with VLC. Furthermore, VLC lacks support for simultaneous screen and audio recording, which poses a significant inconvenience for many users. Instead, you can only record the screen and audio separately and synchronize them after the recording process. Fortunately, there is a wide range of powerful screen recording software that can address any issues you may encounter in the VLC record screen. And one such solution is VideoProc Converter AI – a full-featured screen recording software for Windows and Mac.
The capacity of the screen recording function in VideoProc Converter AI is hard to overestimate. Featuring a total of four recording modes, the VLC screen recorder alternative allows you to easily capture the entire or partial 4K computer screen along with audio. It also enables you to record video from your facecam or simultaneously record screen activities and the webcam to create gaming or reaction videos. Besides, packed with a basket of utility tools, you can crop, draw, and highlight any content, and even add outlines, texts, arrows, voiceover, images, and more.

VideoProc Converter AI – The Best VLC Screen Recorder Alternative
- Record 4K screen on PC/Mac, and capture full/partial screen on desktop with audio.
- Composite two videos or add special effects using chroma key.
- Support popular video formats and GPU encodings.
- Record, enhance, edit, compress, convert, and trim screen recording in one-stop.
Excellent ![]()
![]()
Step 1. Free download VideoProc Converter AI, and launch it on your computer.
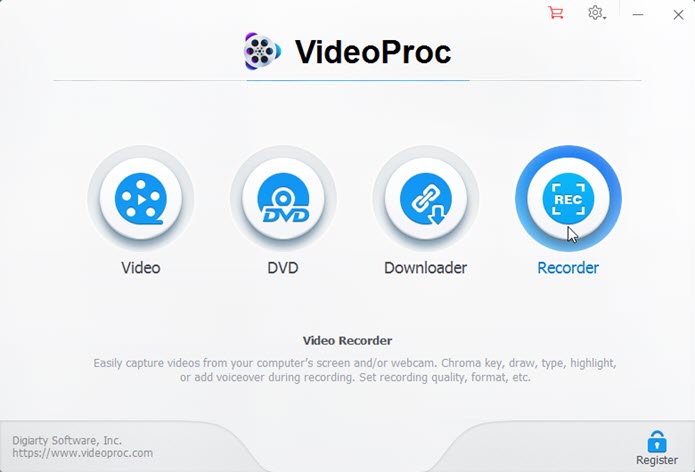
Step 2. Tap Recorder on the home page, and select a recording mode. Set up video settings by clicking the wheel-shaped icon on the top-right corner, including video quality, video format, location, etc.
Select to record a part of your screen using the crop tool if needed. Enable audio devices so that the VLC screen recorder alternative can capture both computer sound and microphone sound.
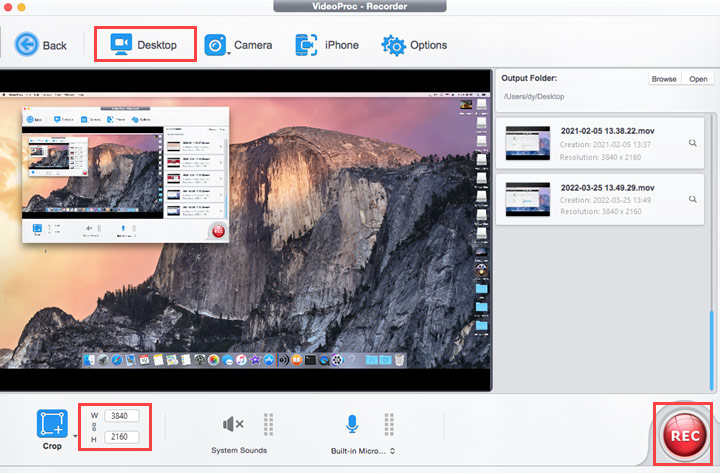
Step 3. Click the REC button, and the recording will start after a countdown. Once finished, click the Stop button to stop recording, and the recorded video clips will be stored in the location previously configured.

