Learning how to download streaming audio can come in incredibly useful in a range of situations. If you're traveling without a reliable internet connection, for example, then you can download your favorite live-stream music concerts, captivating radio shows, or valuable educational content in advance for listing on the journey. Or perhaps you're analyzing a lecture, studying a foreign language, or conducting academic research, having access to recorded audio streams enables thorough examination and review. Recording streaming audio also means you can easily re-listen to these live streams for later or share them with others. Today, let's take a look at how we can record streaming audio on Windows, Mac, online, and our smartphones with great sound quality.
How to Record Streaming Audio on Windows and Mac
VideoProc Converter AI is the best pick to record streaming audio on Windows and Mac. It has the capability to record streaming audio from music websites like Spotify and Apple Music, video platforms like YouTube and Vevo, local radio stations, and even concert discovery services. It comes with a full set of professional audio-capture features, including adjusting the audio recording level, selecting the audio recording sources (the system speaker, microphone, or both), adding the facecam overlay, specifying the recording area, etc. One of the best parts, you can convert your recordings to MP3, AAC, FLAC, and tons of other prevalent audio formats with desired bitrate, channel numbers, and sample rate, so you can listen to the recorded streaming audio everywhere with the best sound quality
Pros:
- Top-notch sound and picture quality
- Record all types of live streams, gameplays, voice/video calls…
- Can record screen with internal audio, external audio, or both
- Easy editing toolkits: speed up/down, trim, merge, and more
- Customize the audio format, bitrate, sample rate, metadata info
- All-in-one: record, download, shrink, and convert videos & audio
Cons:
- No audio equalizer tools
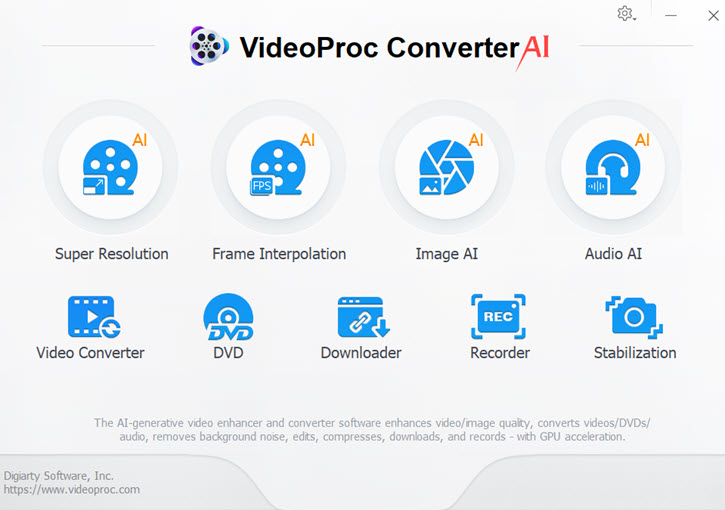
Step 1. Open the Recorder
Download, run, and install VideoProc Converter AI on Windows or Mac. Click on Recorder to open the built-in recorder.
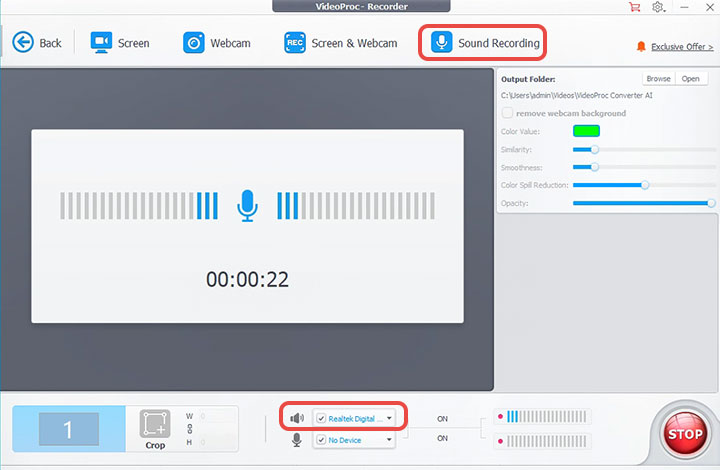
Step 2. Choose the Audio Recording Device
Hit Audio Recorder. Go to the bottom of this panel to find the speaker button. Select the system speaker as like Realtek digital for it.
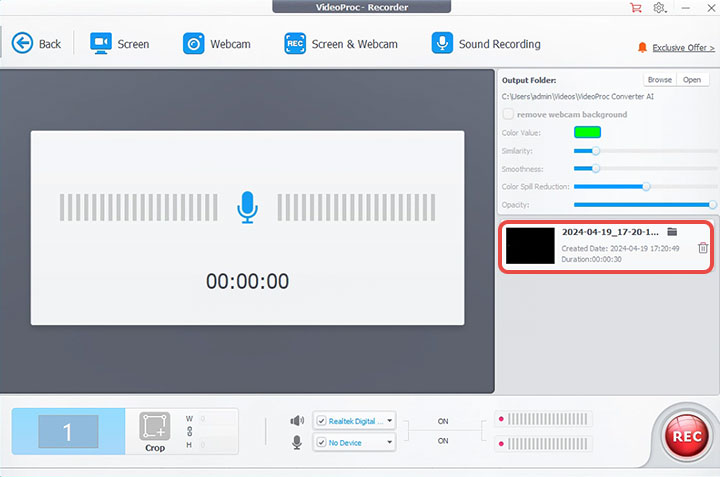
Step 3. Start Recording the Streaming Audio
Hit REC to start recording streaming audio on Windows or Mac. When you need the recording to end, simply hit the Stop icon. Click the folder icon of the recorded file to open its location.
How to Record Streaming Audio on Windows
It's worth noting that many Windows users may be unaware of Microsoft's recent update to the pre-installed Voice Recorder app, which has been rebranded as Sound Recorder to align with the aesthetics of Windows 11. Similar to its predecessor, Voice Recorder, Sound Recorder proves to be a valuable tool for capturing various types of audio. Whether it's audio originating from your system, such as streaming audio or online conference calls, or external sources like ambient sounds or your voice, Sound Recorder is capable to record them all.
Pros:
- Easy and free to use
- Record streaming audio in multiple formats
- Customizable audio recording quality
Cons:
- Not support basic audio edits like trim and paste
- There is a time limit of 3 hours for recording
Step 1. Open Sound Recorder
Search Sound Recorder in Windows 11 search box to find this Windows 11 audio recorder. Click on the shown-up Sound Record to launch it. If Screen Recorder is not showing up, then you can download it from the Microphone Store.
Step 2. Enable Stereo Mix
Press Windows + R on your keyboard to open the Run dialog box. Enter mmsys.cpl and hit OK to open the Sound penal. Hit Recording to open a new tab. Take a right-click on any place in this tab and select Show Disabled Devices from the drop to find Stereo Mix. Right-click on this option, choose Enable > OK.
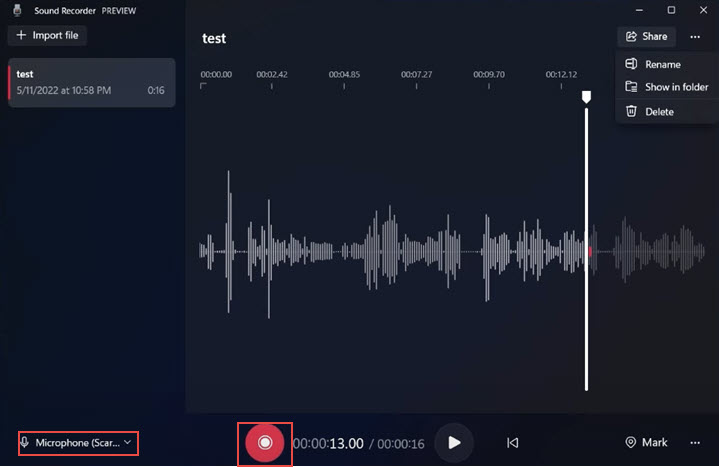
Step 3. Record Streaming Audio
Click the microphone icon and select Stereo Mix. Hit the red record icon to start recording streaming audio on Windows. You can pause and add markers while recording. Hit the red button again to stop recording streaming audio.
How to Record Streaming Audio on Mac
Audacity is an open-source audio recorder that you can use to record streaming audio for free on Windows and Mac. It's full to the brim with pro-level audio recording capabilities. These include being able to record live streaming and digitized music, adjust volume levels from multiple audio sources before, during, and after recording, and add an extra dimension of polish to your audio projects with 41 audio effects, etc. However, the high customizability and flexibility come with the tradeoff that it's quite difficult for beginners to use.
Pros:
- A wide selection of recording tools
- Support an unlimited number of audio track
- Include a raft of audio editing tools
Cons:
- Take a steep learning curve for beginners to learn
- Have many bugs that may cause lags and slowdowns
- Can't record streaming audio on Mac directly
Step 1. Install Soundflower on Mac
To download Soundflower, visit its GitHub page and click on Assets. Open the Soundflower-2.0b2.dmg file by double-clicking it in Finder. Hold the control key and click the .pkg file simultaneously.
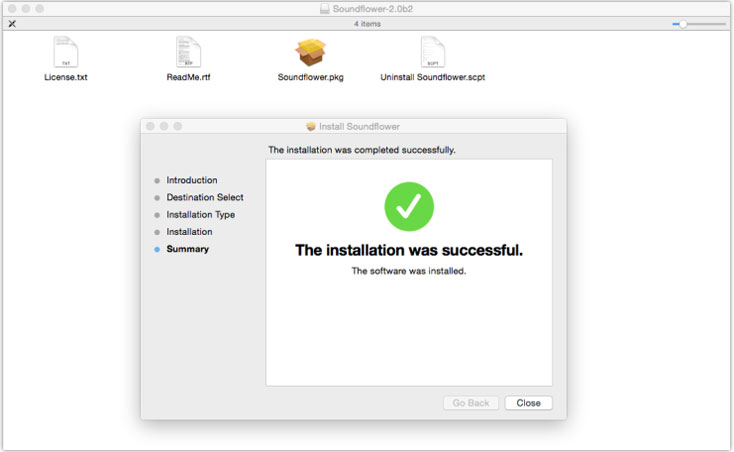
If this is your first time installing Soundflower, you'll be notified that Soundflower.pkg can't be open because it's from an unauthorized developer. In this case, you should go to System Preferences > Security > Privacy > General and click Open Any Way. Now you can follow the installation wizard to complete the installation of Soundflower on Mac.
Note:
Soundflower is compatible only with Intel-based Macs. If you're using a Mac with Apple M1 or M2 chips, then you're recommended to use a Soundflower alternative such as the BlackHole app. Otherwise, you can try VideoProc Converter AI as an alternative to Audacity. This robust audio recorder allows you to record streaming audio on Mac without installing additional plugins.
Step 2. Output Sound from Soundflower
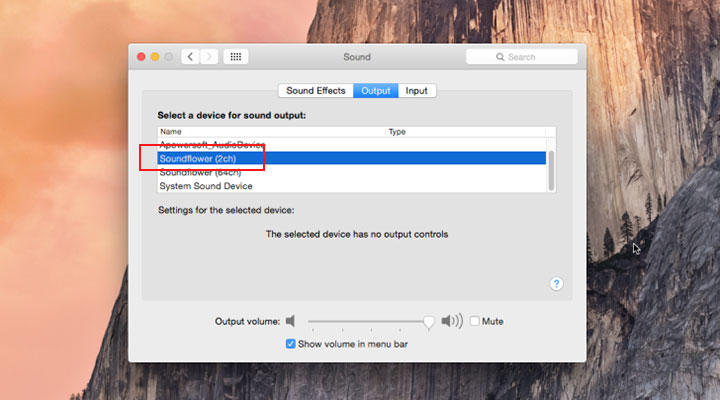
Go to System Preferences on your Mac, click Sound > Output and select Soundflower (2ch) as the output device.
Step 3. Install Audacity
Go to the official site of Audacity. Hit DOWNLOAD AUDACITY to get the most recent release of this free streaming audio recorder downloaded on your computer. Double-click the DMG file, and then drag the Audacity.app icon onto the Applications folder shortcut.
Step 4. Record Streaming Audio on Mac
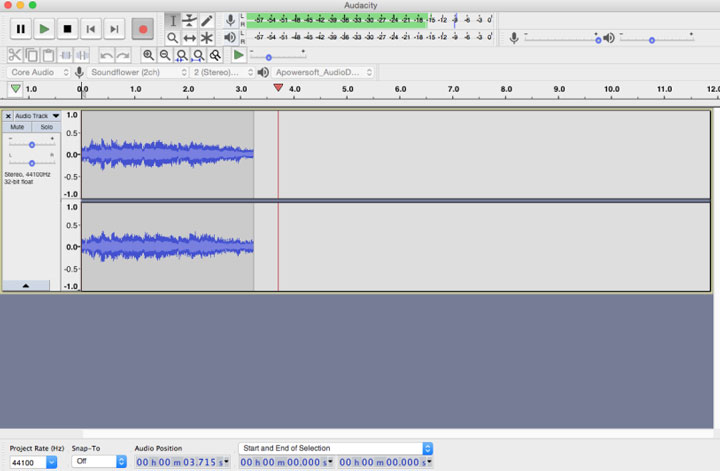
Launch Audacity and select Soundflower (2ch) as the recording device. Play the streaming audio from any browser or app on your Mac. Click on Record to start recording streaming audio using Audacity.
How to Record Streaming Audio Online
Are you looking to capture streaming audio directly from your browser? I've tried tons of online audio recorders, but unfortunately, they only seem to be capable of recording audio from the microphone only, instead of the computer sound. However, I eventually found a suitable solution that I believe is the next best thing: Chrome Audio Capture, a browser extension. Although it does require installation on your web browser, this extension offers the convenience of recording streaming audio without the need to download complex desktop-based software. With over 400,000 users, it's one of the most popular Chrome extensions available for recording various types of audio, including streaming audio, on the current tab.
Pros:
- Simple to use
Cons:
- Can't preview your recording before downloading
- There is a time limit of 30 minutes for recording
- The encoding error happens frequently
Step 1. Install the Extension
Go to the Chrome Store to find Chrome Audio Capture. Click Add to Chrome to have this simple streaming audio recorder installed on your browser.
Step 2. Enable the Extension
Locate the Extensions icon (usually found on the top-right corner) and click on it to open the extension list. Look for Chrome Audio Capture in the list and click the pin icon next to it to enable the extension.
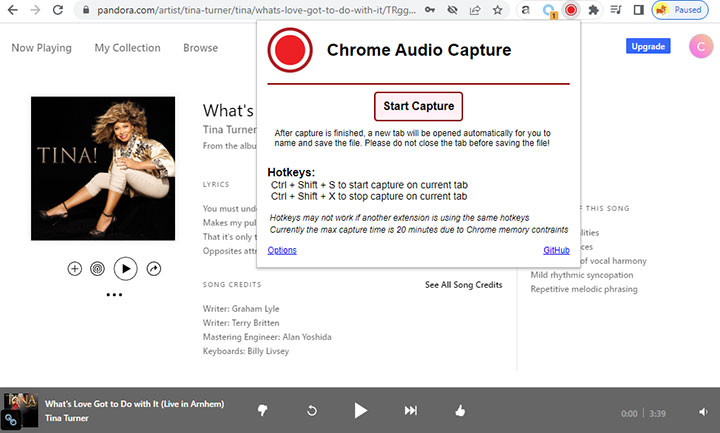
Step 3. Record Streaming Audio
Find the Chrome Audio Capture icon (usually located in the toolbar) and click on it. Select Start Capture to begin recording the streaming audio. When you're finished, click on Save Capture to stop the recording. A new tab will appear with a pop-up message. Click on Save Capture again to download the recording onto your local disk.
How to Record Streaming Audio on iPhone
If you're keen to record streaming audio on your iPhone, the Voice Memo app may disappoint as it only captures your voice and ambient sound. But fret not! There's a workaround to record streaming audio on iPhone without third-party apps. Here's the trick: use the pre-installed Screen Recorder app to capture your screen with system sound while playing the streaming audio. Then, convert the recording to an audio file using the Shortcuts app. Both apps come free and pre-loaded on your iPhone. Keep in mind that iOS Screen Capture has limitations—it can't record streaming audio from Apple Music and select websites or apps that prohibit recordings. However, for most streaming sources, this workaround works like a charm.
Pros:
- No extra cost
Cons:
- Can't record audio files directly
- Can't record streaming audio from most paid services
- No audio editing toolkits
Step 1. Set Up the Screen Recorder
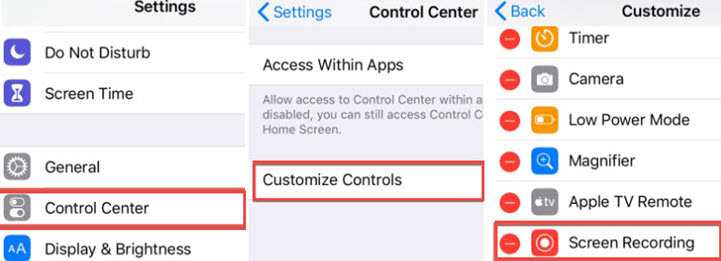
Start by accessing your iPhone Settings. Locate the Control Center option and tap on it. Next, look for the green plus icon beside the Screen Recording option and tap on it to add it to your Control Center. Once added, exit the settings and return to the app or website where the streaming audio is being played.
Step 2. Record the Streaming Audio
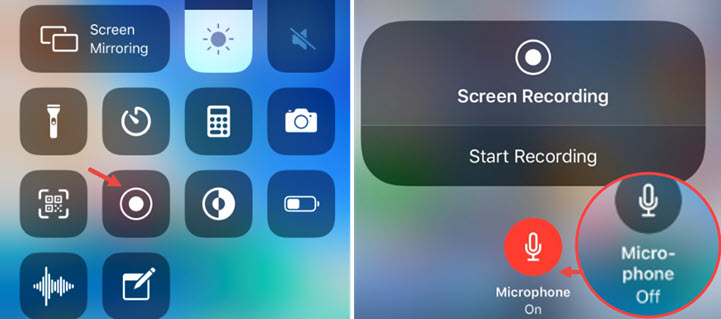
Swipe down from the top-right corner of your iPhone's screen to open the Control Center. Within the Control Center, locate and tap the Start Recording button to initiate the recording of the streaming audio. If you need to record streaming audio along with your voice, then tap the microphone icon. To stop the recording, tap the red Stop button located in the upper left corner. The recording will be saved to your photo album automatically.
Step 3. Create the Video to Audio Conversion Shortcut
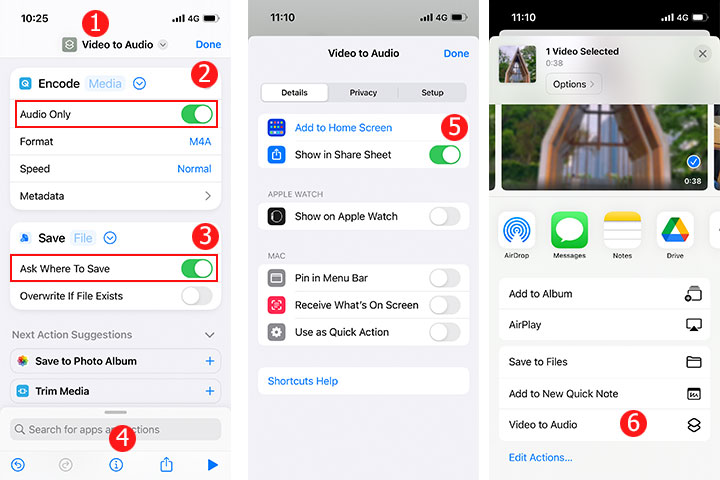
Open the Shortcuts app. Tap the plus icon located in the top-right corner. Select Add Action to proceed. In the search bar, type Encode Media and choose the matching Encode Media option from the results. Name this shortcut. Tap the expand icon and enable Audio Only. After that, tap Save File, select the expand icon, and then enable Ask Where to Save option. Tap the information icon located in the bottom, enable Show in Share Sheet, and tap Done. Next, tap Done to proceed.
Step 4. Convert the Screen Recording to Audio
Open your photo album and locate the screen recording you captured. Tap the Share icon and select the recently created shortcut from the options. Choose the folder where you want to save the output audio file, and then tap Download. After a short while, you can navigate to the Files app to locate and access the audio file converted from the screen recording.
How to Record Streaming Audio on Android
Recording streaming audio on Android devices has become more convenient with the built-in recorder feature found on most recent phones, including popular brands like Google, Xiaomi, Samsung, OnePlus, OPPO, Vivo, and more. The native screen recording function allows you to capture your screen while also capturing the streaming audio and other internal audio sources. However, it's important to note that the screen recording will result in a video file. To save the recordings in an audio format, you can use video-to-audio converters like VideoProc Converter AI.
Pros:
- No additional cost involved
Cons:
- Can't record streaming audio in an audio format directly
- Can't customize the audio recording quality or volume level
- record sound from apps and services that do not allow audio recording
- Lack of basic toolkits for audio editing
Step 1. Open Screen Recorder
Swipe down from the top of your Android device's screen to open the Quick Settings panel. Look for the screen recording icon, typically represented by a small video camera. On most phones, you can find the Screen recorder option in the Quick Settings section of the notification dropdown. If it is not visible, tap the pen tool icon in the dropdown to add the setting.
Step 2. Configure the Audio Settings
Tap on the Screen Recorder option and select Settings. From there, choose Internal Audio as the audio recording source. This ensures that you record the screen along with the streaming audio.
Step 3. Start Recording
Tap the record icon to begin recording the screen with audio. When you want to end the recording, tap the Stop button. The screen recording will now be saved in your phone's Gallery app. If you want to enjoy streaming audio on music players, then you need to convert video into MP3, M4A, or other audio formats using a video-to-audio converter.
FAQ
Is there a way to record streaming audio?
Yes. You can record streaming audio without paying a dime by using desktop audio recorders like Audacity and Chrome extensions like Chrome Audio Capture. You can also make use of the native screen recording app of an iPhone or Android smartphone to record the screen with internal audio and then convert the screen recording to audio for achieving the purpose of recording streaming audio as a digital music file.
Can Audacity record streaming audio?
Yes, Audacity can record streaming audio. This popular and versatile audio editing and recording software supports recording audio from various sources, including streaming audio, online music, podcast, and more.
What is the best streaming audio recorder?
Here is the list of the top 6 best streaming audio recorders:
- VideoProc Converter AI for Windows and Mac users
- Audacity for Mac users
- Sound Recorder for Windows users
- Chrome Audio Capture for online users
- iPhone native screen recorder for iOS users
- Android native screen recorder for Android users


