Introduction to Audio Editor
Audio makes a great impact on a video. It can control the pace of the video, match the ups and downs of the story, and create a horrible or romantic atmosphere, and so forth.
VideoProc Vlogger offers a professional Audio Editor to help shape the sound the way you want. No matter novice users or pros can handle audio with ease.
Free download VideoProc Vlogger to edit the video and fine-tune the audio for a variety of purposes.
Watch video to get to know the Audio editor in VideoProc Vlogger, or read text instructions below.
Introduction to Audio Editor in VideoProc Vlogger
Now get to know the audio editor in VideoProc Vlogger in detail.
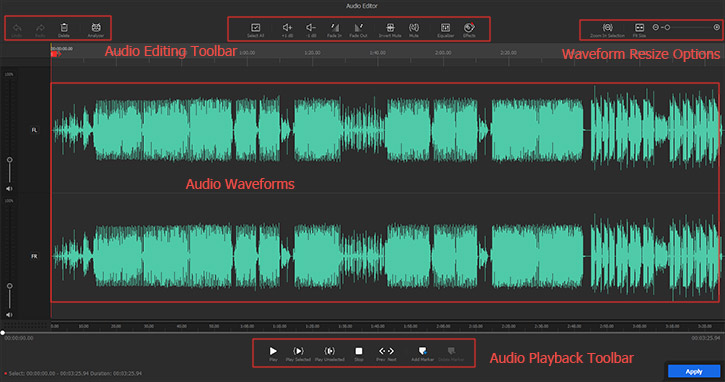
1. Audio Waveforms
When you open Audio Editor in VideoProc Vlogger, the first thing that gets into your sight is the waveforms in different audio channels. And the number of channels depends on the audio file. Most music files are stereo with 2 waveforms, while some movies containing surround sound have 6 waveforms.
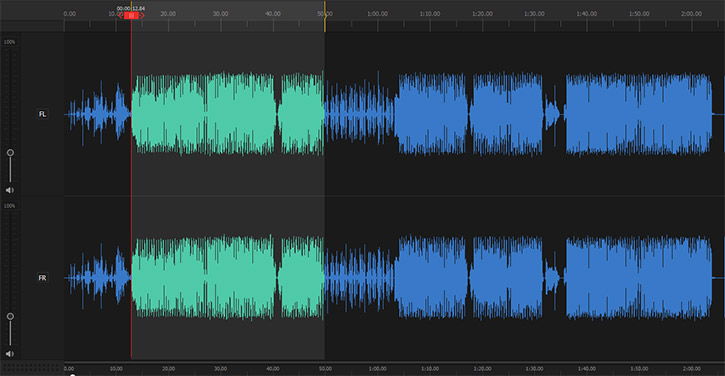
The entire audio is selected by default. You can drag the mouse and choose a portion of the waveform, and you'll see the unselected segments in blue and the selected one in green. Only the selected part can be edited with options in the toolbar. Meanwhile, you can delete, copy, and paste the selected audio with keyboard shortcuts.
On the left side of the waveform, you can drag the slider to adjust the volume of a single channel, or click the square icon next to it to lock a channel when you don't want to apply changes to it.
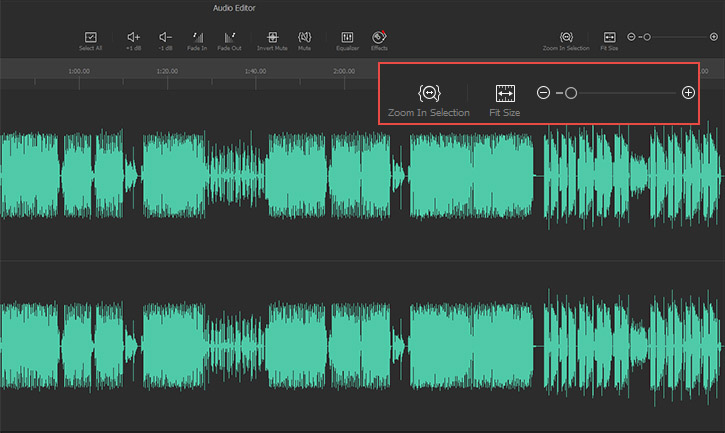
2. Waveform Resize Options
- Zoom In Selection: Enlarge the selected part in the audio and let it fit the available window size.
- Fit Size: Quickly change the view of the whole waveform by fitting it into the available window size.
- Zooming slider: Move the slider towards the right to zoom in on the audio waveform, and vice versa.
3. Audio Editing Toolbar
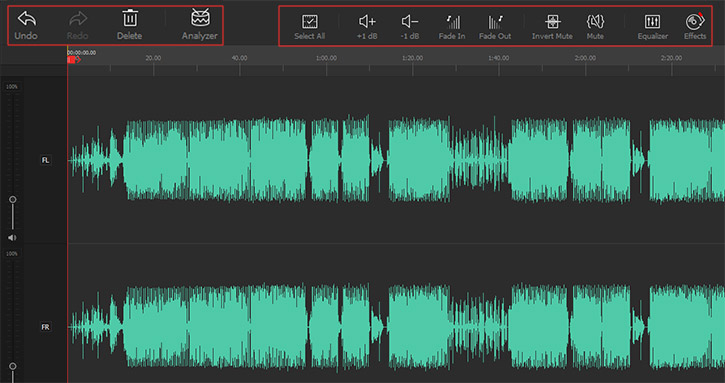
The audio editing toolbar sits above the waveform where you can find the whole set of editing tools as follows.
Undo and Redo
Click Undo to reverse a mistake, such as deleting the wrong word in a sentence.
Click Redo to restore any actions that were previously undone using an undo.
Delete
Click the Delete icon, and the selected audio (green waveform) will be removed from the file.
Analyzer
Click on the Analyzer icon, and you can see 3 options to analyze audio – Audio Onset, Audio Beat, and Audio Silence. You can edit your video to the beat of the music auto-detected by Audio Beat and Audio Onset, and remove silences with detections by Audio Silence
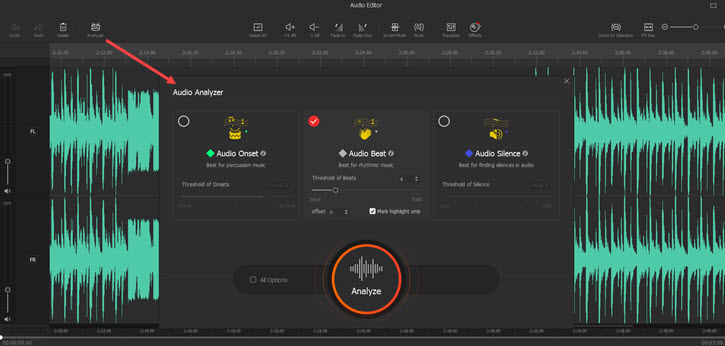
For detailed guides, please visit the page of introduction to VideoProc Vlogger Audio Analyzer>
Select All
Click this option, and you can quickly select the whole audio waveform which will turn green from blue. Then all the edits will be applied to the entire video.
+1 dB and -1 dB
These two options are used for increasing and decreasing the volume of the selected audio file. Please note that they are different from the volume adjustment sliders on the left side of the waveform. The sliders adjust the volume of their corresponding channels.
Fade In and Fade Out
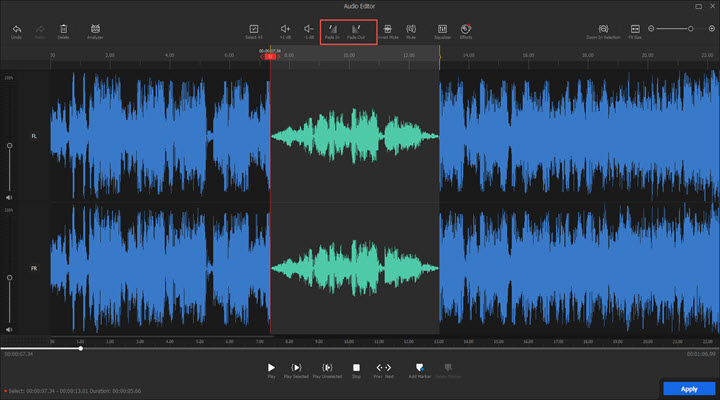
To make your BGM end smoothly, you can use the function of Fade In/ Fade Out.
VideoProc Vlogger will automatically choose the start/end segments to achieve the effect in either the while audio or in a selected part.
Invert Mute and Mute
Select a part of the audio waveform and then click on the Invert Mute icon, so the unselected part (in blue) will be muted. Similarly, the Mute button will mute the selected part.
Equalizer
The equalizer can be a great tool to shape the sound of audio tickle your fancy. It can help when you want to:
- Highlight the human voice
- Improve sound quality, compensate for the imperfect quality of speakers or headphones
- Remove unwanted frequencies, such as the noise in the recording process
- Make super cool sound effects
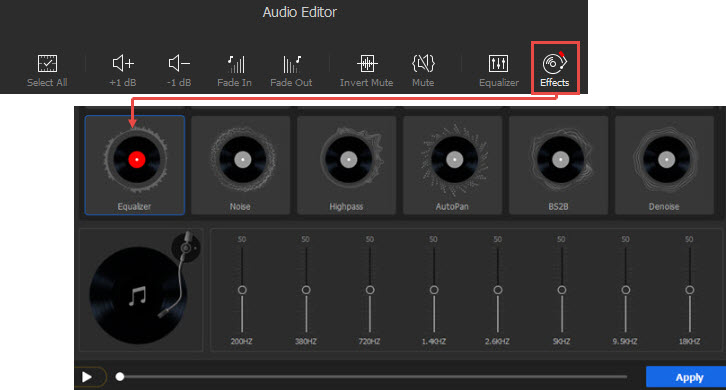
For detailed guides, please visit the page of introduction to VideoProc Vlogger Audio Equalizer>
Effects
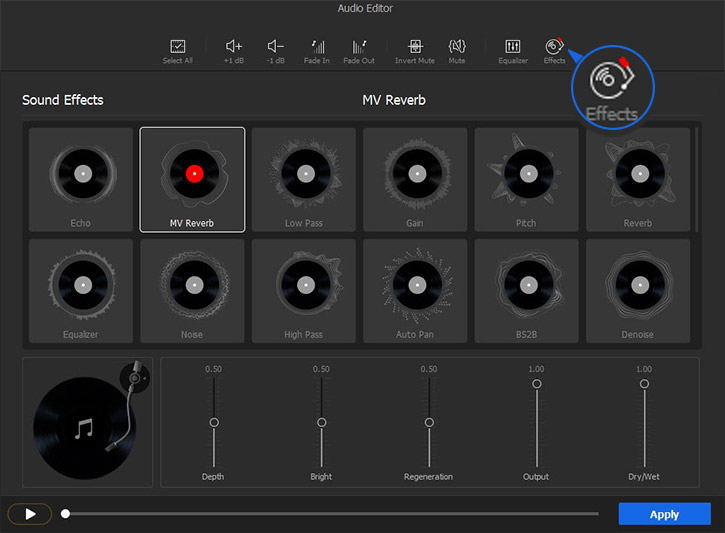
Click on Effects and then pop out the Audio Filter panel. VideoProc Vlogger has preset 13 kinds of audio filters, including Echo, MV Reverb, LowPass, Gain, Pitch, Reverb, Equalizer, Noise, Highpass, AutoPan, BS2B, Denoise.
4. Audio Playback Toolbar
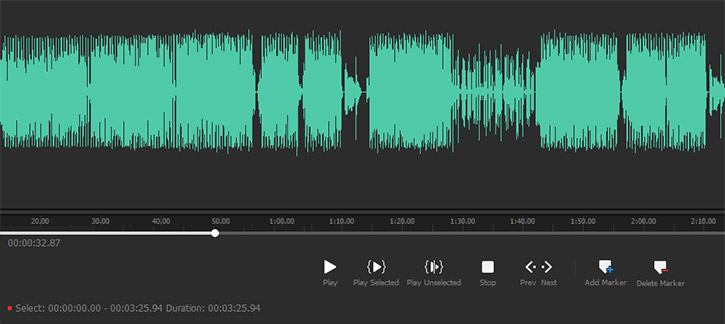
The audio playback toolbar is under the waveform. You can use these tools to preview the audio in multiple ways.
Scroll bar
Drag the scroll bar at the bottom of the waveform left or right, and you can quickly navigate to the time position you prefer.
Play, Play Selected, and Play Unselected
- Play: Play the audio from the position where the playhead is placed to the end of the audio file. And during the playback, it will turn into a Pause option which stops the playback at the current time.
- Play Selected: Play the selected part of the audio (green waveform).
- Play Unselected: Play the unselected part of the audio (blue waveform).
Stop
The Stop button will stop playing the audio and put the playhead at the very beginning of the audio.
Prev and Next
Prev represents the Previous 0.05s of the current audio, and Next represents the Next 0.05s. You can use them to move the playhead and edit the audio accurately.
Add Marker and Delete Mark
Click Add Maker to add a marker to the position where the playhead stops. When you select a part and click Add Maker, you will add two markers at the beginning and the end of the section.
Click Delete Marker to remove markers in the waveform.
These markers matter a great deal when you make beat-sync videos because they can assist you in quick navigation to the potion where you want to make a cut, add transitions and effects.
How to Edit Audio in VideoProc Vlogger
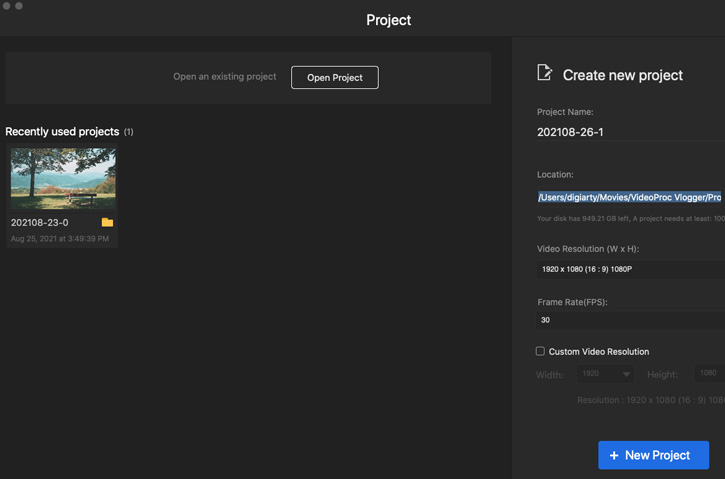
Step 0Start a project
Create a new project and customize its name, location and video resolution.
Step 1Import video and audio
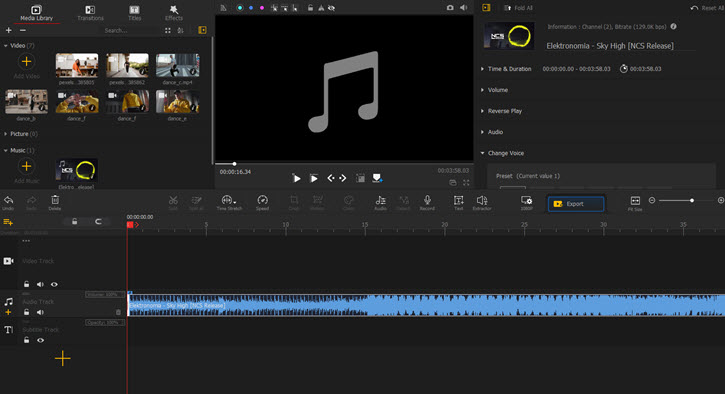
Click the upper left corner + icon and choose the video, music in your folder, or drag and drop the media file to the media library directly. Then drag the files to the timeline.
 Editing Tips
Drag a video to the audio track will only keep the audio, and now you can edit the background sound of the video.
Step 2Open Audio Editor
Click to select the audio track in the timeline. Move to the toolbar under the preview panel and click Audio to open the Audio Editor panel.

Step 3Start audio editing
When you open the Audio Editor panel, you can:
- Delete and reorganize audio
- Adjust volume
- Mute audio
- Add fade in/out effect
- Use audio Equalizer
- Analyze audio onsets, beats, and silences
- Apply audio effects
- ...
When you finish audio editing, click the Apply button to confirm and apply changes to the audio file.
 Editing Tips
You can also edit the audio track in the Inspector Panel which has features like volume adjustment, reverse play, and voice changer (Woman, Mac, Child, Robot, and Minions).
Free download VideoProc Vlogger to edit the video and fine-tune the audio like a pro.
- > Detach Audio from Video
- > Mute Audio
- > Reduce Background Noise of Video & Audio
- > Record Voiceover and Change Voice
- > Adjust Audio Speed without Changing Pitch
- > Add Filters to Audio
- > Volume Fade In and Out
- > Using Audio Equalizer in VideoProc Vlogger
- > Using Audio Analyzer in VideoProc Vlogger
For more guides of VideoProc Vlogger, please visit this page >
If you have any question, please email us or visit

