Summary: This post talks about how to add transitions to a video on Windows (11/10/8/7) by using VideoProc Vlogger - a 100% free Windows 10/11 video editor that provides users with over 60 eye-catching transition effects.
Tech-savvy video creators or rookies? We've all heard and seen video transitions. As one of the most common video editing techniques, transitions are used for helping us move the video progression from one screen to the next without distracting jumpy. It's like the glue that holds different scenes together, making our video feel more cohesive, fancy, and professional. If you are interested in making transition videos in Windows 10 or Windows 11, follow this step-by-step tutorial.
How to Add Transitions to Videos in Windows 10/11
Depending on the Windows video editor with transitions we use, making transition videos can be anywhere from ridiculously simple to highly complex. Luckily, if we are working with VideoProc Vlogger, it's especially easy.
This self-explained yet powerful Microsoft video editor comes with dozens of trendy transition effect presets. With it, everyone can add transitions to a video in Windows 10/11 within a few clicks. (It's also available on the macOS machines). Keep reading. I'm going to show you how to add transitions in this Windows 10/11 video editor.
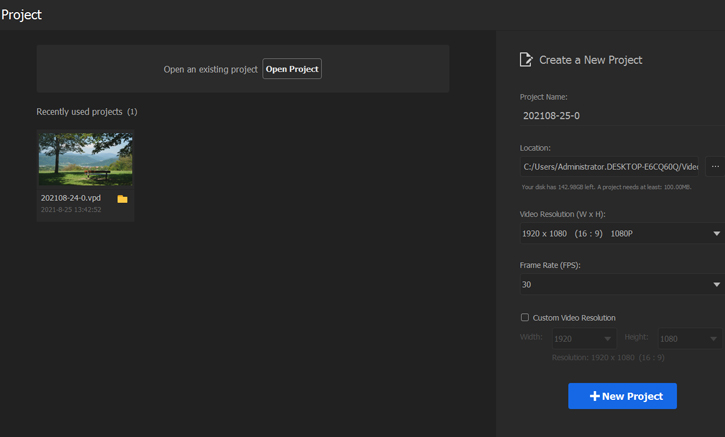
Step 0. Create a New Project
Open up this amazing Windows video editor. Enter the wanted project name, location, video resolution, and frame rate on the general setting panel to create a new project.
Step 1. Import the Original Videos and Pictures
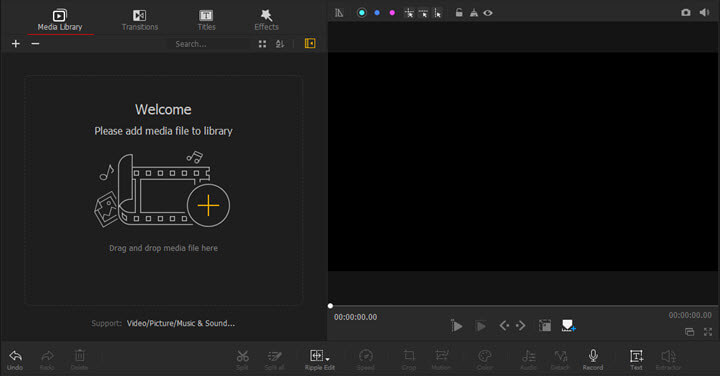
Drag the original video and picture files from the local disk to the Media Library. You can also add folders that contain multiple video clips to this Windows 10/11 video editor.
Step 2. Add Videos and Pictures to Video Track
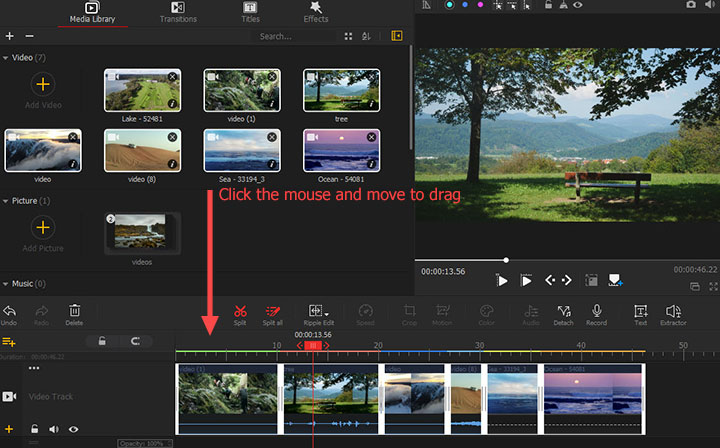
Select a video, and press Ctrl + A to select all videos under the Video bin. Drag them onto Video Track in batch. You can also select a picture, press Ctrl + A to select all pictures, and then drag all the pictures onto Video Track.
Step 3. Change Sequences
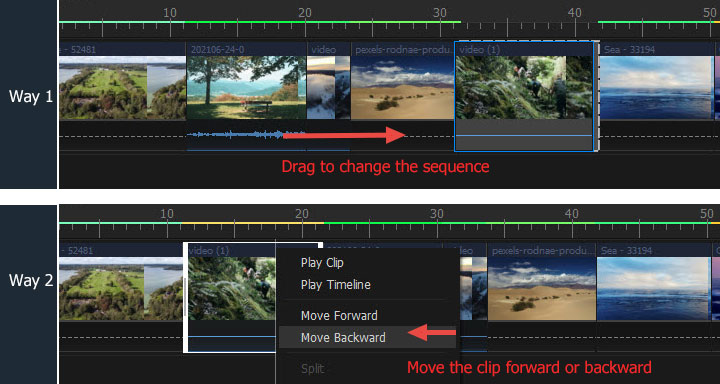
Drag the clips forward or backward if you need to rearrange the position on this Windows video editor with transition effects.
Step 4. Apply Simple Edits
Sometimes we want to add filters or special effects to some short piece of videos before applying transition effects. To do so, double-click the clip on the timeline. After that, you can:
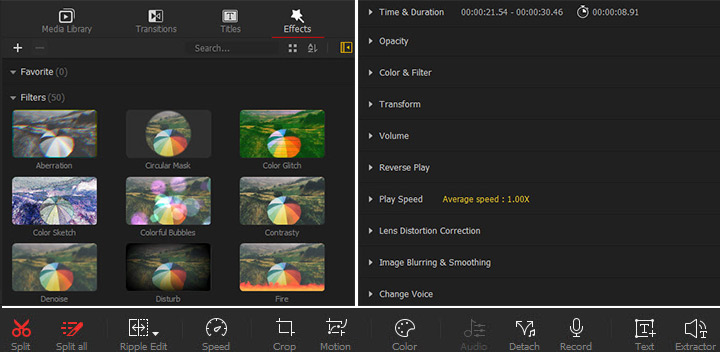
- Use Speed, Motion, Color, and a few other tools on the toolbar to adjust video speed, add motion crop effect, change picture color…
- Use the options available on the Inspector panel to adjust the video appearance.
- Press the Titles or Effects option above Media Library to add animated titles and eye-catching filters.
Step 5. Add Video Transitions on Windows 10/11
Now, let's start to add video transitions by using the transition effects preset on this Microsoft video editor.
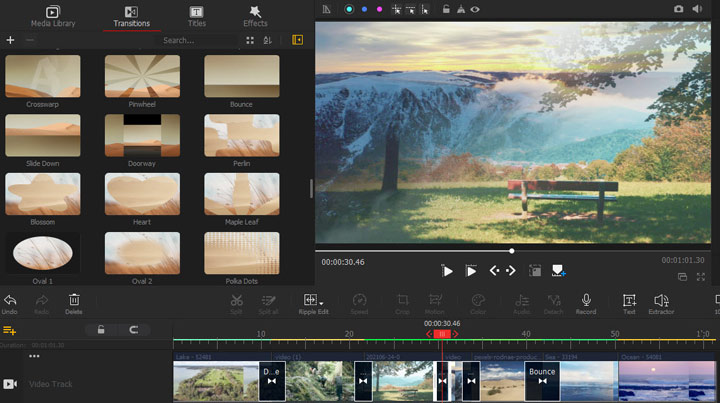
Hit Transitions. VideoProc Vlogger offers 61 free transition effects for video editing, including Angular, Bounce, Colorphase, Burn and CrossZoom, etc. Select the needed transition effect. Drag it over the position in-between the two clips for adding the transition effects on Windows 10 or Windows 11.
Step 6. Adjust the Transition Effects
Drag the start or the end of a transition effect clip on the timeline to adjust its start time, end time, and duration.
Select Add All Left or Add All Right, and then click on Batch Add Transition to batch add the same transition effect between clips on the left or the right of the selected clip. If you need to apply the same transition for all clips, hit Add All and choose Batch Add Transition.
Select Random Transition Type and then press Batch Add Transition. This capable video editor will apply the transition effects you've added to favorite to in-between all clips of your project.

Tips: You can also select Repeat Frame, Retrieve Frame, or Stretch Frame under the Propertied panel to decide what should display during the transition between two clips. (In most cases, you can leave Properties as default settings.)
Step 7. Export the Video with Transition Effects
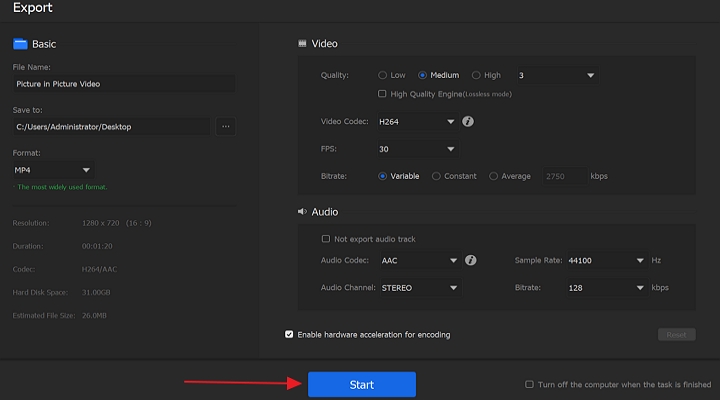
Hit Export when we finish the process of adding transitions in this Windows 10/11 video editor. On the Export panel, we can leave all settings as the default ones and simply press Start to export the video with the transition effects.
Tips on Making Transition Videos in Windows 10/11
1. Don't Go Overboard with Transitions.
Many green hands tend to overuse transition effects simply because they looked great, even if they are distracting for the audiences and may detract from the overall video quality of the videos. Keep in mind that transitions are for smoothly switching from one scene to the next. Thus, in most cases, transitions are for two clips that are recorded from different shots and show changes in some aspects, such as weather, time, mood, and place.
2. Shoot to Edit.
A video with seamless transitions does not happen by accident. It's not just for making our video look interesting and professional. It should also show our audience that we are meant to add transitions, so they can be perfectly suited for each other. To achieve this goal, we need to plan our transitions ahead of time. This can also help us out in the editing bay. Let's say, we have a 3-minute video that contains over 100 different short clips, and then it can be very necessary to add lots of transition effects for the fluidity of the storytelling. However, as we mentioned earlier, too many transitions can make the video looked too dizzying and disjointed.
3. There Are Always Exceptions.
Though we emphases do not use too many transitions, there are exceptional. A good example is wedding slideshow video. The plenty of pleasant and tasteful slide transition effects, will add a romantic feel to our photo videos, is usually a big plus for wedding slideshows. The only thing we should notice is, we should limit ourselves to apply one or two sorts of transitions for keeping the cohesion of the video.


