Overlaying a picture on a video is a great way to help you communicate with your users or viewers more easily. They can understand what you mean in a more efficient way. Besides, if you take this editing skill seriously and apply it in your clip properly, it will make your video clip more professional.
But the real problem is how to overlay a picture on a video. No worries. In the following, you will learn about 4 unique methods to make this job done. Check them now.
How to Overlay a Picture on a Video on Windows
For Windows users, we recommend VideoProc Vlogger as the best option. Because with it, it will be very easy to finish the job of overlaying a picture on a video, within just a few clicks. Besides, it will also enable you to do more on your video clip, like adding transitions, filters, text, editing the audio file, etc. Most importantly, all those features which you will use are free. And you can export the finished video clip without any watermark. So why not try it for free now?
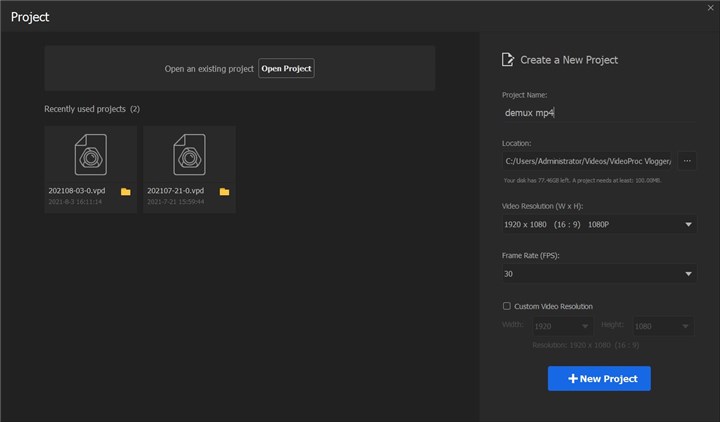
Step 1. After you download and install VideoProc Vlogger on your computer, launch it. First, it will require you to create a new project. There you can set the project name, its location, its resolution and frame rate. After all is set, just click the New Project button into the editing window.
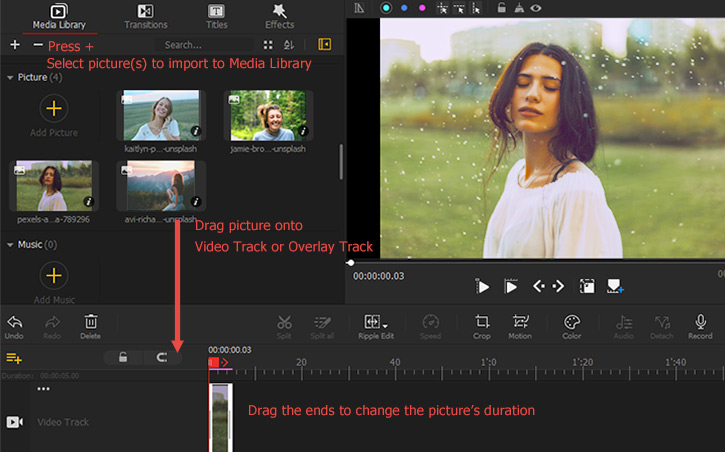
Step 2. In the Media Library, click on the + button to load the video and picture files.
Step 3. Drag the video clip into the Video Track in the timeline, and the picture file into the Overlay Track.
Step 4. Double-click on the image in the preview window, and then you can customize its position and size.
Step 5. In the timeline, click on the picture and then pull its head or tail to set its duration.
Step 6. After you finish all the operations above, now just click on the Export button, which is located near the preview window, to the saving window. There what you need to do is just set the parameters for your video clip. If you have nothing to do with it, just leave the parameters as it is. Lastly, click on the Start button to make VideoProc Vlogger start processing your video file.
How to Overlay a Picture on a Video on Mac
If you are a Mac user, you can use the built-in video editing tool - iMovie to do the job. Here are the detailed steps.
Step 1. Launch iMovie on your Mac, click the + icon on its top left corner, and select Movie. Then it will require you choose a template or go with No Theme. Mostly, I will go for the No Theme. Lastly, click the Create button at its right bottom to create a new project.
Step 2. Click the My Media tab and import the video and picture you will use.
Step 3. Drag and drop the video clip to the timeline.
Step 4. Similarly, drag and drop the picture to the timeline, but over the video clip. There will be a little bar connecting the video and the picture. By far, you will not see the overlay effect happening. The image is still underneath the video clip. There are still some other jobs needed.
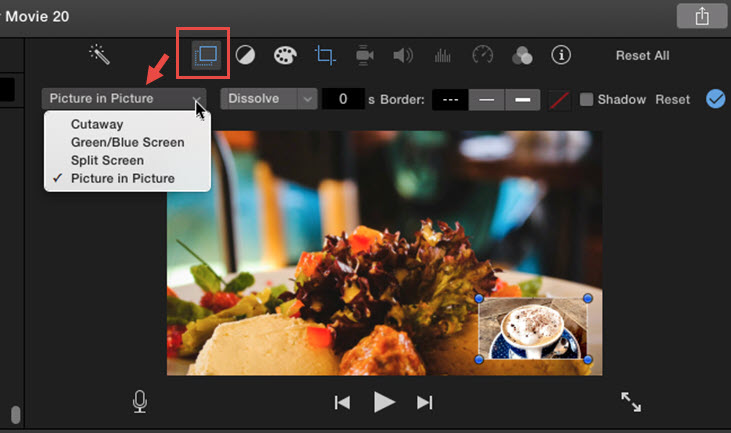
Step 5. Click the overlay icon and find the Picture in Picture feature from the drop-down menu. Now the picture will appear on the video.
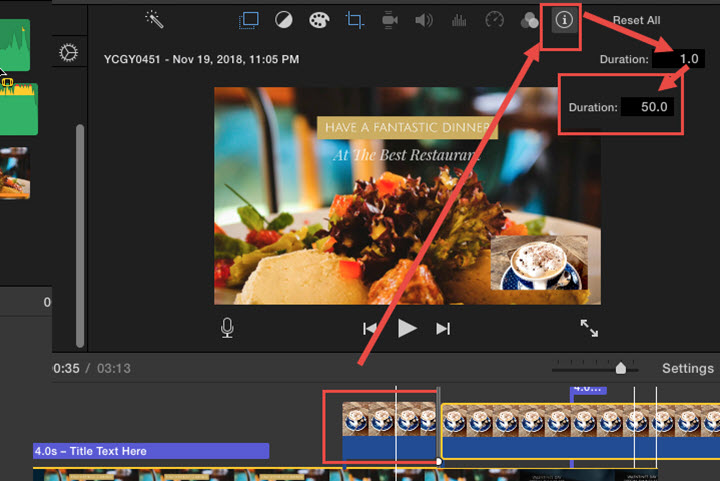
Step 6. Click on the picture on the timeline to select it. Then find the i menu which is located at the top right of the interface. Click on it, and you will see a Duration box, where you can set how many seconds the picture can appear on the video.
Step 7. After all the operations above finish, click the Share menu to export the video.
How to Overlay a Picture on a Video Online
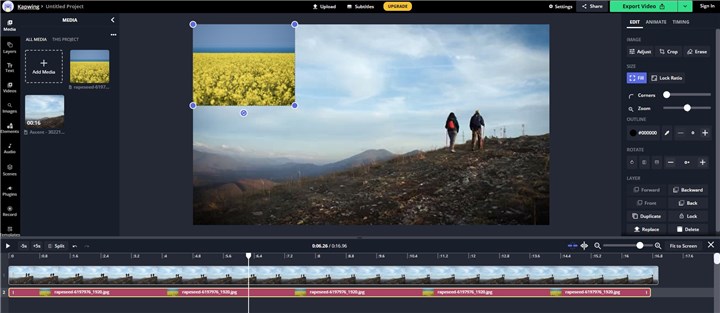
If you are tired of downloading and installing programs on your computer, you can seek some online tools as the solutions. Here we recommend the Kapwing video editor.
Step 1. Open Kapwing in your browser.
Step 2. Click on the Media button on the left side to import the video and picture into it. You can directly drag the files, or choose the Add Media button.
Step 3. First drag the video clip to the right window. It will automatically load the file, and then you will see the editing window.
Step 4. Then similarly, drag the picture into the preview window and the picture will appear on the video.
Step 5. Now what you need to do is customize the picture's size and duration.
How to Overlay a Picture on a Video on Android and iOS
If you are looking for a mobile app which can enable you to overlay a picture on a video, then you can take CapCut for a try. You can find it on both Android and iOS app stores. Most importantly, it is owned by ByteDance, which is also the owner of TikTok. So there will be good compatibility with TikTok video creation.
Step 1. Download and install this CapCut app on your Android or iOS device.
Step 2. Run it, and then you will see the New Project menu. Tap it, and it will pop up all the folders on your phone, which save your videos and pictures.
Step 3. Find the video clip, check it, and tap the Add button to import it into the editing tool.
Step 4. Scroll the screen to the bottom, where it loads lots of editing features which CapCut has. Find the Overlay feature and tap it.
Step 5. Now tap the Add Overlay button, and then you will go back to your phone library again. Find the picture, check it, and click on the Add button. Then the picture will be added into the overlay track in the timeline.
Step 6. Tap on the picture, you can move its position and change its size easily. In the timeline, you can move the picture's head or tail to customize how long it would appear on the video clip.
Step 7. After all is done, just click on the upload button to save your finished video clip or share it to online platforms.
The Bottom Line
For these four methods, there is no one which can definitely beat the other three. Each of them has its uniqueness and advantages. So choose the one which is the most suitable for you, and start the picture overlaying on a video job now.


