Hi all,
I have a video in which everything looks a little squat and compressed. I'd really like to stretch it vertically just a teeny bit, so it looks a bit more normal. Any clues on how to do that in a video editing application? Thanks!
- A user from Reddit
OK, let's come straight to the point. If you are also suffering from the same issue as the Reddit user above, and would like to stretch a video, no matter vertically or horizontally, to make it look like normal, you can find the detailed how-to steps in the following words. Let's check them out.
How to Stretch a Video Vertically and Horizontally with VideoProc Vlogger
To do this job, we need help from a professional tool. And its name is VideoProc Vlogger. It is a piece of video editing software. With it, you can stretch your video with a few clicks in minutes. It is very easy to operate owing to its user-friendly interface. But the reason why we recommend VideoProc Vlogger is definitely more than this.
For VideoProc Vlogger, stretching a video is just kind of a very basic or tiny feature of its. It can provide you with more options to polish your clips, from fundamental ones, like trimming and splitting, to advanced ones, like speed ramp, text customization, filter and effects adding, color correction and grading, audio editing, etc. The most important one is that all those editing features within VideoProc Vlogger are free. It would not cost you a penny.
So why not free download and follow the steps below to make your job done in a few minutes?
Step 1. Install VideoProc Vlogger after you download and save it on your Windows or Mac computer.
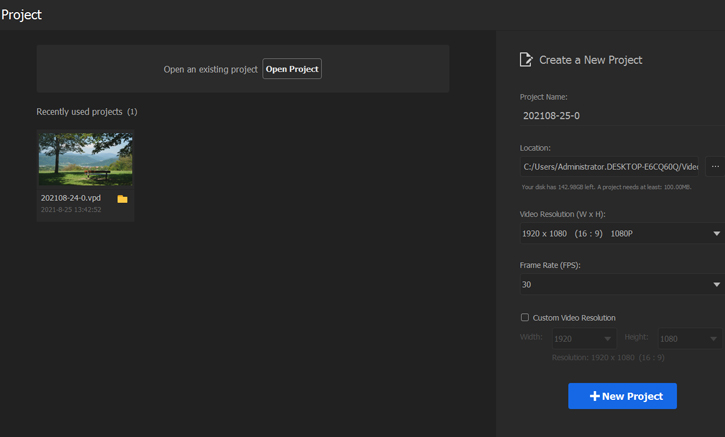
Step 2. Run it. And the first job that it requires you to do is creating a new project. In the creation page, you can customize the video FPS and resolution.
What you need to specially notice here is the resolution. You may prefer checking the Customize Video Resolution option, because there you can have more options which will benefit you for stretching a video. Under the Customize Video Resolution option, what you need to do is estimate how wide or high you would like your video clip to be, and then select a combination of width and height. For example, the original video is 1920 * 1080. And you would like to stretch it only vertically by about 50px, so it will look a bit normal. Then you need to customize the resolution with the option of 1920 * 1170.
You may wonder how you can know the exact number of pixels needed for the video becoming normal, right? No worries. We can fine-tune it later.

Step 3. Then you will be led to the main editing page. There you can import the compressed video clip into its media library. Then drag it from the library into the timeline, which is located at the bottom, for further editing.
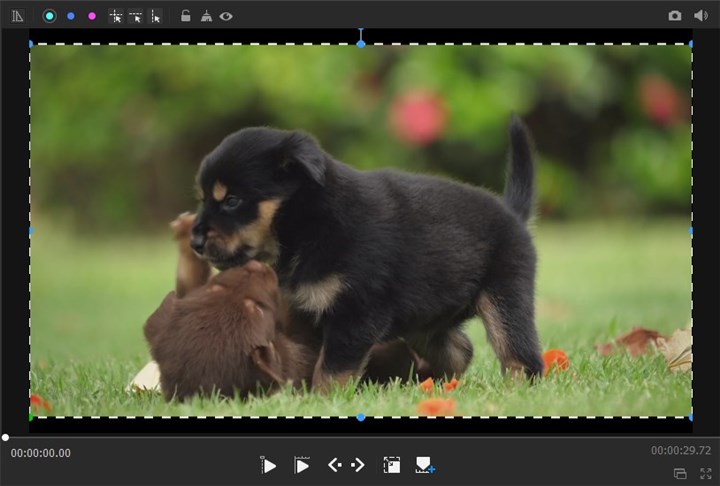
Step 4. Click on the video clip in the timeline, and it will be displayed in the preview window. Double-click on the image in the preview window. You will see a dotted box. Pull the top border line and the bottom one to make the video image look normal.
If you have already stretched the image to fit the whole screen, but it still does not look great, obviously, you need a larger number for the resolution. You can click on the resolution button, which is right under the preview window and next to the Export button, to adjust the resolution numbers.

Step 5. Lastly, simply click on the Export button to save the edited video clip on your computer.
The Bottom Line
If you plan to stretch a video horizontally, the only difference is that you need to customize the video width a little larger than the original one. Then the rest operations are just as same as what we just mentioned above.


