Introduction to Preference Settings
VideoProc Vlogger offers preference settings in terms of different video editing habits. You can set defaults for the language, file locations, editing preferences, hardware acceleration, and so on.
Let's download, install VideoProc Vlogger, and customize preferences to serve your editing work better.
Watch the video to learn the preference settings in VideoProc Vlogger, or read text instructions below.
General Settings
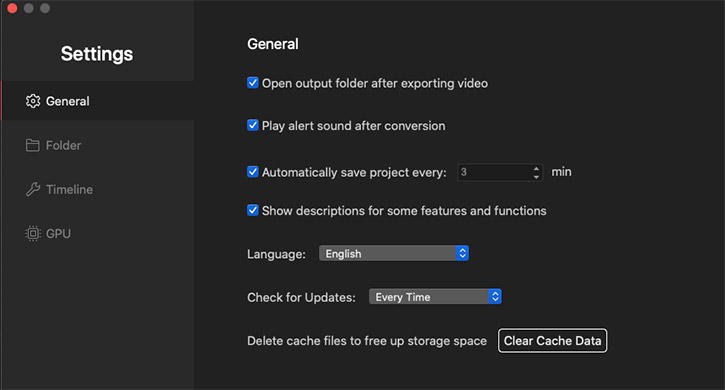
Expand the drop-down menu of VideoProc Vlogger on the top area. Click Preference to open the Settings tab, and then you can change options as follows.

Open output folder after exporting video - After activating this option, the video file will pop up automatically in case you have no ideas where it is saved. You can uncheck to disable this option.
Play sound when a task is finished - Enable this option, and it will ring to remind you that the rendering is completed if you are working on other tasks. You can uncheck it if you don't need it.
Auto save the project - To prevent losing work when it crashes or quits unexpectedly, enable this option to let VideoProc Vlogger backup your editing project at a certain frequency. You can find the auto-saved copy in the project folder.
Show descriptions for some features and functions - After enabling it, you can see explanations of some tools or options in this software while hovering the mouse over them.
Language - Open the drop-down menu of this option to select a language, English, German, Spanish, French, Italian, Japanese, Korean, or Chinese.
Check for Updates - Check this option to let it detect if there's a new version of VideoProc Vlogger monthly, daily, weekly, or every time you open it. Once a new version is released, a window will pop up to remind you to upgrade.
Clear Cache Data - Hit this button to delete cache files to free up storage on your computer and improve editing performances of VideoProc Vlogger.
Folder Settings
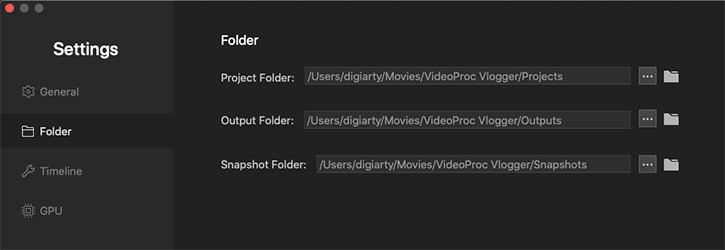
Open the Folder option in Settings and you can change output file locations with the instruction below.

Click the three-dot icon to browse file folders on your Windows computer. Select a folder to save editing projects in the Project folder option, output video/audio files in the Output Folder option, and snapshots in Snapshot Folder.
Timeline Settings
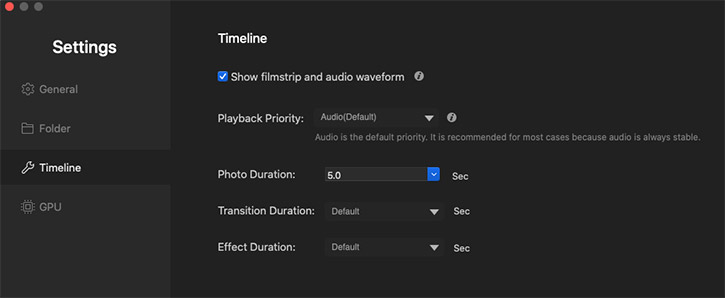
Open the Timeline option in the Settings tab, and you'll see following options:

Show filmstrip and audio waveform - Check the box before this option, and you can see series of snapshots and audio waves on the timeline. If disabled, it shows only the cover image of a video clip, for fast loading.
Playback Priority - Expand the drop-down menu in the option. Choose to give a high priority to the audio or video quality when the playback is lagging esp. on low-end or old computers.
- Audio (Default): It is recommended for most cases because audio is always stable.
- Video: High-quality preview of each frame but may change the voice pitch or lose some audio.
- Audio (Drop Frame): Not recommended unless the playback keeps lagging or freezing seriously due to too many effects and transitions. It may drop some frames, but won't impact the output quality.
Photo Duration - Specify how long the image you import to the timeline lasts. You can choose 1- 9 sec or customize it in the drop-down menu.
Transition Duration - Set the length of a transition from 1 second to 10 seconds. By default, it lasts for 2 seconds.
Effect Duration - Set the duration of the effect you add to the timeline. By default, it lasts for 5 seconds.
GPU Settings
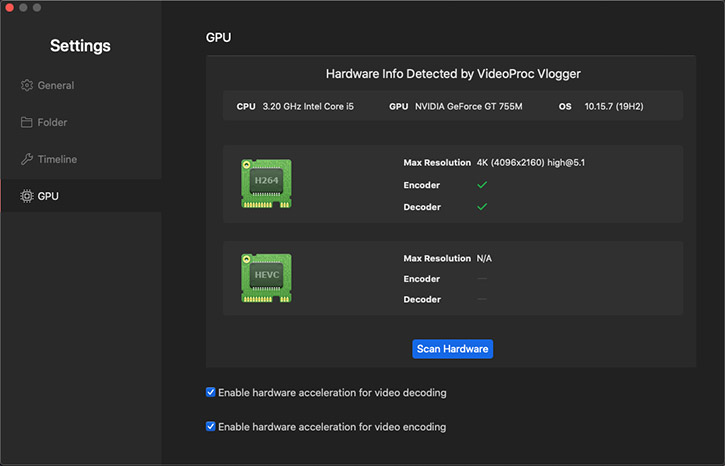
By fully utilizing hardware acceleration, VideoProc Vlogger decodes, processes, and encodes large UHD 4K videos fast and smoothly even on low-end computers. Click GPU under the Editor settings or scroll down the window to move to GPU settings.

Scan Hardware - Hit this button to let VideoProc Vlogger detect the hardware info of your computer.
Enable hardware acceleration for video decoding - Check the box before it and select a GPU in the drop-down menu. Then, VideoProc Vlogger will activate GPU to decode H.264/AVC and H.265/HEVC videos when you load them to this software.
Enable hardware acceleration for video encoding - Check the box before and select a GPU in the drop-down menu. Then, VideoProc Vlogger will activate GPU to help render an H.264 or H.265/HEVC video when you add effects to it and export it from this software.
Once you change any of these options, they are applied in VideoProc Vlogger immediately. You just need to close the Settings tab and get back to the main UI.
Now free download, install, and run VideoProc Vlogger to edit videos in your own way.
- > Introduction to VideoProc Vlogger Interface
- > Introduction to Hardware Acceleration in VideoProc Vlogger
- > Create New Project in VideoProc Vlogger
- > Import Media in VideoProc Vlogger
- > Preview Project in VideoProc Vlogger
- > Using Timeline in VideoProc Vlogger
- > Create a Video Quickly with VideoProc Vlogger in 5 Minutes
For more guides of VideoProc Vlogger, please visit this page >
If you have any question, please email us or visit

