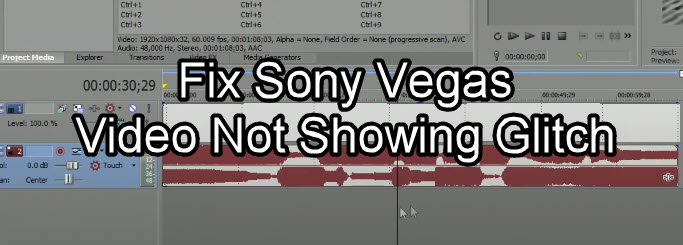
"Sony Vegas video not showing only audio showing in the timeline" is a re-occurring topic in many forum threads, from Sony Vegas older versions such as 8, 10, 12, 13 to newer versions, many users find that when a video is imported to the timeline, there is no trace of video, or the screen is complete black, but the audio works well.
Why Sony Vegas Video Not Showing Only Audio Glitch Happens?
Based on the description and feedback from various users under different circumstances, there are several causes for this "Video Not Showing" error:
1. Screen recordings videos are created by Recorders with incompatible codec:
For instance, some screen recorder software may have their own proprietary codec when recording the video. Other times, the recorder does recorded in mainstream codec, such as H264 MP4, still, it won't play well in Sony Vegas. There are users recording gameplays using Camtasia and Mirillis Action reported the failure.
Plus, OBS users may not be aware that the video are recorded in viable frame rate (VFR), which is not friendly for Sony Vegas.
2. Videos downloaded online are encoded with challenging codecs for Sony Vegas:
For instance, some online videos are encoded with HEVC, VP9, AV1, WebM. Newer versions of Sony Vegas may gradually add support for these videos.
3. Footage shot by cameras from small manufacturers:
For instance, several users find the footage from super cheap no-name action cameras undergone the error in question.
4. Video converted by VLC still won't work in Sony Vegas:
There are several cases when the user has transcoded the video, but the "Video Not Showing" problem still persists after importing into Sony Vegas.
So much for the analysis. With the understanding of hidden causes for the Sony Vegas error, here are 3 easy solutions to solve the problems accordingly.
Solution 1. Convert Video to Sony Vegas Compatible Codecs
No matter whether it is the demanding codecs HEVC, VP9, AV1, from cameras, iPhone, GoPro, online downloading, or the vagaries of recordings from screen recorder software, the best solution is to transcode the video into Sony Vegas-supported video format.
To do so, you need a dedicated video converter software: VideoProc Converter AI, which has a large library of codecs, and can convert rare video formats into mainstream videos.

VideoProc Converter AI – Best Video Converter for the Editing Crowd
- Transcode footage into editing-compatible video (420+ formats)
- Convert video from recorders, cameras, iPhone, drones, action cams.
- Option to manage codecs settings, support 4K, hevc, av1, WebM, VP8/9
- Video toolkit to edit, record, download, remux videos easily
How to fix "Sony Vegas video not showing, only audio" easily by converting:
To get started, you need to download VideoProc Converter AI for Windows or for Mac, and prepare the source footage that's showing only the audio.
Step 1. Launch VideoProc Converter AI, and go to the Video section.
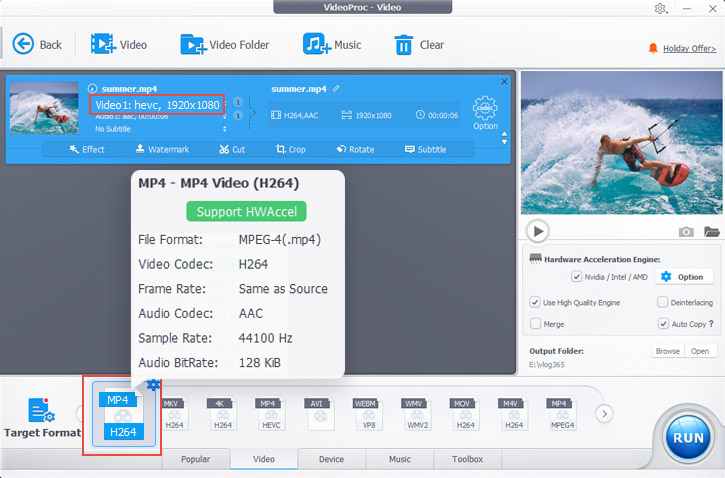
Step 2. Drag and drop the source footage into VideoProc Converter AI, and select a target format to convert into.
"Sony Vegas no video track", what format shall I convert to fix this?
- It is recommended to use MP4 H264 profile, as H264 is the most compatible codec to playback in video editors, media players, online video hosting sites, and commodity devices such as TV, iPhone, Xbox, PS.
- VideoProc Converter AI also supports the intermediate codec: ProRes. Power users familiar with intermediate codec can use ProRes 422, 422HQ and other ProRes profiles to smooth the editing experience in Sony Vegas.
- For older versions of Sony Vegas, if the converted format still doesn't work, and "Sony Vegas not showing video, only audio" error persists, you can convert the source footage into MPEG-2 video, which is also included in the target format in VideoProc Converter AI.
Step 3. Hit Run to convert the video.
- Make sure to tick "Use high-quality engine" before you start converting the video.
- When the conversion is completed, the folder containing the converted video will pop up. This will be the footage to use in Sony Vegas.
Step 4. Replace the problematic footage in Sony Vegas.
Here are two ways to use the newly converted video.
- You can delete the problematic footage, add new footage into the timeline. Now the video and audio should be both showing up in the timeline.
- Alternatively, you can go to the project media library, right-click on the original footage, and hit Replace Media. Then choose the converted video.
Solution 2. Convert VFR to CFR Video to Fix Sony Vegas No Video Track Error
As analyzed before, when "Sony Vegas not showing video, only audio" error occurs, chances are that the video is encoded in a way that Sony Vegas fails to decode. Such as proprietary format from video recording software, or newer codec format that Sony Vegas fail to keep up with.
Besides incompatible codec, frame rate mode can also account for the no-video-track annoyance. For instance, some users find their source videos are encoded with variable frame rate (VFR), such as gameplay recording using OBS recorder.
Easy Solution:
The solution is to convert VFR to CFR (constant frame rate) video. The tool to use is also VideoProc Converter AI. If you haven't downloaded it in Solution 1, you can click the download buttons below.
How to Convert VFR to CFR to Fix "Sony Vegas Importing Only Audio" Error
Step 1. Launch VideoProc Converter AI and go to the Video section to add source video.
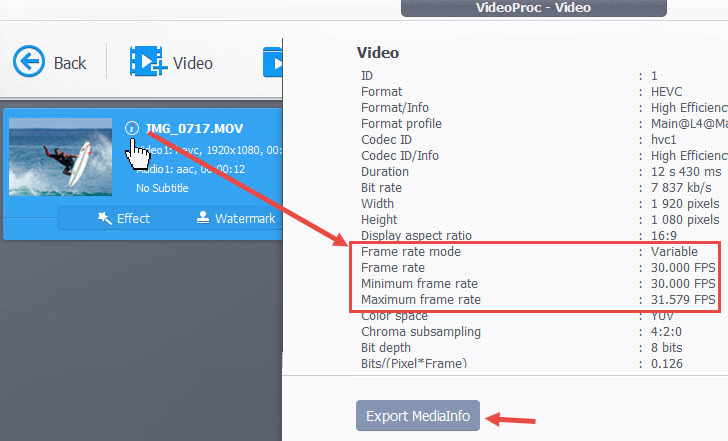
Tip: After importing the video, you can click the information icon to check detailed video information using VideoProc Converter AI.
For instance, you can check about frame rate mode, video codec, etc.
Step 2. Choose target format to convert the video.
For most cases, MP4 H264 is recommended. The ready-to-use profile will convert the video into the constant frame rate (CFR), in .mp4 extension, encoded by H264(AVC codec).
Step 3. Click Run to Convert VFR to CFR.
Step 4. Add the converted video into Sony Vegas, and now you shall be able to see video track showing together with audio track.
Additional Tip: Change Folder Name to Fix the Glitch
Besides the video glitch, some users also find there is no audio track when import mp4 video. Here is a quick solution by changing the name of the folder.
Step 1. Save and backup your Sony Vegas project for security concerns.
Step 2. Find the compoundplug folder in Sony Vegas installation folders.
The folder is in Vegas main folder > FileIO Plug-Ins > compoundplug
If your Sony Vegas is the steam version: ...\steamapps\common\Vegas Pro 14.0\Vegas Pro 14.0\FileIO Plug-Ins\compoundplug (version number 14.0 is just an example).
Step 3. Change folder name.
You need to change the folder compoundplug to compoundplugx.
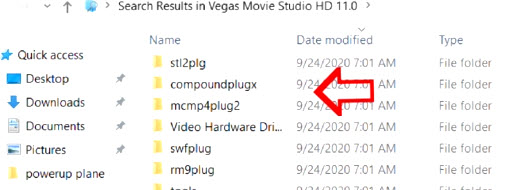
Step 4. Restart Sony Vegas.
If Sony Vegas still not showing audio track, you can delete the video from the timeline, and then re-add it to the timeline.
Caution:
This solution may not be working for all the users. Users reporting failure are meeting with the following consequences:
- Sony Vegas start to alert the users to enter a valid license code.
- After renaming the folder, Sony Vegas start to prompt users to install QuickTime.
- Some users find their edited and rendered video clips are gone.
- Still others find they cannon open video after changing the folder name, and Vegas throws an error message "Warning: An error occurred while opening one or more files. The reason for the error could not be determined".
Therefore, make sure to use the solution with caution. Though it did help many users to solve the no audio track glitch, especially for OBS captured videos, there are other unlucky cases.


