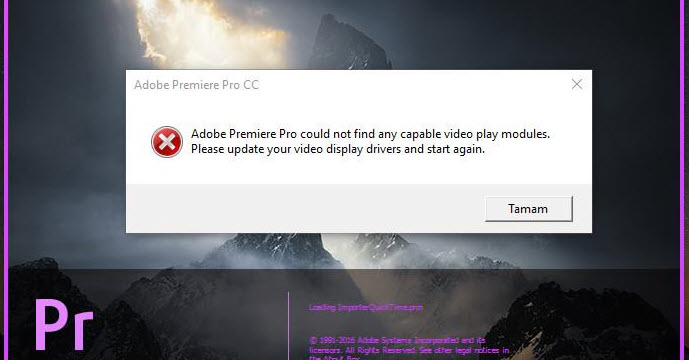
When you try to launch Premiere Pro, but suddenly get disappointed by the error message "Adobe Premiere Pro could not find any capable video play modules", what to do next? Seeking support from the technical person and gathering workable solutions from various forums, here are 8 ways to fix the incompatibility errors and failures.
Method 1: Run Adobe Premiere as Administrator
For many users, the quickest solution is the run the Adobe Premiere with the Administrator privileges. It seems that when you launch Premiere as a guest with limited rights, the alerts "Adobe Premiere Pro CC could not find any capable video play modules" will pop up.
Get Administrator Rights on Windows
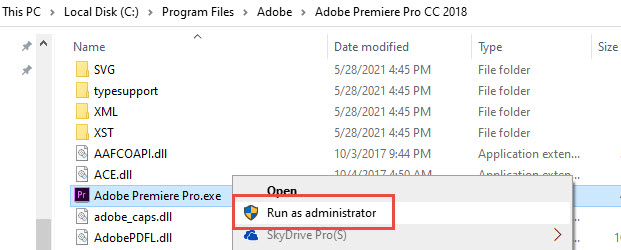
Under such circumstances, you just need to simply right-click on the program executable (Premiere Pro icon), and hit Run as Administrator.
If you don't have Premiere Pro as the shortcut on the desktop, you can find Premiere Pro executable file in its installation folder, and right-click on it to bring out the context menu, then choose Run as administrator.
Depending on where you install the program, and which version it is, the installation folder can be on /Program Files/Adobe/Adobe Premiere Pro [version]/Adobe Premiere Pro. If you cannot find the executable, you can also search Premiere Pro from the Start Menu, and right-click to open the file location.
Get Administrator Rights on Mac
Follow these steps to run as Administrator on Mac:
1. Go to the Apple Menu and click System Preferences
2. Click Users & Groups. If you cannot change the settings, make sure to unlock the preference pane by clicking the lock icon.
3. In the list of the users, choose the user that you can currently use, and hit "Allow user to administer this computer."
Method 2: Use Troubleshooting Compatibility Option on Adobe Premiere Pro
Troubleshoot compatibility is a utility to diagnose and fix problems. Many users reported using it successfully to fix the error of Adobe Premiere could not find any capable video play modules. This troubleshooting utility can detect your computer system version, can change parameters to accordingly to launch Adobe Premiere Pro in a compatible way.
To use the troubleshooting compatibility option, follow the simple steps below:
Step 1. Find the Adobe Premiere Pro executable.
If you don't have the Premiere Pro shortcut on desktop, you can go to its installation folder, and find the executable (.exe).
If you forget where Premiere Pro is installed, you can search it from the Start Menu, find the program, and right-click to Open File Location.
For most people go with default installation settings, the path is:
Local Disk/Program Files/Adobe/Adobe Premiere Pro [version number]/Adobe Premiere Pro.
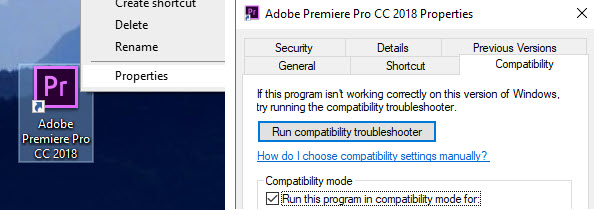
Step 2. Right-click on Premiere Pro and hit Troubleshoot compatibility.

If the utility cannot correctly detect your system, you can also right-click on Premiere Pro > Properties > Compatibility, and select the compatibility mode before clicking Run Compatibility Troubleshooter.
Step 3. Now you shall see the utility is progressing and trying to detect the problems. Wait for it to finish.
Step 4. In the result page, click Try recommended settings. This option will deploy the program to the way that's compatible with your Windows OS.
Step 5. Click Test the program to see if the steps were completed without error. If everything is ok now, you can click Yes, save these settings.
Now you can open up Adobe Premiere Pro again, and see whether the error message Adobe Premiere Pro could not find any capable video play modules still lingers on.
Method 3. Update Your Graphics Driver to the Latest Version
Newer versions of Graphic Drive may address known issues from user feedback. You can check the brand of your Graphic Card, and go to the corresponding GPU provider's website to update the graphics.
Step 1. Check the brand and model of your graphic card.
- On Windows: Press Windows Key + X and click Device Manager. Click Display Adapters to check the information.
- On Mac: Click the Apple icon from menu, and Click About this Mac. In the Graphics section, you can find the information.
Step 2. Visit the corresponding manufacturers.
- Intel: https://www.intel.com/content/www/us/en/support/detect.html
- Nvidia: https://www.nvidia.com/en-us/geforce/drivers/
- AMD: https://www.amd.com/en/support/kb/faq/gpu-driver-autodetect
Step 3. Download the driver to upgrade your graphic card.
Method 4: Add Premiere Related Executables to the Exclusion List
Other possible causes to trigger the error message are false alarms and over-protection from third-party security software. For instance, the third-party party security software may wrongly block Premiere executables (mainly GPUSniffer.exe and dynamiclinkmanager.exe) because they thought these executables were suspicious.
Analysis:
In fact, GPUSniffer.exe is a Premiere Pro executable to detect (or "sniffs out") the GPU from the operating system, so that it can utilize GPU acceleration in Premiere Pro. dynamiclinkmanager.exe on the other hand, is the utility to enable communications between Adobe Programs such as Premiere, After Effects, Photoshop, etc.
As these executable are trying to communicate with external utilities, third-party firewall and security software may be overly cautious and block the executables in a way we don't want.
How to Solve It:
If the exclusion list feature is available in your specific security software, you can add GPUSniffer.exe and dynamiclinkmanager.exe to the exclusion list. Otherwise, you might consider quitting the protection mode, switching to another security software, or using the default Windows Defender.
Then restart Premiere Pro, and check whether this error Adobe Premiere Pro could not find any capable video play modules persists. If so, you can go to the next method to troubleshoot this issue.
Method 5: Change Battery Mode to High-Performance Mode (Applicable for Laptops)
The failure to find capable video play modules in Premiere Pro may happen to users running the software on a laptop. Unlike desktop computers, a laptop has different power-saving modules for wireless and wired situations.
Analysis:
Some users have found that when they switched the power mode to High Performance, the problem was solved. It is probably because that when your laptop is on Power Saving mode, the program will have to use the integrated graphics card for video playback, rendering, and encoding. Yet it is less powerful than a dedicated graphics card.
Quick Guide:
Step 1. Save the current project and close Premiere Pro
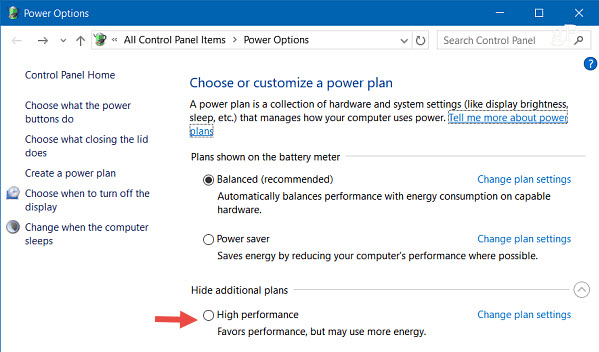
Step 2. Click the battery icon on the Windows taskbar.
Step 3. Go to the settings and change Power Saving mode to High Performance.
Method 6. Disable the Graphic Card Momentarily
Several users reported another workaround: disabling the AMD graphic card. If your computer's graphic card is from AMD, especially the 7670M model, chances are that there might be compatibility issues with Premiere Pro. The reason is unkown, but some users find it working when disabling AMD graphic card temporarily.
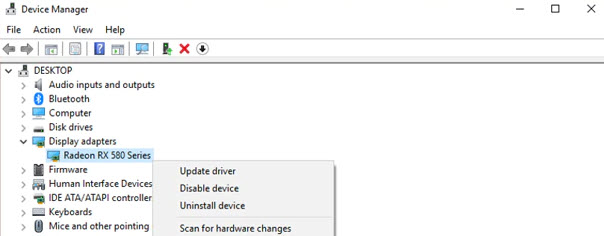
Step 1. Press Windows key + X on your keyboard, and hit Device Manager.
To open up the Device Manager window, you can also press Windows Key + R to call out the Run dialogue box, and enter "devmgmt.msc"
Step 2. Go to Display Adapters, and click the arrow to expand the list.
Step 3. Right-click on the AMD graphic card, and hit Disable Device.
Step 4. Launch Premiere Pro, and check whether it still alerts you with the error message Adobe Premiere Pro could not find any capable video play modules.
Step 5. You can later re-enable the device in the Device Manager.
Please note that, since you have disabled the Graphics Card before launching Premiere Pro, you will not be able to use GPU acceleration when exporting the video.
Method 7. Enable High-Performance GPU (Applicable to AMD Users)
Besides disabling the AMD graphic card in Device Manager temporarily, other users find it workable to turn on the High-Performance GPU to solve the incompatibilities issues.
It is mostly applicable for AMD Radeon cards. If your AMD graphic card has switchable graphics technology, go on enabling the High-Performance GPU with these steps:
Step 1. Launch the AMD Radeon Settings.
You can right-click on the desktop and find the option in the context menu.
Step 2. Click the System tab and hit Switchable Graphics.
Step 3. Browse the application to find Premiere Pro. Since you have just closed Premiere Pro, it should appear in the Recent Applications section.
Step 4. Click the arrow icon and hit High Performance from the drop-down menu.
The High-Performance option in AMD settings will use the discrete GPU card for Premiere Pro.
Now you can try to launch Premiere Pro and check if the problem solves.
Note: NVIDIA graphic card settings also support the option to use high-performance GPU. During your troubleshooting steps, if your computer is equipped with NVIDIA devices, you can try the method to see if it works.
Method 8. Upgrade Premiere Pro Related Service to the Latest Version
Incompatibility issues could arise with software that offers related services and solutions alongside Premiere Pro. For instances, according to several users from the video editing forum, the older version of the storage solution from PROMISE can cause the error Adobe Premiere Pro could not find any capable video play modules. The PROMISE storage solution offers power users with seamless collaborative video editing in Adobe Premiere Pro. You can upgrade to the latest version to see if the problem solves.