Summary: How to easily convert MOV to JPG with the original quality? No worries! In this post, you're going to learn 6 quick ways to convert .mov to .jpg on Windows 10/11, Mac, and iPhone without losing quality.
Do you want to turn the MOV files from the Live Photos that you took accidentally into the regular still JPG(also known as JPEG) images for saving storage space or editing in image editing programs? Are you looking into how to save some specific frames of a MOV video as JPG files for making a photo slideshow or YouTube/TikTok video thumbnails? Not a problem. With a proper tool, you can easily convert MOV to JPG within several clicks.
Best Way to Convert MOV to JPG on Windows and Mac
While there are multiple programs you can use to convert MOV to JPG, the best one to use is VideoProc Converter AI. Take a look at what it can do for you and you'll know why it's the best.
- Convert specific frame(s) of a MOV to JPG with no loss in quality.
- Convert video to JPG or PNG image sequence in one click.
- Turn video to image, video to video, video to audio, and audio to audio.
- Supports 370+ formats, including MP4, HEVC, ProRes, JPEG, and GIF.
- Ouput JPG with the original 4K or the customized resolution.
- 100% Safe. User-friendly interface. GPU-accelerated conversion speed.
- New! AI Super Resolution to upscale/enhance images to max quality.
Step 1. Open VideoProc Converter AI on Mac or Windows. Hit Video and then drag and drop the MOV file(s) onto the program.
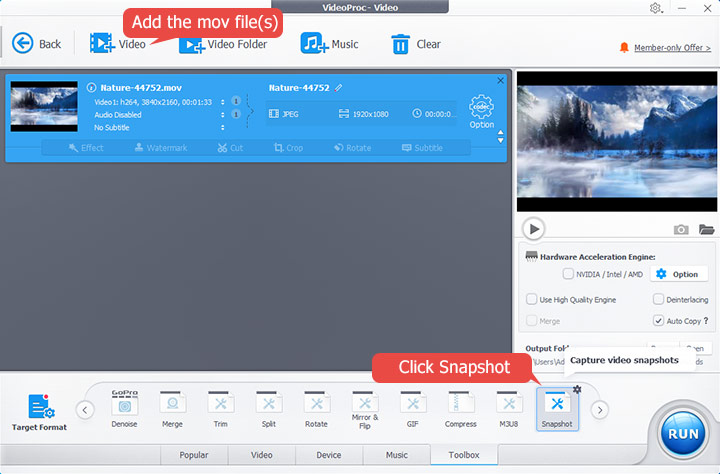
Step 2. Hit Toolbox. Double-click Snapshot to open the Video Snapshot panel. Choose JPEG(.jpg) as the Picture Format.
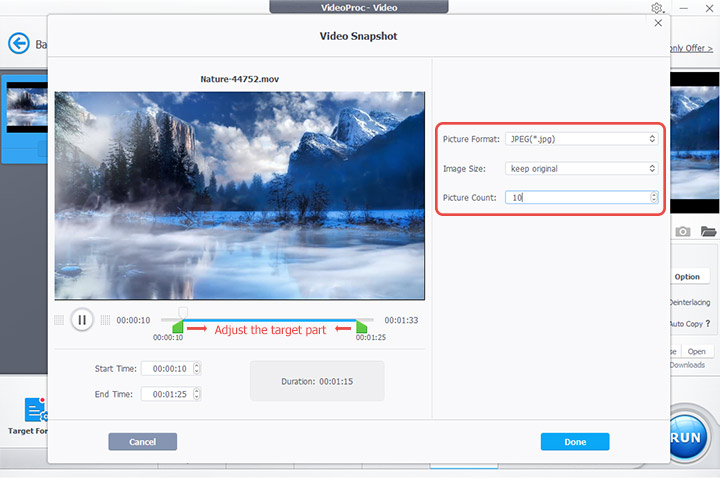
- Drag the green knobs to select the wanted segment that you want to turn into JPG.
- Go to Image Size and set the desired resolution. Let's say your MOV video is in 4K, you can choose keep original for getting the 4K JPG file.
- Go to Picture Count and set how many JPG files you want to extract from the MOV video.
Step 3. Hit Done. Click on the Settings option located in the upper right corner of this panel. Go to Snapshot Folder, hit the small pen icon, and select the output file location. Exit the Settings panel and hit Run to start converting MOV to JPG.
Pros:
- 0 Learning curve. No limits on size or length
- Convert MOV to JPG with original quality in one click
- Extract multiple JPG files from MOV at a time
- Convert video to JPG/PNG/GIF in seconds
- Extra features: edit, convert, compress, and record videos
Cons:
- There is nothing we dislike
How to Convert MOV to JPG on Mac Using iMovie
iMovie is a free video editing program pre-installed on Mac, with which you can make basic edits such as cutting, rotating, and merging to improve your MOV iPhone recordings. The Save Current Frame feature located on the Share menu can help you convert MOV to JPG with ease.
Step 1. Launch iMovie. Hit the plus icon in the Project menu to start a new project.
Step 2. Hit the import icon and select the original MOV file that you'd like to convert to JPG.
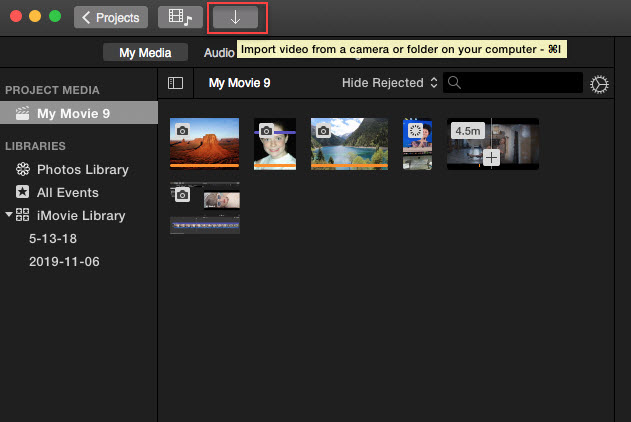
Step 3. Play the MOV video. Press the blank space to pause the video when it gets to the target frame.
Step 4. Go to the upper corner, hit the Share button corner, and select Save Current Frame.
Pros:
- No watermark. Free of charge
- Easy to locate the specific frame of a MOV video
- Support MOV format very well
Cons:
- Slow conversion speed
- Not allow customizing the image resolution
How to Convert MOV to JPG on Mac Using QuickTime
Being the native media player of Mac and iPhone, QuickTime supports the playback of MOV, ProPres, and all other formats developed by Apple, along with dozens of mainstream video and image formats such as JPG and MP4. If you're using QuickTime 7 Pro or an earlier version, then there is a Movie to Picture feature that you can turn to for converting the specific frame of a MOV video into a JPG image.
Step 1. Launch QuickTime. Go to the top menu bar to find File and click on it.
Step 2. Select Open and select the target MOV file for adding to the program.
Step 3. Drag the playhead to get to the frame that you want to convert into JPG.
Step 4. Hit File > Export > Movie to Picture and then hit Options.
Step 5. Go to Compression Type, select JPEG, and then hit Export.
If you have no desire to upgrade QuickTime, you can also check out these free video converters on Mac to take screenshots, save MOV to JPG, and convert incompatible video formats.
Pros:
- No watermark and free of charge
- Convert MOV to JPG without losing quality
Cons:
- Recent versions of QuickTime only let you take a screenshot to export JPG
- Can't extract multiple JPG files from a MOV file in batch
How to Convert MOV to JPG on Windows Using Movie Maker
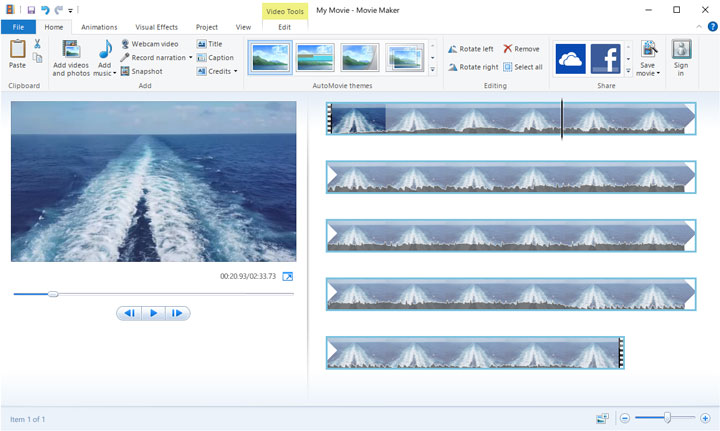
Windows Movie Maker, preinstalled on Windows 2003/7, is a free piece of video editing software. It comes with a pretty simple interface while offering all basic video editing toolkits and hundreds of transitions and animation effects. These explain why it's the go-to pick for many Windows users to make photos slideshows and apply quick edits, though being discontinued for years. With the handy Snapshot feature, you can convert the loved frame in a MOV video into a JPG image effortlessly.
Step 1. Launch Windows Movie Maker and drag the source MOV file onto the program.
Step 2. Move the playhead to the frame that you want to convert into JPG.
Step 3. Hit Snapshot. Enter the file name and hit Save.
Pros:
- No watermark or limits on video size
Cons:
- It's not available on Windows 10/11
- Might fail to recognize the MOV file
- Slow loading and conversion speed
- Stutter timeline playback
How to Convert MOV to JPG on Windows & Mac Using VLC
VLC media player is an impressive tool, especially for people who want to play video and audio files that cannot be recognized by other media players, and it's a good free option for converting MOV to JPG. However, unlike its self-explanatory playback controls, the options for converting video to images are buried deep in a complicated settings panel, which means VLC is not suitable for beginners to convert video to image sequence.
Step 1. Go to the official site of VLC to get its most recent version downloaded and installed on your Mac or Windows 10/11.
Step 2. Launch the program. Go to the top menu bar, hit Tools, and select Preference.
Step 3. Navigate to the bottom left of the pop-up Simple Preference panel and hit All.
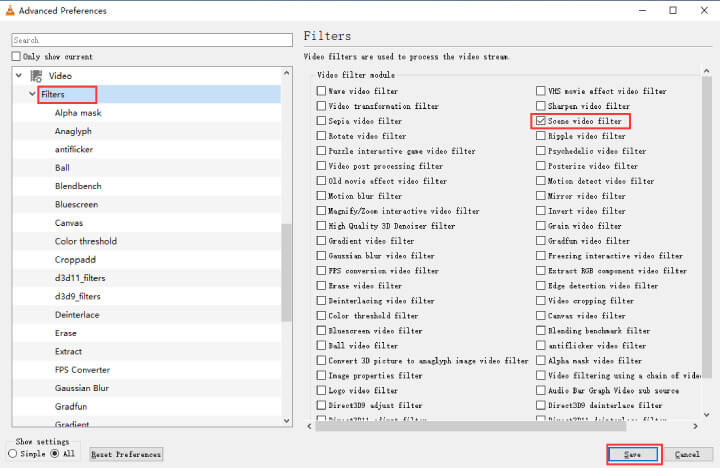
Step 4. Go to Filters under Video and select Scene filter.
Step 5. Go to the upper right of this panel. Enter jpg in the setting box of image format.
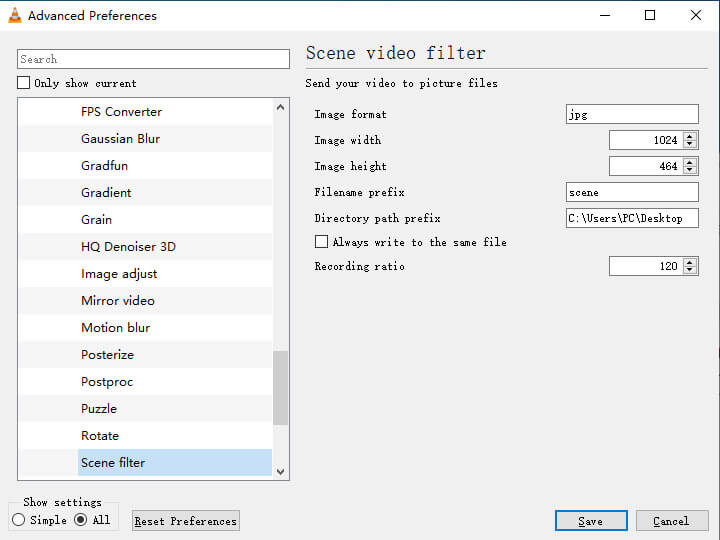
Step 6. If necessary, you can customize the width and length of the image.
Step 7. Adjust the recording ratio based on the frame rate of your MOV file. Let's say the frame rate of your MOV video is 30fps and you enter 30 as the recording ratio, then VLC will save each frame as a JPG image.
Step 8. Select Filters located on the left side. After that, come over to the right side and check Scene video filter. Hit Save to confirm the adjustments.
Step 9. Play the MOV video via VLC media player. It starts to convert MOV to JPG on Windows 10/11 or Mac.
Pros:
- This is an open source and cross-platform program
- No limits on size or length
- Support hundreds of popular video formats
Cons:
- Too difficult for beginners to use
- After conversion, you have to manually cancel the video to picture conversion feature
How to Convert MOV to JPG Online Using Anyconv
If you want to convert a small MOV to JPG on iPhone, Mac, or Windows without installing third-party programs, then a browser-based MOV to JPG converter like Anyconv may be a great pick. It allows you to convert MOV to JPG right from the browser installed on the iPhone, Mac, and Windows.
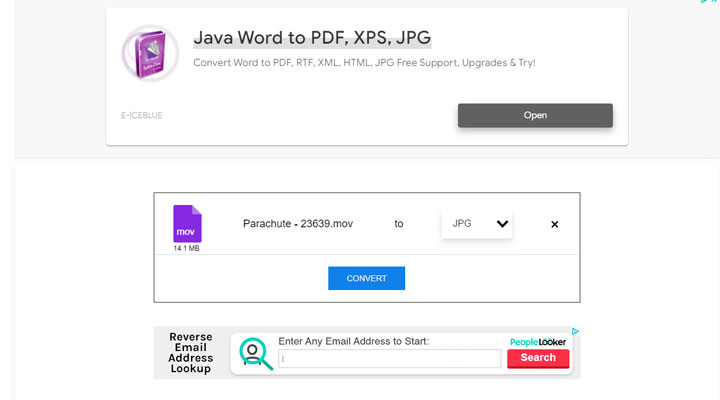
Step 1. Go to the MOV to JPG conversion page of Anyconv.
Step 2. Hit CHOOSE FILES and select the original MOV file for uploading to the program.
Step 3. Hit CONVERT to enable Anyconc to load and process the MOV file.
Step 4. Click on DOWNLOAD to save the JPG converted from MOV on the local disk.
Pros:
- Free of charge
- No registration or installation required
Cons:
- Can't handle a MOV file over 100MB
- Many pop-ups and ads
- Can't turn specific frames into JPG
- Can't customize the resolution of the JPG file


