Change Resolution in VideoProc Vlogger
When you create a new project in VideoProc Vlogger, you're asked to set the resolution. This determines the resolution of the video you export from VideoProc Vlogger finally, but you can change the resolution at any time before you export.
Free download VideoProc Vlogger to change video resolutions for different playback platforms or devices.
How to Change Resolution
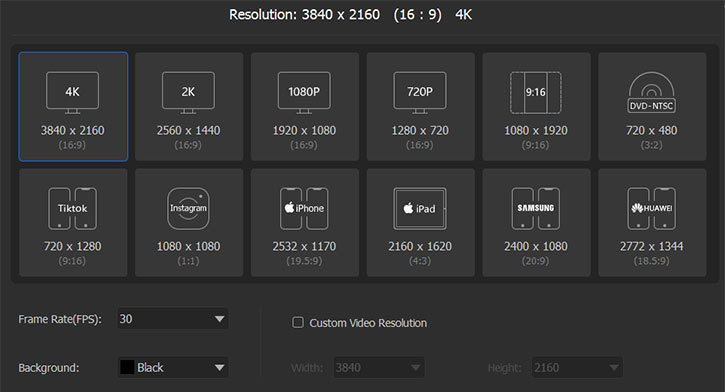
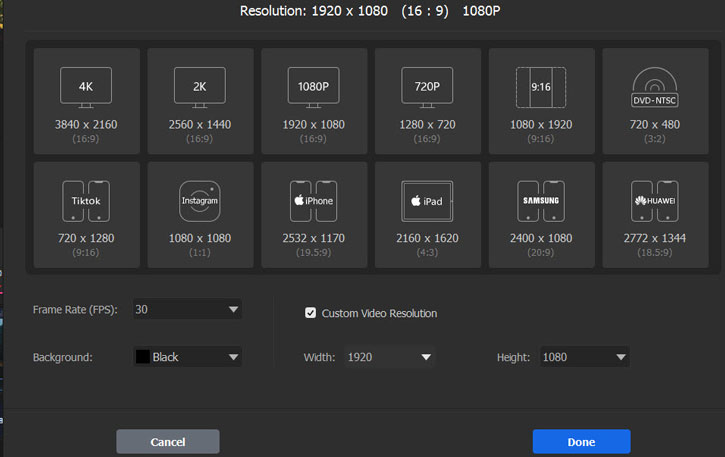
During the edits, you can set video resolution in 2 ways, choosing a preset from the given options or manually selecting the wanted video width and height.
Option 1. Choose a Preset
Step 1 Choose a preset with a predefined resolution from the given 12 options.

Which preset should you choose? This depends on the playback devices and platforms.
| Resolutions | Examples of Matched Devices and Platforms |
|---|---|
|
3840 x 2160P 4K (16:9) 2560 x 1440P 2K (16:9) |
|
|
1920 x 1080P 1080P (16:9) 1280 x 720P 720P (16:9) |
|
|
1080 x 1920P 1080P (9:16) 720 x 1280P 720P (9:16) |
|
|
1080 x 1080P (1:1) |
|
|
720 x 576P (5:4) |
|
|
720 x 480P (3:2) |
|
|
2532 x 1170P (19.5:9) |
|
|
2160 x 1650P (4:3) |
|
|
2400 x 1080P (18.5:9) |
|
|
2772 x 1344P (20:9) |
|
Navigate to Digiarty VideoProc Vlogger - Tech Specs to check more information about the supported video resolutions for popular social media platforms and devices.
Step 2 Hit Done to confirm the change.

Option 2. Customize the Resolution
You might want to specify the video resolution to achieve your specific purposes, for instance, downscaling 4K to 1080P to reduce the file size, upscaling the video resolution to get better viewing experience on large screens, creating square videos for TikTok or Instagram, etc. In these cases, the Customize Video Resolution feature of VideoProc Vlogger comes in handy.
Step 1 Hit Custom Video Resolution.
Step 2 Specify the wanted width and height for the video.
Step 3 Hit Done to confirm the change.

The final resolution and the aspect ratio info will display on the top of this panel.
 Recommend resolution settings for popular devices and platforms
• To output vertical videos for iPhone or any other portable devices with small screens, choose 1280P (W) x 720P (H), 1080P (W) x 1920P (H), or 1024P (W) x 576 (H).
• To output videos for sending on emails, choose 1280P (W) x 720P (H) or a smaller dimension.
• To output square videos for TikTok or socia media like Instagram, Twitter, and Pinterest, choose 720P (W) x 720P (H) or 1080P (W) x 1080P(H).
• To output videos for 21:9 monitors, choose 2560P (W) x 1080P (H).
Get Rid Off Black Bars
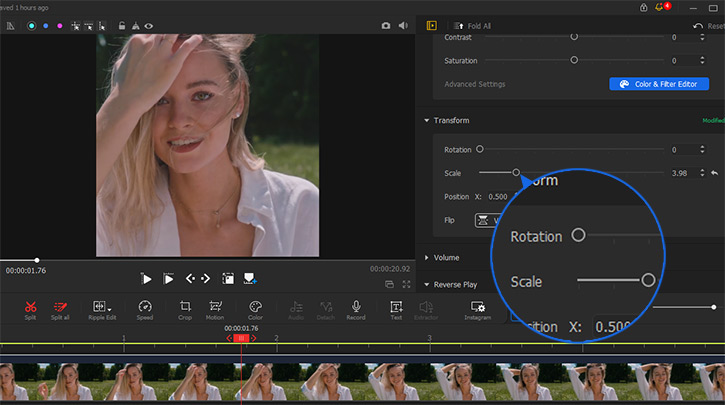
If the selected resolution does not match the source video, then there might be black bars on the sides of the video. You can easily get rid of the black bars by working with the Background or the Scale option.
To assume the source video comes with 1920x1080P resolution. When setting 1080x1080 (1:1) as the target resolution, there will be two black bars added on the top and bottom of the video.
Option 1. Delete the Black Bars
Step 1 Go to the right of the preview windows to locate the Scale and Position menu.
Step 2 Use the Scale slider to scale up the frame until it fills up the canvas. If necessary, use the Move menu to adjust the portion that you want to see on the canvas.

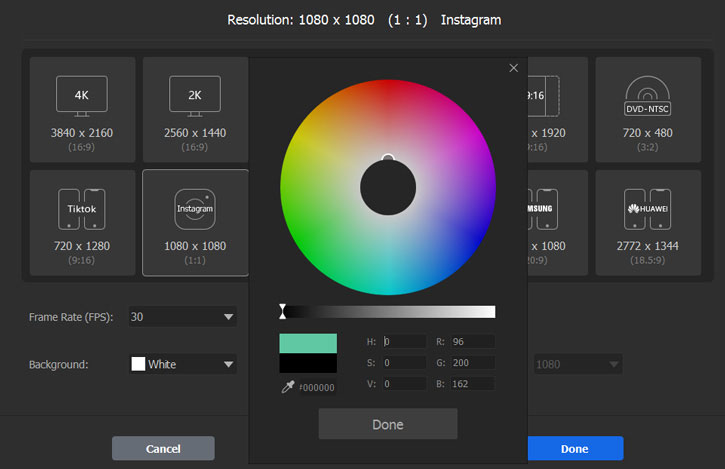
Option 2. Change the Background Color
Step 1 Select the expand button of the Background menu.
Step 2 Choose a preset color as the background color.

 Tips
TipsAlternatively, you can hit Custom and then pick the loved color on the color wheel or adjust the HSV/RGB values to replace the background color.
Free download VideoProc Vlogger to create videos for iPhone, TikTok, or any other devices or platforms.
Para más guías de VideoProc Vlogger, visite esta página >
Si tienes preguntas, envíenos un correo electrónico o visite

