Apple Music is a popular streaming service that offers access to over 75 million songs, playlists, podcasts, and more. With such a vast library of music and content, it's no wonder that people might want to screen record Apple Music for various reasons.

Whether you want to share your favorite songs with friends or social media, create tutorials or reviews of Apple Music features, or capture audio or video clips for personal or professional use, screen recording can be a useful tool. However, Apple Music has some restrictions and protections in place that prevent users from easily screen recording its audio or video content.
In this article, we will explore different methods and tools to help you screen record Apple Music on any device.
How to Screen Record Apple Music on iPhone or iPad
For iPhone or iPad users, we will strongly recommend you use the built-in screen recording feature to capture Apple Music content. And here is how:
Step 1. Enable Screen Recording in Control Center
Before you can start screen recording, you need to enable the feature in your device's Control Center.
1. Open the Settings app on your iPhone or iPad.
2. Scroll down and tap on "Control Center."
3. Under "More Controls," find "Screen Recording" and tap the green "+" button next to it to add it to your Control Center.
Once you've enabled screen recording, you're ready to start capturing Apple Music on your device.
Step 2. Start Recording Apple Music
1. Swipe up from the bottom of your screen (or down from the top right corner on iPhone X or later) to open the Control Center.
2. You'll see a screen recording icon, which looks like a circle with a dot inside. Tap on it to start recording.
3. A three-second countdown will appear, giving you time to prepare. After the countdown, your screen recording will begin.
4. Open the Apple Music app and navigate to the song, playlist, or album you want to record.
5. Play the music as you normally would, and the screen recording will capture both the screen and the sound.
Step 3. Stop Recording and Save the Video
To stop recording, simply tap on the red status bar at the top of your screen. Alternatively, you can also open the Control Center and tap on the screen recording icon again to stop the recording.
Once you've stopped recording, the video will be automatically saved in the Photos app on your device. You can access it by opening the Photos app and navigating to the "Recents" or "Albums" tab.
Pros and Cons of Using the Built-in Screen Recording Feature
Using the built-in screen recording feature on iOS devices has its advantages and disadvantages. Let's take a look at some of them:
Pros:
- It is easy and convenient to use, as it doesn't require any additional apps or tools.
- It can capture both the screen and the sound of Apple Music content, allowing you to create high-quality recordings.
- You can save the recorded videos directly to your device's Photos app, making it easy to access and share them.
Cons:
- The screen recording feature may not capture the full sound quality of Apple Music content, as it relies on the device's microphone to record audio.
- It may not work with some Apple Music features, such as lyrics or videos, that require additional permissions or interactions.
- Screen recording can consume a significant amount of battery and storage space, especially for longer recordings.
- The recorded videos may include any notifications, calls, or other sounds that might interrupt your recording.
Tips and Tricks for Better Screen Recording Quality
To improve the screen recording quality and avoid potential issues, here are some tips and tricks you can try:
1. Adjust the screen recording settings in the Control Center: Long-press or 3D-touch the screen recording icon to access additional settings. You can choose to record with or without microphone audio, enable or disable Do Not Disturb mode, and select a broadcast destination (such as YouTube or Facebook).
2. Use headphones or earphones: Using headphones or earphones can help reduce background noise and improve the sound quality of your recordings.
3. Turn off notifications and other apps: Before you start recording, make sure to turn off any notifications or apps that may interfere with the screen recording process. This will help ensure a smoother recording experience.
4. Use a stable Wi-Fi connection: If possible, connect to a stable Wi-Fi network before starting your screen recording. This will help prevent any interruptions or buffering issues during the recording.
5. Turn on Do Not Disturb mode or Airplane mode: To avoid any interruptions during your recording, consider turning on Do Not Disturb mode or Airplane mode. This will prevent incoming calls, messages, and notifications from disturbing your recording session.
6. Adjust the volume levels: Before you start recording, make sure to adjust the volume level of your device and microphone. This will help avoid any distortion or feedback in the recorded audio.
7. Choose a high-quality screen resolution and frame rate: If your device supports it, you can choose a higher screen resolution and frame rate for better video quality. Go to Settings > Camera > Record Video and select the desired resolution and frame rate.
How to Screen Record Apple Music on Mac
If you're a Mac user and want to screen record Apple Music, you're in luck! With QuickTime Player, a built-in media player and recorder on Mac computers, you can easily capture your favorite Apple Music content.

In this part, we'll walk you through the steps to screen record Apple Music using QuickTime Player, provide some tips and tricks to improve the recording quality, and mention the pros and cons of using QuickTime Player for this purpose.
1. Open QuickTime Player: You can find QuickTime Player in the Applications folder or in Launchpad.
2. Start a New Screen Recording: In the menu bar, click on File and select New Screen Recording.
3. Choose a Sound Source: Click on the arrow next to the record button and select a sound source, such as the internal microphone or external speakers. This will ensure that the audio from Apple Music is captured during the recording.
4. Select the Recording Area: Click on the record button and drag a rectangle over the area of the screen that you want to record. If you want to record the entire screen, simply click anywhere on the screen.
5. Start Recording: Click on Start Recording and then play the Apple Music content in another window or app. QuickTime Player will begin recording the screen along with the sound from Apple Music.
6. Stop Recording: When you're done recording, click on Stop Recording in the menu bar. The recorded video will be saved in QuickTime Player.
While QuickTime Player is a convenient tool for screen recording Apple Music on Mac, it's important to consider the pros and cons before diving in.Pros:
- Free and Easy to Use: QuickTime Player comes pre-installed on Mac computers, so there's no need to download any additional software.
- Records Screen and Sound: QuickTime Player allows you to capture both the screen and the sound of Apple Music content.
- High Resolution and Quality: You can record in high resolution, ensuring that your screen recording looks crisp and clear.
Cons:
- Sound Quality Limitations: QuickTime Player may not capture the full sound quality of Apple Music content. If you're looking for professional-grade audio recording, you might want to consider using a dedicated audio recording software.
- Limited Compatibility: QuickTime Player may not work seamlessly with certain Apple Music features, such as lyrics or videos. Make sure to test the recording beforehand to ensure everything is captured as expected.
- Resource Intensive: Screen recording can consume a significant amount of CPU and memory resources, so be mindful of your computer's performance during the recording process.
To enhance the quality of your screen recording and avoid potential issues, consider the following tips and tricks:
1. Adjust Screen Recording Settings: In QuickTime Player, click on the arrow next to the record button to access the settings. You can choose the video quality (high, medium, or low), frame rate (60 fps or 30 fps), and mouse click effect (show or hide) to customize your recording.
2. Use Headphones or External Speakers: To reduce feedback and improve sound quality, consider using headphones or connecting external speakers to your Mac.
3. Minimize Distractions: Turn off notifications and close any unnecessary apps or windows that may interfere with the screen recording process.
How to Screen Record Apple Music on Windows PC
For Windows users, here we will show you how to use VideoProc Converter AI, a versatile media tool, to screen record Apple Music on your Windows PC.
Step 1: Download and Install VideoProc Converter AI
First things first, head over to the official website of VideoProc Converter AI and download the software. Once the download is complete, follow the on-screen instructions to install it on your Windows PC.
Step 2: Play Apple Music Content
Now, open the Apple Music app on your Windows PC and play the content you want to screen record. It could be a song, a podcast, or even a radio station. Make sure the audio is playing and ready to be captured.
Step 3: Launch VideoProc Converter AI and Select the Recorder Button
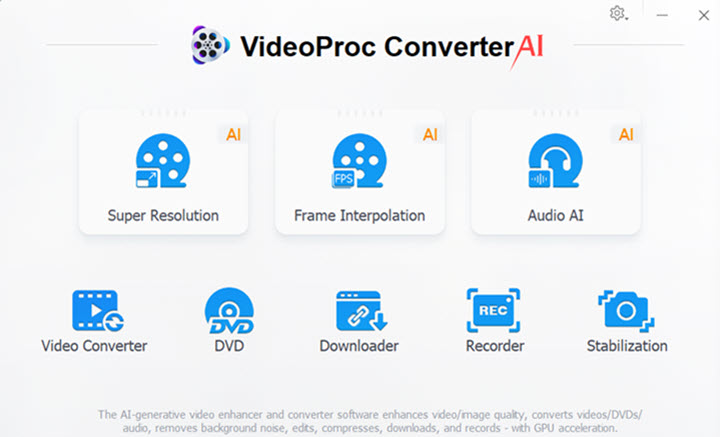
After installing VideoProc Converter AI, launch the software. You'll see the main interface with different options. Look for the "Recorder" button and click on it to access the screen recording feature
Step 4: Adjust Recording Quality and Settings
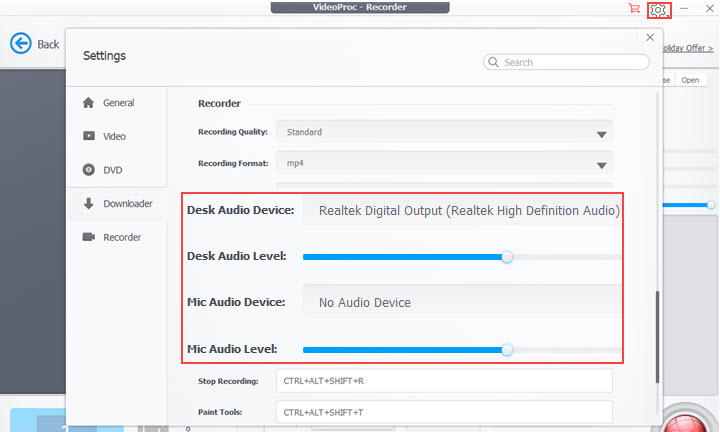
Before you start recording, it's important to adjust the recording quality and settings. In the settings menu, you can choose the recording quality to be "High" for the best results. You'll also find other features that can enhance your screen recording experience, such as the option to show or hide the mouse cursor during recording. Once you've made your desired adjustments, close the settings page and return to the recording interface.
Step 5: Choose the Screen Recording Mode and Select the Area
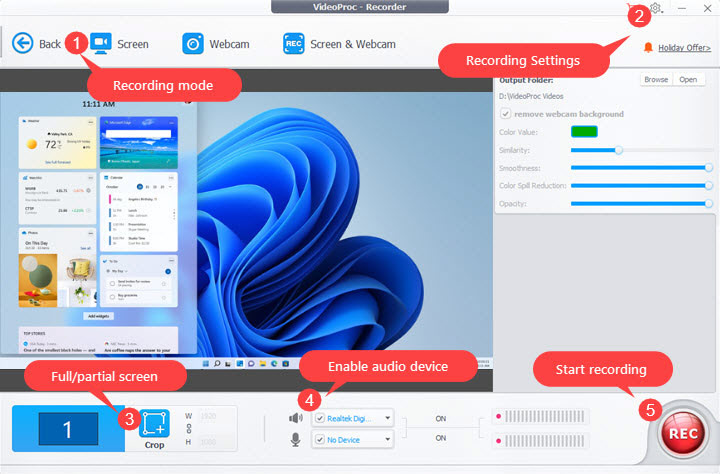
Now it's time to choose the screen recording mode. VideoProc Converter AI offers various options like Full Screen, Custom Area, and Follow Window. Select the mode that suits your needs. If you choose the Custom Area mode, you can crop the screen to focus specifically on the Apple Music interface. Simply click on the Crop button and select the area you want to record.
Step 6: Start Recording
Once you've set up the recording area, click on the "REC" button to start recording. VideoProc Converter AI will begin capturing both the screen and the audio from Apple Music.
Step 7: Stop Recording and Preview the Video
When you're done recording, click on the "Stop" button. The recorded video will be automatically saved in VideoProc Converter AI. You can now preview the video and make sure everything looks good before moving on to the next steps.
Step 8: Edit, Convert, and Export the Recorded Video
VideoProc Converter AI is not just a screen recording tool; it also offers advanced editing, converting, and exporting features. You can trim the video, add effects or subtitles, convert it to different formats, and even export it to various devices. Explore these features to make your recorded video even better.
Pros and Cons of Using VideoProc Converter AI to Screen Record Apple Music on Windows PC
Pros:
- VideoProc Converter AI can record both the screen and the sound of Apple Music content with high quality and clarity.
- It allows you to record any area of the screen or any app or game that supports Apple Music playback.
- The software offers advanced features and options like editing, trimming, converting to audio formats, and more.
Cons:
- VideoProc Converter AI is not free and requires a license key to activate all its features.
- It may not work with some Apple Music features, such as lyrics or videos.
Tips and Tricks to Improve Screen Recording Quality and Avoid Potential Issues on Windows PC
1. Adjust Recording Settings: Take advantage of the settings menu in VideoProc Converter AI to enhance your screen recording. Experiment with different recording quality options and features like showing or hiding the mouse cursor.
2. Use Headphones or External Speakers: To improve the sound quality of your screen recording, consider using headphones or external speakers. This can help reduce feedback and provide a clearer audio recording.
3. Turn off Notifications and Other Apps: Before you start recording, make sure to turn off any notifications or other apps that could interfere with the screen recording process. This will help minimize distractions and potential issues during the recording.
Note: VideoProc Converter AI is a powerful media tool that can be used for various purposes, including screen recording. However, please ensure that you comply with copyright laws and regulations when using this software.
How to Screen Record Apple Music on Android
If you're an Android user who loves Apple Music and wants to screen record your favorite songs or playlists, AZ Screen Recorder, a popular and easy-to-use screen recording app, would be an answer.
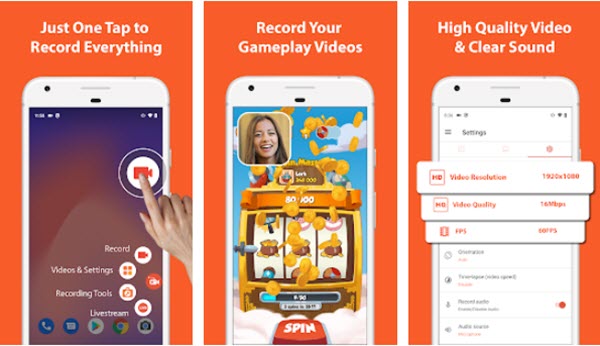
Step 1: Download and Install AZ Screen Recorder
The first step is to download and install AZ Screen Recorder from the Google Play Store. Simply search for "AZ Screen Recorder" in the Play Store, select the app from the search results, and click on the "Install" button to download and install it on your device.
Step 2: Launch AZ Screen Recorder and Grant Permissions
Once the app is installed, launch AZ Screen Recorder from your app drawer. When you open the app for the first time, it will ask for certain permissions to enable screen recording. Follow the on-screen instructions to grant the necessary permissions to AZ Screen Recorder.
Step 3: Open the Control Panel
After granting the permissions, you will notice a floating icon on your screen. This floating icon is the control panel of AZ Screen Recorder. Tap on the floating icon, which looks like a camera with a red dot, to open the control panel.
Step 4: Start Recording Apple Music
In the control panel, you will see various options and buttons. To start recording Apple Music, tap on the record button, which is a circle with a dot inside. Once you tap on the record button, AZ Screen Recorder will start recording your screen.
Step 5: Play Apple Music
While AZ Screen Recorder is recording your screen, open Apple Music and play your desired songs, playlists, or albums. You can play the music in another window or switch to a different app while the recording is in progress.
Step 6: Stop Recording and Preview
When you're done recording Apple Music, tap on the stop button in the control panel, which is a square button. AZ Screen Recorder will stop recording and automatically save the recorded video. You can then tap on the preview button in AZ Screen Recorder to watch the recorded video.
Like any app, AZ Screen Recorder has its pros and cons when it comes to screen recording Apple Music on Android.
Pros:
- It is free and easy to use, making it accessible for all Android users.
- AZ Screen Recorder can record both the screen and the sound of Apple Music content, allowing you to capture the full audio experience.
- The app offers many features and options, such as editing, annotation, countdown, pause, and resume, giving you more control over your recordings.
Cons:
- While AZ Screen Recorder can capture the sound of Apple Music, it may not capture the full sound quality compared to listening directly from the Apple Music app.
- Some Apple Music features, such as lyrics or videos, may not be fully supported or captured by AZ Screen Recorder.
- Depending on your device or Android version, you may need to have root access to use certain advanced features of AZ Screen Recorder.
To ensure the best screen recording quality and avoid potential issues, here are some tips and tricks:
1. Adjust the Screen Recording Settings. In AZ Screen Recorder, you can tap on the gear icon in the control panel to access the settings. Here, you can choose the resolution, frame rate, bit rate, orientation, sound source, text or logo overlay, camera overlay, and more. Adjusting these settings can help improve the quality of your screen recordings.
2. Use Headphones or Earphones. To reduce background noise and improve the sound quality of your screen recordings, use headphones or earphones while playing Apple Music.
3. Minimize Distractions. Before starting a screen recording, turn off notifications and close any other apps that may interfere with the recording process. This will help ensure a smoother recording experience.
4. Use a Stable Wi-Fi Connection. Screen recording can consume a significant amount of data, so it's recommended to use a stable Wi-Fi connection instead of cellular data to avoid any interruptions or buffering during the recording.
Conclusion
In this article, we have covered how to screen record Apple Music on different devices, such as iPhone, iPad, Mac, Windows PC, and Android, at the same time with the corresponding tips and tricks to improve the screen recording quality and avoid potential issues.
Thank you for reading the article and now it's your turn to try out the methods and tools that were suggested above.

