Cyberpunk 2077, probably the most keenly awaited video game of the new decade, was released for PS4, Xbox One, Windows, and Stadia on 10 December, 2020. Due to its shoddy performance on the PlayStation 4 and Xbox One, you can still find out a stream of videos showing the embarrassing bugs and glitches in the game across platforms.
If you purchased the game on your PS4 and haven't refunded it, you can submit anything you encountered, too. This article will show you how to record PS4 gameplay in 7 different ways. Without further ado, let's dive in!
Part 1. How to Record PS4 Gameplay More Than 60 Minutes
The built-in capture feature on PS4 is the easiest route to screen record PS4 gameplay by far. However, it has some limitations that may be prohibitive to some, such as it takes much internal storage on PS4; it screen records on PS4 clips and cannot capture the things outside the game; it put a facecam overlay on the game clip, etc.
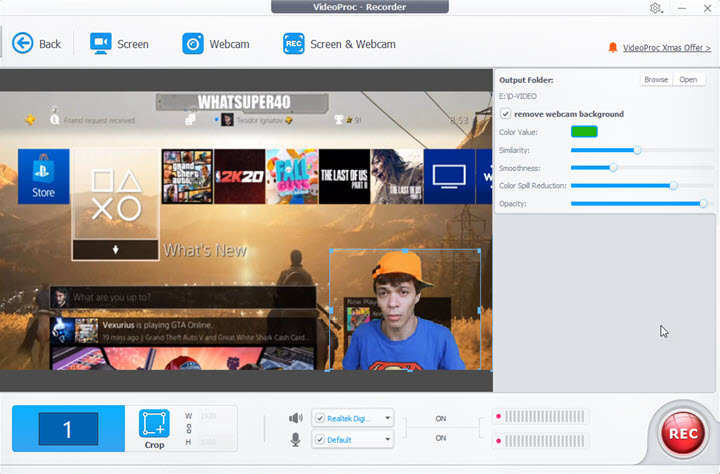
So your best bet is to screen record on PS4 gameplay with a PC, because you are allowed to use a feature-rich screen recording software to capture gameplay clips when you steam the PS4 to a PC. For me, VideoProc Converter AI is a reliable PS4 screen recorder that lets you capture internal game sound, overlay a facecam/webcam, use green-screen effects and many more.
VideoProc Converter AI - Probably the Best PS4 Screen Recorder
- Record either full-screen or selected area on your PC screen.
- Record internal sound and do commentary at the same time.
- Add a facecam/webcam to videos with the green screen effect.
- Support Intel, Nvidia, and AMD hardware encoding.
Step 1. How to Use PS Remote Play
- Download the latest PS Remote Play to your computer.
- Configure your PS4 if you use Remote Play for the first time. You should enable Remote Play by going to Settings at the main screen > Remote Play Connection Settings > select Enable Remote Play.
- You will next activate your console as your primary PS4 console. Go to Settings > Account Management > and select Activate.
- Set up the rest mode. Head over to Settings > Power Save Settings > Set Features Available in Rest Mode > then toggle on Stay Connected to the Internet and Enable Turning on PS4 from Network.
- Boot up your PS4 and connect your PS4 controller to your PC.
- Fire up PS Remote Play and log in to your PSN account.
- Click the wheel-shaped icon in the lower left corner to set up video quality for streaming.
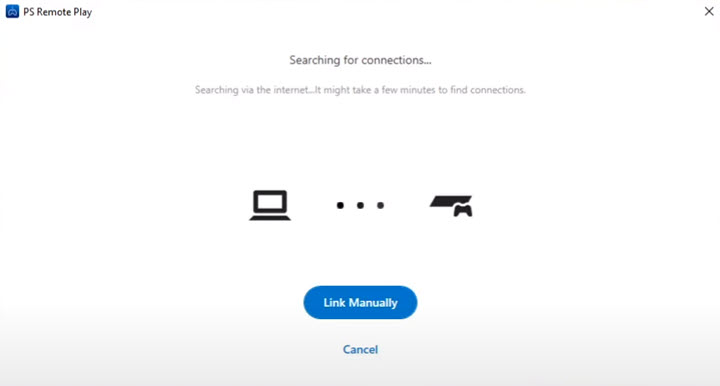
- Select to connect to your PS4 and the app will search and link to your PS4 over the same network.
Step 2. How to Record PS4 Gameplay With Facecam
- Download VideoProc Converter AI and install it.
- Select Recorder on the main screen and choose Screen & Webcam at the top.
- Remove the facecam background on the right if needed.
- Choose to record the full screen or a particular area.
- Enable the internal sound and microphone sound.
- Configure video quality by going to the wheel-shaped icon at the top right corner.
- Set up a new directory to store new clips.
- Click RUN to start recording. When the recording is complete, click STOP to end the recording.
Part 2. How to Record Gameplay on PS4 Directly
This part is going to cover how to record PS4 gameplay with its native capture feature, which means you can directly record past gameplay, current gameplay, as well as how to take a screenshot on your PS4. And all the captures will be automatically saved in the PS4 Capture Gallery where you can view, make edits, and share your gameplay clips to social media platforms.
Method 1. Record the Past Gameplay
If you just experienced an awesome moment in a game, but you didn't start recording in advance, PS4 allows you to save the last 15 minutes of gameplay to video.
Step 1. Play a game as usual.
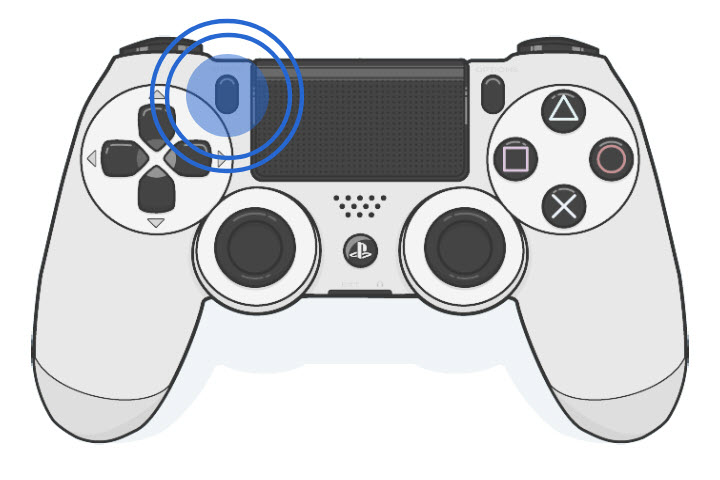
Step 2. When you want to retroactively save the past gaming moments, tap the Share button once on your PS4 controller. And a guide will appear on the left.
Step 3. Select Video Clip in the guide by hitting the Square button. PS4 will auto-save the previous gameplay for 15 minutes by default.
Method 2. Record the Current Gameplay
You can record what's going to happen next in a game on PS4, either.
Step 1. Tap the Share button twice on your PS4 controller before you start playing. And you'll get a message on the left telling you that PS4 is recording the following 15 minutes.
Step 2. To stop the gameplay recording, tap the Share button twice again. And the video clip will be saved in the Capture Gallery.
Method 3. How to Record PS4 Gameplay Longer Than 15 Minutes
As stated above, the default recording time on PS4 is 15 minutes, but you can adjust how long of a video clip that you scren record on PS4 so that you can record gameplay for 60 minutes on max.
Step 1. Press the Share button to open the guide.
Step 2. Go for Sharing and Broadcasts on the context menu.
Step 3. You will go down to Video Clip Settings.
Step 4. Select Length of Video Clip. Now, you can set the recording duration from 30 seconds to 60 minutes on PS4.
Method 4. How to Record Gameplay on PS4 With Voice
How to pick up your voice so that you can do voice-over or do commentary while recording gameplay on PS4? You need to get three items prepared: a PS4 controller, a headset, as well as a 3.0 mm audio cable to connect the controller and the headset. Now, let's take a look at how to configure the audio settings on PS4.
Step 1. Go to Settings at the PS4 main panel > Go down to Devices > Audio Devices > Change microphone level and headset volume.
Step 2. Now go to Sharing and Broadcasts under the Settings section > Audio Sharing Settings > select Include Microphone Audio in Video Clips.
Step 3. Launch a game and double-tap the Share button on your controller to start recording gameplay on PS4.
Step 4. Play as usual and do commentary for your clip.
Step 5. Double-tap the Share button again to stop recording. And you can find the gameplay clip with your voice-over in the Capture Gallery.
Method 5. How to Record PS4 Gameplay With Party Chat
Many people love to play games online with their friends and mates. Actually, you can also include everyone's voice on a gameplay clip on PS4, so that you can save the best gaming moments or hilarious mistakes of your team. Now, follow the steps below.
Step 1. You should have your headphone plugged into the controller at first.
Step 2. Adjust the microphone level and headphone volume as previously stated.
Step 3. Go to Settings at the main panel > Sharing and Broadcasts > Audio Sharing Settings > select Include Microphone Audio in Video Clips and Share Party Audio.
Step 4. Find Party at the main panel > Party Settings > Allow Your Voice to Be Shared > choose either Always Allow or Allow for Current Party. And you should make sure everybody in the party who wants the voice to be picked up has this setting on.
Step 5. Begin a party chat and double-tap the Share button to record a game.
Part 3. How to Record PS4 Gameplay With Capture Card
Mirroring PS4 to PC may have latency problems because it requires a high-speed internet connection. If your network is spotty, the video quality of mirroring and the response will be spotty. To solve these potential problems, you can record PS4 gameplay with a capture card and OBS.
In the preparatory work, you have to get a capture device like Elgato, AverMedia, etc., two HDMI cables, and a USB 3.0 cable. Plus, you will need an HDCP splitter to capture copyright-protected content. Finally, you can use the free and open source OBS to display PS4 content on your computer.
The following will show you how to record PS4 gameplay with Elgato and OBS.
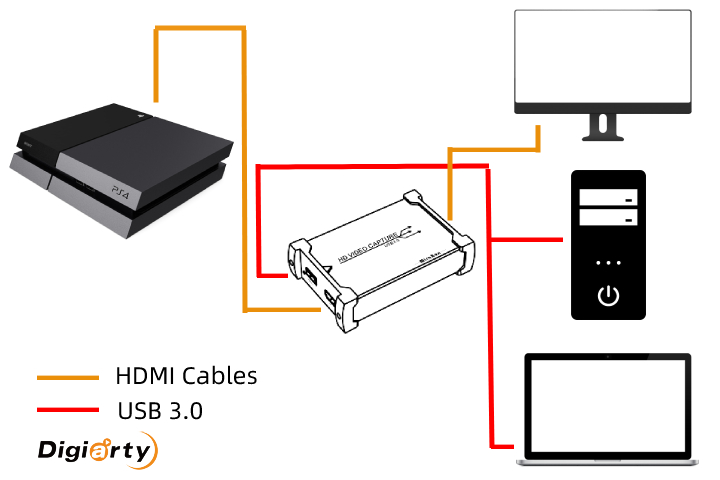
Step 1. If you don't have an HDCP splitter, turn off HDCP at the get-go. Go to Settings > System > uncheck Enable HDCP.
Step 2. Connect your PS4 to the HDMI IN jack of the capture device via an HDMI cable.
Step 3. Connect your display to the HDMI OUT jack of the capture card via an HDMI cable.
Step 4. Connect the capture card to your computer or laptop via a USB 3.0 cable.
Step 5. Turn on your PS4 console and launch OBS on your computer.
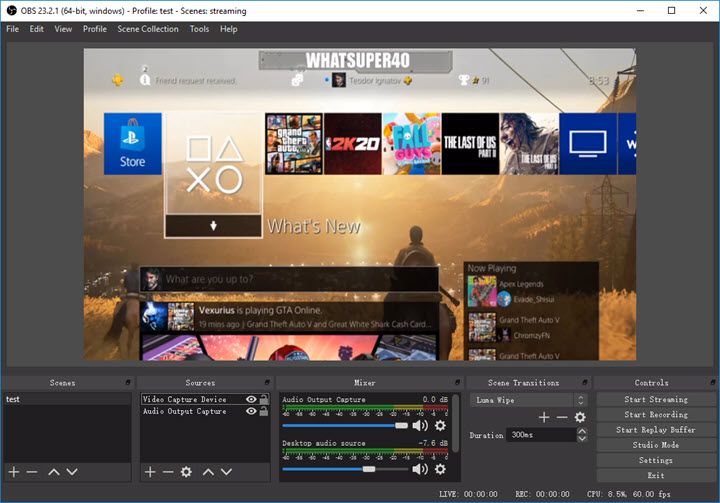
Step 6. To display your PS4 in OBS, go to the Source section > Plus icon > Video Capture Device > OK.
Step 7. To enable PS4 sound, go to the Source section > Plus icon > Audio Input Capture > choose the audio device of the capture device. In this way, OBS will recognize the audio device to pick up internal sound and will record game audio with Elgato.
Step 8. Click Start Recording and play as usual. Once the recording is over, hit the Stop Recording.
How to Record PS4 Gameplay FAQs
How to Record PS4 Gameplay Without Capture Card?
The easiest route to record PS4 gameplay without capture cards is to use the PS4 built-in capture features. Of course, you can bank on PS Remote Play and stream your PS4 console to other devices over the local internet.
Does PS4 Record Gameplay Automatically?
PS4 will auto-save the gameplay to video. What you need to do is to tap the Share button on the controller > Select Video Clip, and you will get the last 15 minutes of a gameplay clip from PS4's video cache by default.
How Do You Record and Edit Gameplay on PS4?
It depends. You can make simple edits in PS4 Capture Gallery or using Share Factory on PS4. If you need more editing features, you should transfer the clips to your computer and do editing with video editing software like VideoProc Converter AI, Premiere Pro, Final Cut Pro, etc.


