Summary: This post explains how to remove background noise in Audacity by using 3 different features: Noise Reduction, Noise Gate, and Notch Filter.
Have you ever recorded something important, only to find annoying background sounds getting in the way? Whether you're recording a podcast interview, creating a YouTube video, making music at home, narrating an audiobook, capturing a voice memo, or even recording a class lecture, unwanted noise can be frustrating. It might be the quiet buzz from your computer, the hum of an air conditioner, street traffic, or just the general room echo that's ruining your audio.
Don't worry - it's a common problem that's actually quite easy to fix! Audacity, a free and open source audio editing program, has several tools that can help clean up your audio recordings. In this guide, we'll show you 3 ways to remove background noise using Audacity.

Want to Remove Background Noise Automatically? Try the AI-Powered Solution
Although Audacity includes noise reduction features, it's not always effective in every situation. According to Audacity's own documentation, it struggles to bring good results when dealing with loud or fluctuating noise, or when the audio you want to keep - like speech or music - is barely louder than the background noise.
For an easier and more reliable solution, consider using VideoProc Converter AI. Powered by the advanced AI technology, it can identify and clean up virtually all kinds of unwanted noise - whether it's constant background noise, electrical humming, or wind interference. Even in challenging situations where traditional tools fall short, such as recordings in noisy environments, this AI-powered noice reducer software can separate and remove unwanted noise while keeping your main audio clear and natural. You can hear the difference in these before-and-after examples.
| Noise type | Before | After |
|---|---|---|
| Wind noise | ||
| Hiss noise | ||
| Street noise |
3 Ways to Remove Background Noise in Audacity
Important Note: Before using Audacity to eliminate background noise, you'll need to download and install it. However, be cautious! The default and most prominent download button on the Audacity website is for a software bundle called Muse Hub, not Audacity itself. Many users have reported issues with Muse Hub, including unwanted wallpaper changes, difficulties during uninstallation, and even concerns about potential malware.
"Please don't install the newest version with the Muse Hub. Lesson learned the hard way. The behavior seems similar to malware. From this point, I'm not installing anything else beyond the older versions that I have on a back up drive."- by macaroniandcheesefan from Reddit.
To avoid these problems, make sure to click the Download without Muse Hub option. On the next page, you can select the appropriate Audacity version for your operating system.
Method 1. Remove Background Noise in Audacity with Noise Reduction
Audacity's Noise Reduction feature is effective at removing constant, low-level background noise such as the hiss of fans, the hum of electronics, or other consistent buzzing or humming sounds.
Step 1. Drag and drop your original audio with background noise to Audacity.
Step 2. Find a section in your recording that contains only the background noise you want to remove. Ideally, this should be a few seconds long. Select this section by clicking and dragging your mouse over it.
Note:
This selected noise sample needs to be representative of the background noise throughout your entire recording. If it's not, you might end up with artifacts (strange, short bursts of sound) in your final audio.
Step 3. Go to the Effect menu and choose Noise Reduction. A window will pop up; click on Get Noise Profile so Audacity can analyze the noise characteristics based on your selected sample.
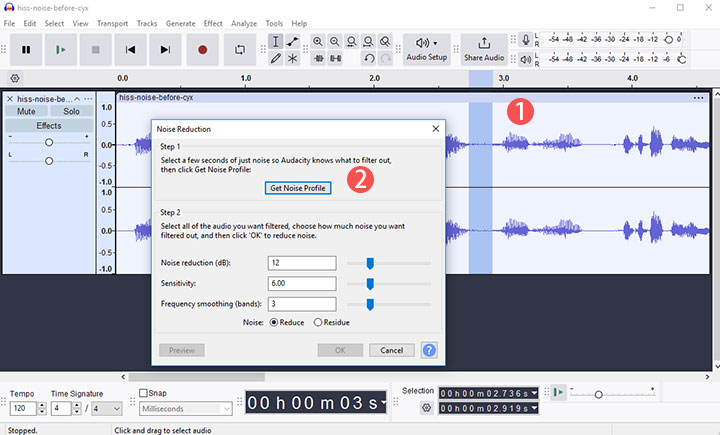
Step 4. Select the whole audio track for noise removal. Access the Noise Reduction feature again from the Effect menu to fine-tune its settings:
- Noise Reduction (dB): This controls the amount of noise reduction. Higher values remove more noise, but too high can create a "bubbly" or metallic sound. Start with a value around 6dB for relatively clean recordings and increase as needed for noisier ones.
- Sensitivity: This determines how much of the audio is considered noise. Higher sensitivity removes more, but it might also remove parts of your desired audio. Start low and increase gradually until the noise is sufficiently reduced without affecting your main audio.
- Frequency Smoothing (Bands): This setting helps to smooth out any remaining artifacts after noise reduction. If you notice any harsh or unnatural sounds, try increasing this value. However, be aware that excessive smoothing can make your audio sound less clear. Start with 0 and increase only if needed.
Step 5. Use the Preview button to hear how the settings affect your audio. You can toggle between Reduced (to hear the final result) and Residue (to hear only the noise being removed).
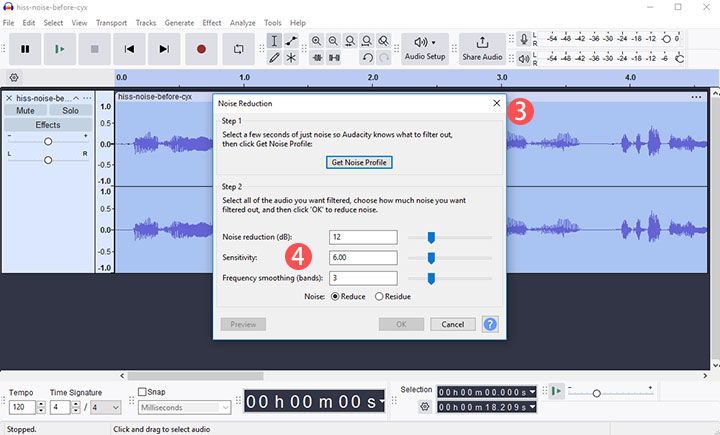
Step 6. Experiment with the settings until you achieve the desired balance between noise reduction and audio quality. Click OK to apply the noise reduction to the selected audio.
Method 2. Remove Background Noise in Audacity with Noise Gate
The Noise Gate plugin in Audacity lets you control background noise by only allowing sounds above a certain volume to pass through (this is when the "gate" is open). Sounds that are quieter than this threshold are reduced or completely silenced (the "gate" is closed). This makes it perfect for cutting out unwanted background noise while keeping the main audio intact. It's best to use the Noise Gate after applying Noise Reduction to get a cleaner result with less aggressive noise reduction settings.
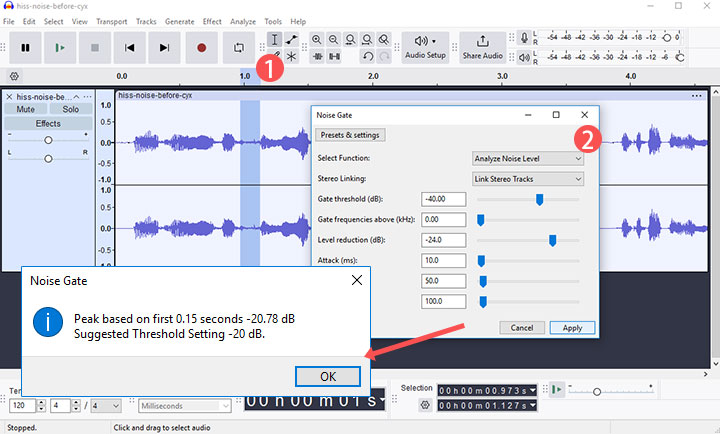
Step 1. Select a section of your audio that contains only background noise by clicking and dragging.
Step 2. Go to Effects > Noise Gate and choose Analyze Noise Level. Click Apply. Audacity will analyze the noise and suggest a threshold level for you.
Step 3. Now, select the portion of your audio where you want to use the Noise Gate. Return to Effects > Noise Gate, switch the function back to Gate, and enter the suggested threshold. You can also adjust other settings to fine-tune the result. Once you're happy with the settings, click OK to apply the effect.
- Gate Threshold: Anything below this threshold will be muted.
- Gate Frequency Above: Allows you to specify which frequencies the gate affects. This can be useful for targeting specific ranges of noise.
- Level Reduction: Controls the amount of sound reduction when the gate is closed. Lower settings can better reduce noise but may cause audio fluctuations.
- Attack: Determines how quickly the gate opens when the signal surpasses the threshold. It can prevent clipping at the beginning of sounds.
- Hold: Dictates the duration the gate remains open after the signal drops below the threshold.
- Decay: Governs how rapidly the gate closes once the signal is below the threshold.
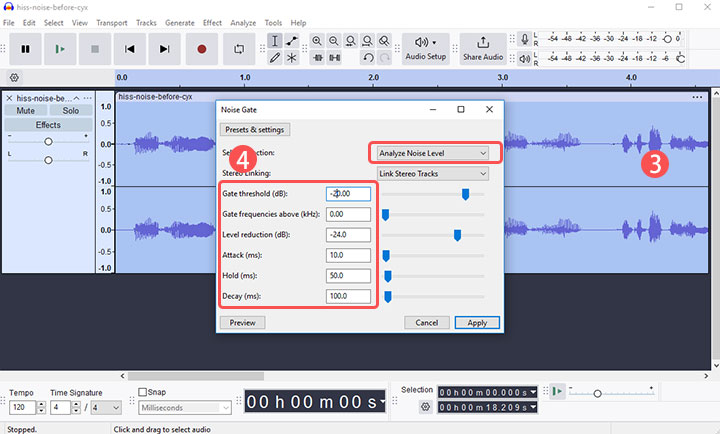
Step 4. Click the Preview button to listen to the results. If you're happy with the result, click OK to apply the Noise Gate to your audio for reducing the background noise.
Method 3. Remove Background Noise with Notch Filter
The Notch Filter plugin for Audacity can reduce a very narrow frequency range from an audio signal. This is particularly useful for eliminating unwanted tones or hums at specific frequencies, such as electrical interference noise (e.g., 50 Hz or 60 Hz hums from power lines) or other persistent noise at a particular frequency.
Step 1. Select the portion of the audio you wish to remove the background noise from.
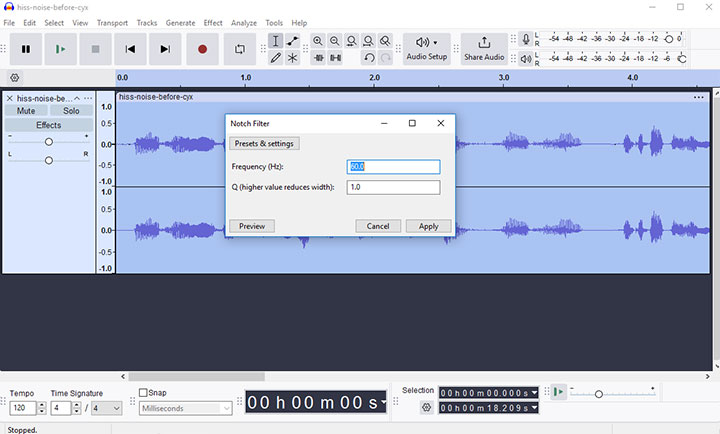
Step 2. Go to the top menu bar and choose Notch Filter from the list of Effects.
Step 3. Set the Frequency and Q values. Click Preview to hear the noise reduction result.
- Frequency (Hz): This specifies the center frequency of the notch, i.e., the frequency that you want to attenuate. For example, if you are trying to remove a 60 Hz hum, you would set this value to 60 Hz.
- Q: This controls the width of the notch. A higher Q value creates a narrower notch, affecting a smaller range of frequencies around the target frequency. A lower Q value makes the notch broader, affecting a wider range of surrounding frequencies.
Tips: The mains hum frequency in North and Middle America is typically 60Hz, while in most other countries it is 50Hz. To identify the exact frequency of the mains hum in your recording, you can use the "Plot Spectrum" feature under the "Analyze" menu in Audacity.
An AI To fully remove the mains hum from your recording, you may need to apply the Notch Filter at not only the main frequency (e.g., 50Hz) but also at the harmonics (e.g., 100Hz, 150Hz, etc.).
Remove Background Noise with AI: An Alternative to Audacity
While Audacity offers a valuable solution for reducing background noise, it can be challenging for beginners to use effectively without degrading audio quality. Many users encounter issues such as diminished sound clarity, difficulty in isolating vocals from background noise, and unsatisfactory results that leave the audio muffled. Even experienced users often find themselves investing significant time and effort to achieve satisfactory outcomes.
That's where VideoProc Converter AI steps in. This AI-driven noise reduction software enables users to automatically remove various types of background noise with just a few clicks—no technical expertise required. By leveraging advanced artificial intelligent techniques such as deep neural networks (DNNs) and recurrent neural networks (RNNs), VideoProc Converter AI effectively predicts and filters out noise, tackling a wide range of disturbances like white noise, electrical hum, and wind interference, even in the most challenging audio environments.
VideoProc Converter AI – Remove Background Audio Instantly
- 1-Click to make your podcast, meeting record, or any audio crystal clear
- Tackle noises of any type: hums, buzzes, hissing, clicks, wind, traffic sound…
- Support 370+ video and audio formats, incl. MP3, WAV, MP4, and MOV
- AI upscale/enhance video and images, stabilization, and more AI features
- Also let you convert, compress, record, and download videos/audio
Step 1. Download and install VideoProc Converter AI on your computer. Once installed, launch the program and click on the Audio AI icon on the main interface.

Step 2. Check the Noise Suppression option and select your preferred AI model. Based on our tests, the default settings for other properties should work well for most audio files. Click the playback icon to preview the audio and hear the difference.
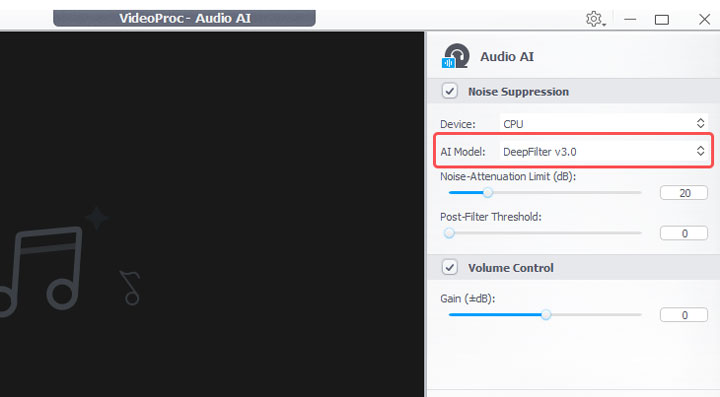
Tips: If needed, you can also experiment with different settings for the Noise Attenuation Limit (dB) to fine-tune the results.
Step 3. Adjust the video or audio codec, quality, and GOP settings according to your needs. Finally, choose your destination folder and click the Run button to export the file with significantly improved audio quality.
How to Prevent Background Noise During Recording
While advanced noise reduction techniques can help salvage an otherwise unusable recording, the best and most professional results always come from capturing a clean, noise-free audio file from the start. Taking the time to prepare your recording environment and minimize background noise beforehand will ultimately yield far better sound quality than any post-production fix.
1. Choose a Quiet Recording Environment
Select a room that is as isolated as possible from external noise sources like traffic, construction, or noisy appliances. Consider recording during quieter times of the day when ambient noise is minimal. Informing others around you about the recording session can also help to minimize interruptions and unexpected noises.
2. Optimize Your Recording Space
Once you've chosen a suitable location, optimize the recording space to minimize noise. Use sound-absorbing materials such as blankets, curtains, or acoustic panels to dampen echoes and reduce reverberation. Close windows and doors to seal off the area from outside noise. Additionally, turn off any unnecessary electronic devices, like fans, air conditioners, or computers, that could contribute to background noise.
3. Use the Right Microphone and Technique
Selecting the right microphone and employing proper microphone techniques are also essential for reducing background noise. Choose a microphone with good noise-rejection capabilities, and consider using a directional microphone (like a cardioid microphone) to focus on the sound source. Position the microphone close to the source (but not too close to avoid distortion) to maximize the signal-to-noise ratio. Using a pop filter can also help to reduce plosive sounds, and a windscreen is beneficial for outdoor recordings to minimize wind noise.

4. Minimize Electronic Interference
Electronic interference can introduce unwanted noise into your recordings. To minimize this, use balanced cables, which help to reduce electromagnetic interference. Ensure your equipment is properly grounded to minimize electrical noise. Additionally, keep audio cables away from power cords or other electrical devices that could introduce interference.
5. Monitor Your Audio Levels
Monitoring your audio levels during recording is crucial to prevent clipping and distortion. Make sure your audio levels are not too high, aiming for a healthy signal level without exceeding the maximum input. Using headphones to monitor the audio in real-time allows you to identify any potential noise issues during the recording process.


