I've noticed a lot of discussion on Reddit and YouTube about background noise in videos and audio files—it's frustrating, right? You finally capture that perfect moment, but then there's that annoying hum, wind noise or the sound of someone's dog barking in the background.
To help you tackle this common problem, I tested several features in DaVinci Resolve to clean up the sound. From adjusting the Noise Gate in Fairlight to using EQ and built-in noise reduction tools, here are proved ways to remove background noise in DaVinci Resolve and using alternative tools.
How to Reduce Noise for DaVinci Resolve Media Files Easily
If you've tried the built-in noise reduction tools in DaVinci Resolve but still feel like you're not getting the clean sound you need, or you're simply looking for an easier option, the Audio AI feature in VideoProc Converter AI is a fantastic alternative.
It offers a much simpler workflow with no steep learning curves, perfect for anyone who prefers a more streamlined approach without sacrificing quality.
Don't just take my word for it. You can hear the difference below. Click to play back these testing files below, and see how VideoProc Converter AI can clean up audio noise. It also works for sounds in video files.
| Noise type | Source File | Enhanced by VideoProc |
|---|---|---|
| Microphone noise | ||
| Wind noise | ||
| Hiss noise | ||
| Street noise |
Download VideoProc Converter AI to reduce audio noise for your awesome DaVinci Resolve projects.

Step 1. Access the Audio AI Feature and add your files.
Click on the "Audio AI" icon on the main interface to access the Audio AI workspace.
Import the audio or video files that has background noise or other kind of noise that you want to remove.
Step 2. Apply AI Noise Suppression and preview the effects in real time.
Enable the noise suppression feature.
Choose from the available AI models designed to enhance speech while filtering out unwanted background noise. These models are particularly effective at tackling noise from busy streets, construction, or even just fan hum.
Step 3. Adjust parameters.

You can adjust settings like the Noise Attenuation Limit (to control how much noise is removed) and the Post-Filter Threshold (to manage any residual noise left after the initial process).
VideoProc Converter AI also lets you fine-tune the audio volume if needed.
For real-time preview, toggle the Noise Suppression on and off to compare the original and enhanced audio.
Before exporting, you can preview the effect in real time, toggling the noise suppression on and off to compare the original sound with the enhanced version. This way, you'll know exactly how your audio will sound post-processing.
Step 4. Export Your Audio once satisfied with the results.
Watch video tutorial below to remove background noise easily.
Why Choose VideoProc Converter AI for Noise Removal?
The AI-powered Noise Suppression feature in VideoProc Converter AI automatically distinguishes between important audio (like vocals) and unwanted background noise, such as traffic, wind, or chatter.
It's especially effective when working on media files with dynamic environments—think of construction sounds, fan hums, or outdoor background noise.
The result? Clean, professional-quality audio without the hassle of diving into complex settings.
Not only is it easy to use, VideoProc Converter AI also delivers higher-quality results compared to manual tweaking in DaVinci Resolve. It's great for creators handling podcasts, interviews, or video courses where clarity is key.
How to Reduce Noise in DaVinci Resolve
Some of the most popular methods include dealing with dynamics (using a noise gate), using EQs to influence certain frequency ranges, applying VST effects, or using noise-removal plugins.
Admittedly, these traditional methods require some effort and learning, as you'll need to understand the underlying theories.
If you prefer a quick solution, you can try the VideoProc Converter AI option mentioned above.
1. Set the Noise Gate (Dynamics) in Fairlight
One popular option to remove audio background noise in DaVinci Resolve is to set the Noise Gate in Dynamics. This helps reduce the prominence of noise and improves overall audio clarity.
It is particularly useful for recordings with unwanted sounds. Users can set thresholds, ranges, ratios, and other parameters to precisely suppress unwanted background noise.
Follow the detailed steps below:
Step 1. Go to the Fairlight panel in DaVinci Resolve, and make sure you have toggled Mixer on.
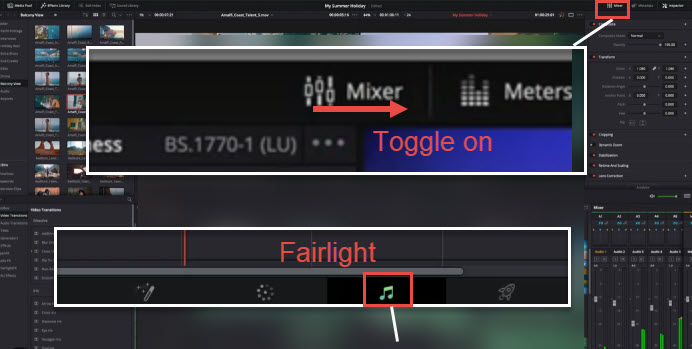
Step 2. Ensure your audio clips are selected. In the Mixer, scroll down to use the Dynamics.
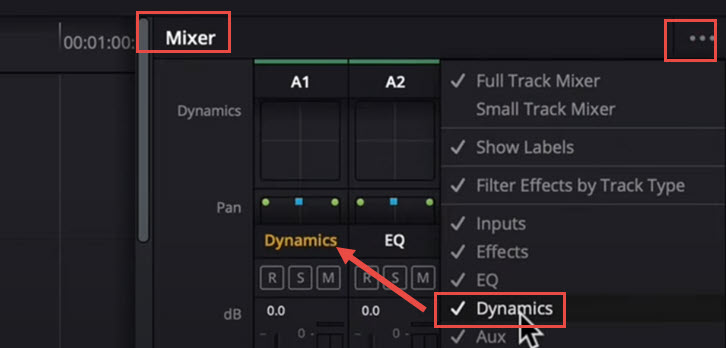
If the Dynamics option is missing under the audio channel in the Mixer, click the three-dot icon and check the Dynamics box to enable it (refer to the screenshot below).
Step 3. Toggle on Gate in Dynamics.
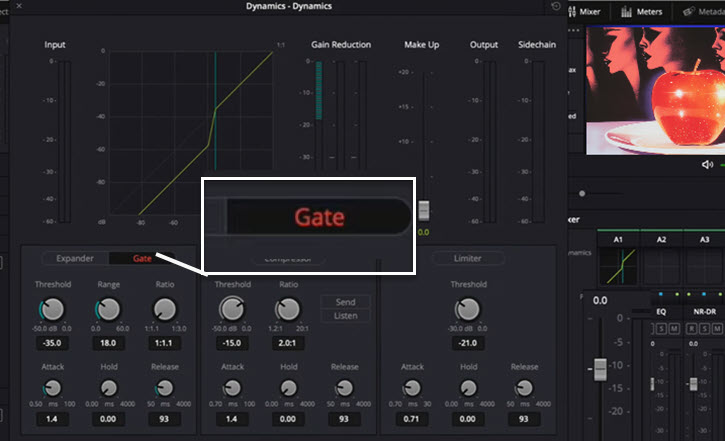
For beginners, simply enabling Gate and using the default settings can reduce background noise in DaVinci Resolve. As you become more familiar with each parameter, you can fine-tune the settings for better results.
Don't worry if you mess up the settings, as you can always double-click on the knobs to reset them to their default values.
Step 4. Loop the audio playback to compare the original audio with the noise-reduced version.
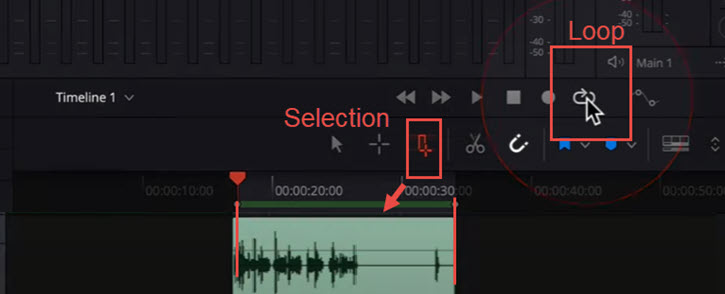
This allows you to clearly hear the differences and assess the effectiveness of the noise reduction.
2. Remove Noise with EQ (Equalizer)
In DaVinci Resolve, the EQ tool allows you to reduce or boost specific frequency ranges in your audio. Its effectiveness can vary depending on the characteristics of your audio files.
For example, if you identify high frequencies from hissing or plosives, you can use the equalizer to reduce those frequencies. However, ensure that this adjustment doesn't filter out high-frequency human speech if present.
Step 1. Select your audio clips, and go to Fairlight > Mixer > EQ.
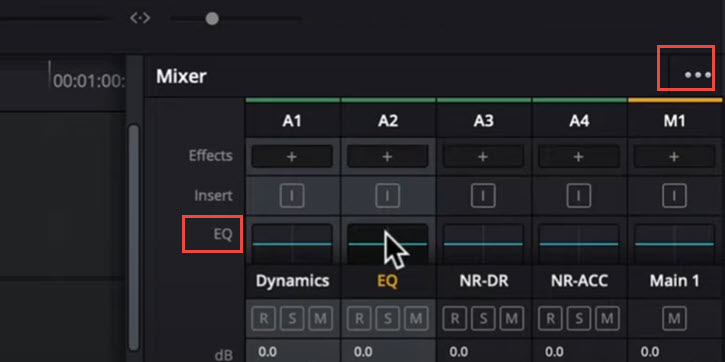
If you don't know how to access Fairlight (the audio editing feature in DaVinci Resolve), please refer to the initial steps in the Noise Gate Method above.
If you don't see an EQ option under Mixer, you can click the three-dot icon, and uncheck some of the other options, so that you can scroll and find EQ under Mixer.
Step 2. Double-click on the EQ under Mixer to open up the dedicated Equalizer panel.
Before you start adjusting the EQ parameters, make sure to loop playback your audio so that you can hear the difference in real time upon adjustment.
Step 3. Listen to your audio and identify the frequencies where the noise is most prominent.
Tips:
Unlike the Noise Gate method mentioned above, which gates audio on and off based on a threshold, EQ affects the entire audio signal continuously. This makes EQ a more nuanced tool for fine-tuning specific elements in your audio.
The trade-off is that it requires some knowledge of common noise frequency ranges and experience in dealing with those noises. For instance, recognizing typical noise frequencies help in targeting and reducing these unwanted sounds without compromising the integrity of your main audio.
- For male voice, the sibilants tend to fall within 3-5 kHz, and for female voice, 5-8 kHz.
- Hissing often falls in the higher frequency range (around 4-10 kHz).
- Hums can be in the lower frequencies (around 50-60 Hz).
- Rumble: very low frequencies (below 100 Hz).
Step 4. Adjust the equalizer to reduce the unwanted frequencies.
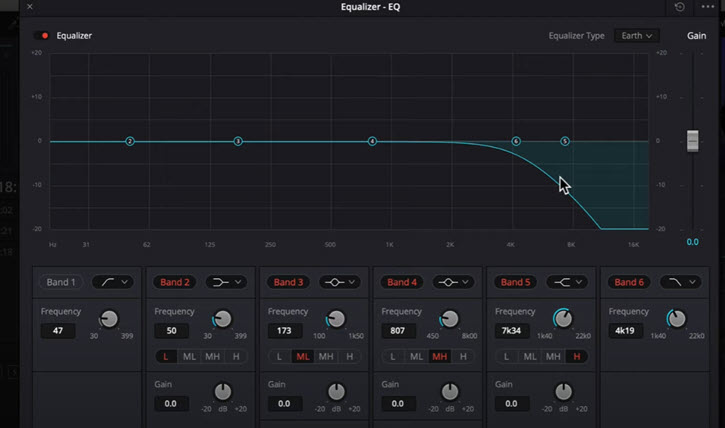
You have to make sure that while reducing the noise, you don't change the voiceover alongside.
3. Use the Noise Reduction Feature in Fairlight
The feature analyzes the audio to identify noise patterns and suppresses them without altering the main audio. Users can fine-tune the parameters for noise reduction.
To get started, make sure you have already added audio files on the track, and open up the Fairlight panel (click the Music Note icon to get to the Fairlight panel).
Step 1. Locate the audio files you are going to reduce noise.
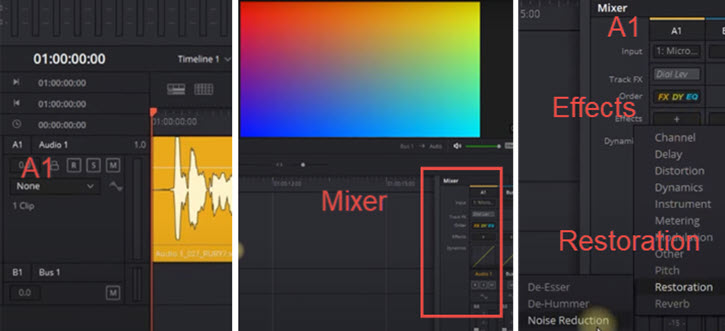
For instance, if you have added the audio clip in Audio 1 (Audio channel number one), then you will be dealing with it in A1 in DaVinci Resolve Mixer.
Step 2. Open up the Noise Reduction utility.

Click the A1 audio channel in the Mixer of the Fairlight panel, and find the Noise Reduction feature in Effects > Restoration > Noise Reduction.
Likewise, if your audio is in A2, then for the Mixer, click Effects in A2.
Note: If you don't see the Effects option, click the three-dot icon (next to the Mixer) to toggle the Effects on.
Step 3. Toggle on the Noise Reduction button in the newly opened panel.
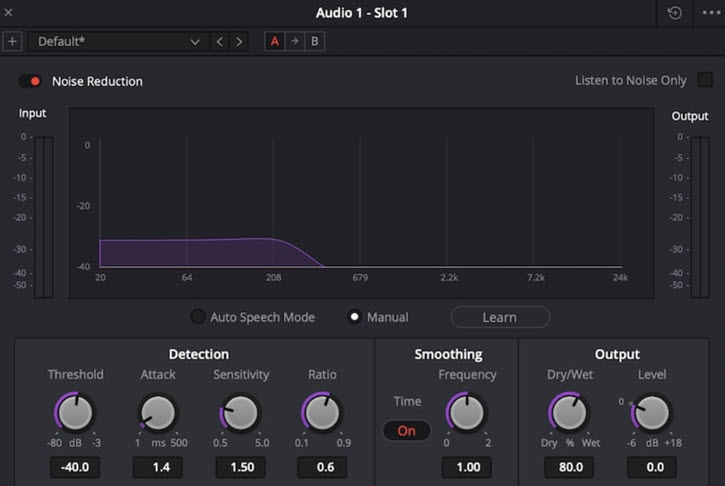
The no-brainer choice is to playback the audio in realtime, and toggle on the off the red button (Noise Reduction) to compare the difference.
Tips:
You can also resort to the Auto Speech Mode or the Manual Mode.
In Auto Speech mode, you just play the track, and it automatically adjusts for better listening.
For Manual mode, you'll need to allow the noise reduction tool to learn the specific noise or frequency you want to target. Select a portion of the clip where there's background noise for the tool to learn from.
When there are pauses or gaps in your dialogue, the noise reduction feature can effectively reduce background noise. These gaps provide samples of the unwanted noise, allowing the tool to "learn" and filter it out, making the dialogue parts cleaner and clearer.
4. Reduce Audio Noise with Other Built-in Utilities
DaVinci Resolve also provides some repair tools, such as De-Esser and De-hummer, which can help fix problems in audio.
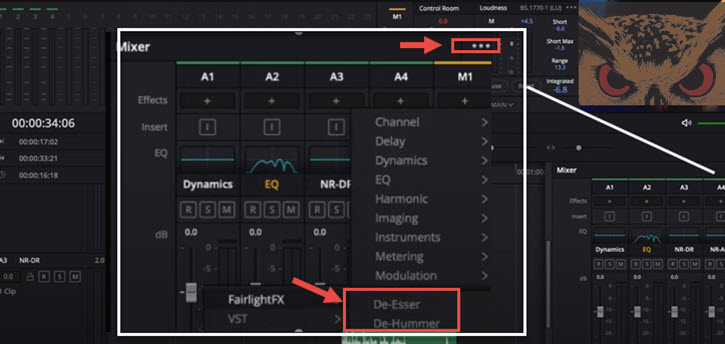
In addition, advanced users can also use multi-track editing technology. Just go with the multi-track editing technology in audio editing to overlay and mix the original audio with other audio tracks, cover up some noise, and highlight the main part of the audio, thus reducing the impact of noise.
Final Words
VideoProc Converter AI's quick, AI-driven process makes it a go-to for anyone who needs fast, reliable noise reduction without spending hours learning new software. If you're a DaVinci Resolve user and want a fast, high-quality way to reduce noise on media files, VideoProc Converter AI might just be the easiest solution you'll find.

