YouTube is one of the largest search engines and the best place for video sharing and consuming, with reported over 2 billion monthly users. MKV supports an extensive list of media codecs and can hold various tracks of video, audio, chapters, and subtitles in one single file. It's one of the most popular container formats. However, we have all been there. Uploading an MKV file to YouTube but ending up in failure. Why does that happen? Does YouTube support MKV playback? Can you upload MKV to YouTube? Read on to find answers to all these questions.

Can You Upload MKV to YouTube
The video formats supported by YouTube include MOV, MPEG-1/2/4, MP4, AVI, WMV, MPEGPS, FLV, 3GPP, WebM, DNxHR, ProRes, CineForm, and HEVC (h265). Apparently, MKV is not on the list. That is to say, YouTube does not support the MKV format and you cannot upload MKV to YouTube directly. However, that's not a big deal as you can easily remux or convert MKV to YouTube-supported formats.
How to Convert MKV for Uploading to YouTube
You don't need technical know-how to convert MKV for uploading to YouTube, provided you are using VideoProc Converter AI. This self-explained video converter lets you convert MKV to YouTube-friendly formats in one click. It adopts a high-quality engine and has ready-made profiles for mainstream platforms and devices like YouTube, Facebook, and Sony TV, so beginners can turn the MKV file into a preferred quality level without tinkering with a plethora of settings.
VideoProc Converter AI - Best Pick to Convert MKV for YouTube
- Handle MKV files from OBS, online downloads, storage devices, NAS…
- Convert MKV to YouTube-supported formats like MP4, MOV, and WebM
- Output presets for YouTube, Facebook, game consoles, Apple TV, etc
- Support the import of 370+ video and audio formats and 420+ others
- Remux MKV to MP4, AVI, and M4V without re-encoding or quality loss
- Full GPU acceleration to convert large videos at up to 47x faster speed
- Awesome extra tools to edit, compress, download, and record videos
Note: The Windows version now supports AI-powered Super Resolution, Frame Interpolation, and Stabilization to enhance video and image quality. These AI features are not yet available in the Mac version but will be coming soon.
Step 0. Download, install, and run VideoProc Converter AI on your computer.
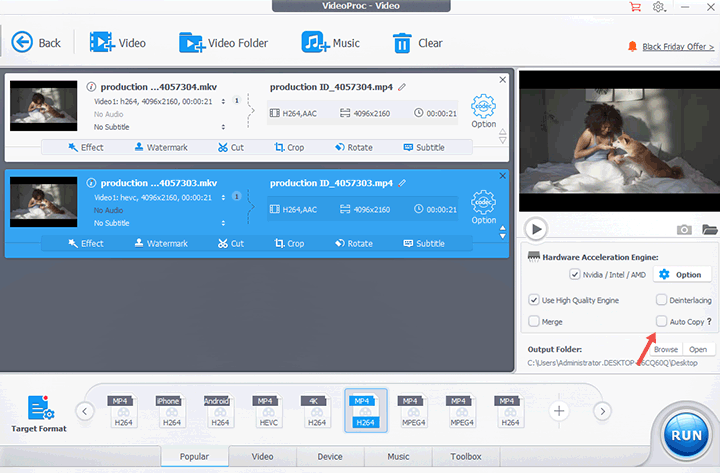
Step 1. Hit Video and drag the source MKV files to the program.
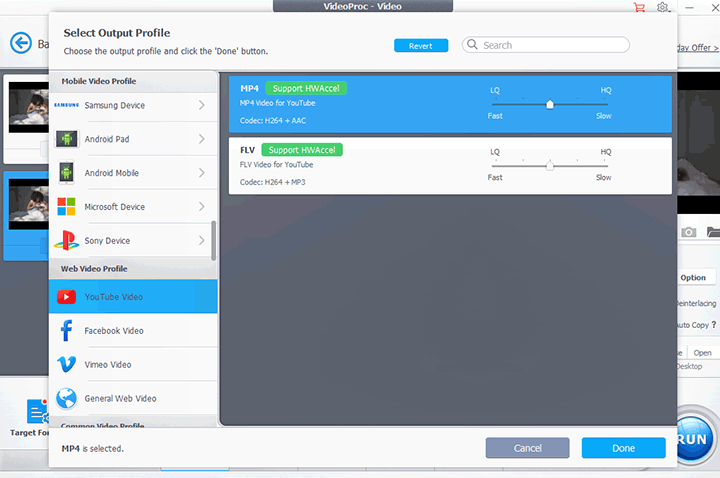
Step 2. Hit Target Format. Scroll down to find YouTube Video. Select it and then choose MP4. Move the quality slider to High. Hit Done to confirm.

VideoProc Converter AI also lets you customize the video encoding settings for YouTube. To do so, select the target video format and hit codec Option. After that, adjust the settings of codec, frame rate, and others, according to the recommended upload settings for YouTube.
- Container: MP4
- Video codec: H264; Audio codec: AAC-LC
- Frame rate: just keep the original frame rate
- Bitrate: 8Mbps for HD video with the standard frame rate
- Resolution & Aspect ratio: 1080p: 1920x1080; 1440P 2560x1440; 4K 3840 x 2160, etc
- Maximum file size: 120GB
- Maximum video length: 12 hours (verified). 15 minutes (unverified)
Step 3. Check High Quality Engine. This can help you convert MKV to YouTube with better quality. Uncheck Auto Copy and then hit RUN to start converting MKV files to YouTube-supported formats.

You can check the Auto Copy feature to remux MKV for YouTube. By remuxing, you're just changing the container format from one to another and the data inside are unchanged, so there is no re-encoding or quality loss. Just give a caution, the remuxing feature works only when the media on the source MKV file are encoded by the codecs that are compatible with the target format. For example, the source MKV file comes with the video encoded by H.264 and the audio encoded by AAC. And the target format is MP4 or MOV. MP4 and MOV are compatible with H.264 and AAC.
How to Upload the Converted MKV to YouTube
After converting an MKV file to the YouTube-supported format, you can follow the below steps to upload it to YouTube.
Step 1. Launch YouTube on your browser or open the YouTube app on your smartphone.
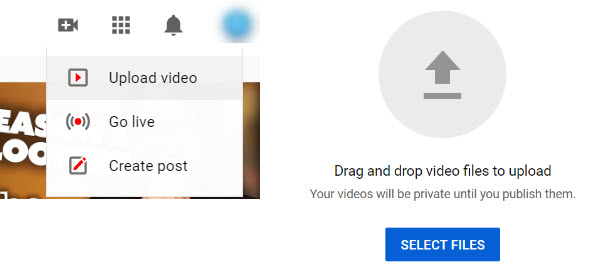
Step 2. Log in to your YouTube channel. Hit the Create button located in the upper right corner and then select Upload video.

Step 3. Hit Select Files. Browse and choose the converted MKV file on the computer for loading to YouTube.
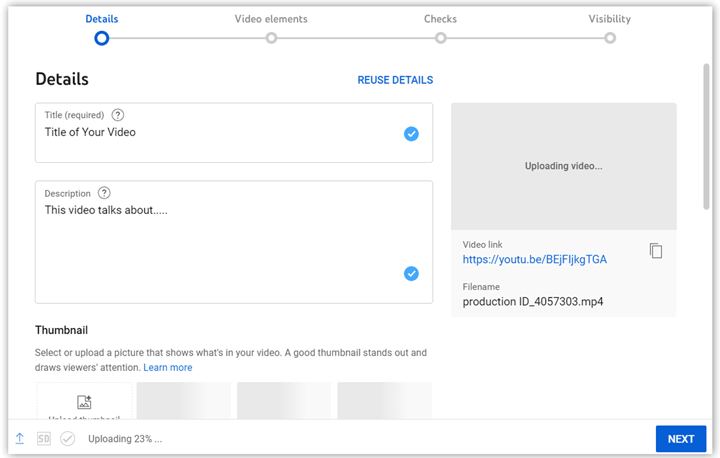
Step 4. Follow the prompt tab to enter the title, description, keywords, languages, and other information about the exported MKV video.

Step 5. Select Publicity under the Visibility section and then hit Publish, so everyone can see this video. You can also choose Private and then hit Save for uploading a private video to YouTube.


